


VIDEOS RETIRING November 12, 2026.
Hi everyone, welcome to our last post before I take a little time out for the Christmas 2020 season!
It’s appropriate that today’s summary of the latest Zentangle Project Pack is their Twelve Days of Zentangle, 2020 Edition.
It’s a lengthy one so before I send you along I want to wish you all a wonderful holiday season with my very best wishes for a safe and healthy one.
Thank so much for spending time with me, I love having your company especially through this rocky, crazy, emotional year we’ve shared together.
And I offer my hopeful prayers and wishes for a much better year in 2021 … Merry Christmas my friends!
.oOo.
From Zentangle’s Project Pack #12 introduction:
It goes without saying that 2020 will go down in history as remarkable year. This year we all experienced the unexpected, the unknown and the uncertain. There were challenges that required our patience and strength in order for us to contribute to what the world needed.
In our Zentangle practice we encourage you to embrace the unexpected, the unknown and the uncertain as a part of your creative process. We encourage you to look for opportunities and to shift your perspective.
As we bring a close to a pivotal year in history, Project Pack No. 12 will offer us a magical time of rebirth, restoration, and awakening. Join us for this year’s 12 Days of Zentangle, that we are calling the 2020 Zentangle Renaissance.

SUPPLIES: Project Pack #12 is available here ($36.95) in the zentangle.com store and it’s certainly a convenient way to get all the supplies for the project. However, the first video reviews the items in the Project Pack and you might discover you have suitable alternatives in your own Zentangle supplies.
Follow along with whatever you have!
- Zentangle Renaissance Tan Tiles: 3Z, Bijou, Square, Phi and Zendala (available from your local CZT or zentangle.com)
- Sakura Micron Black 01
- Sakura Micron Brown 01
- Sakura Gelly Roll White 10
- General’s Pastel Chalk Pencil, Van Dyke Brown (for more details on these pencils and a color chart see the introduction to Project Pack #11)
- Zentangle/General’s Mini White Charcoal Pencil [NOTE: frequently during these videos the white pencil is referred to as chalk but my Project Pack definitely came with a Zentangle Mini White Charcoal Pencil so that’s what I’ve used in my notes below. I’m not entirely clear on the difference between chalk and charcoal. but General sells them as two different products. BTW, since I’ve been asked this question: I do not get Project Packs free, I have to purchase them just like everyone else.]
- Zentangle mini graphite pencil
- 3 tortillions
- #4 round paintbrush – Creative Inspirations by Creative Mark
- mini pot of Lascaux gold gouache
The following chronology is a summary of the videos for this Project Pack with links to the individual videos. Either click the Day #’s title link or the image itself to view the full video on YouTube. Each of the complete videos are included on the corresponding tangle’s page on TanglePatterns.
It isn’t necessary to watch the videos in sequence, but it will be very helpful for you to watch the Introduction video first to learn about the tools and the contents of the pack.
Day 1 – Introduction
In the introductory video (11:00) – Rick and Maria introduce the items in Project Pack #12 and give a little history of the Zentangle Renaissance tiles.

Step 1: Rick displays the Renaissance tiles we’ll be using included in Project Pack #12.
Step 2: At 01:15 – Together they explain “how we got into this whole idea of Renaissance tiles“.
Step 3: At 03:51 – “There’s a word for working with lights and darks, it’s called chiaroscuro.” They encourage us to do our own research on this term, here’s a start:
In the graphic arts, the term chiaroscuro refers to a particular technique for making a woodcut print in which effects of light and shade are produced by printing each tone from a different wood block. The technique was first used in woodcuts in Italy in the 16th century, probably by the printmaker Ugo da Carpi.
Step 4: At 05:29 – Rick talks about the etymology of renaissance.
Step 5: At 04:50 – They display a wide array of beautiful Renaissance tiles they’ve done showing many kinds of possibilities to inspire.
Step 6: At 07:58 – We get a peek inside the second envelope of the Project Pack, the one containing the tools for this series (see the list above in SUPPLIES). “We are going to use pretty much all of the tools in each video.”
Day 1
In Day 1’s video (27:46) – with Rick keeping Maria company, she tangles her variation of the Zentangle-original Bronx Cheer, which she’s named Bronx Spears.

Step 1: At 00:42 – Maria begins by placing a penciled circle in the center of a Zendala Renaissance tile.
Step 2: At 01:06 – “We’re going to work with the concept of Bronx Cheer … a variation of Bronx Cheer we’re calling Bronx Spears.“
Step 3: At 01:37 – She adds a gently arcing stroke growing from the bottom of the penciled circle then adds a series of orbs along each side growing from large near the bottom and gradually becoming smaller towards the top “until they disappear“. She explains this was originally inspired by the work of Ernst Haeckel.
Step 4: At 02:22 – She turns the tile and adds the same kind of orbs on the other side of the center arc stroke.
Step 5: At 02:47 – She adds a second line or orbs nestled against the first. Rick comments that this reminds him of baby corn spears.
Step 6: At 03:14 – She adds a stem at the bottom then adds “a few more of these little pearls around the stem and it makes the stem look like it’s coming forward.“
Step 7: At 03:43 – “I’m going to put another one behind the first Bronx Spear, using the familiar Hollibaugh approach of drawing behind.“
Step 8: At 04:53 – She adds a third spear off to the side.
Step 9: At 05:55 – “We’re going to go back in and darken these, leaving that highlight like we do on Bronx Cheer.“
Step 10: At 09:26 – Changing to her brown Micron 01, “We’re going to do some background design, and it’s going to be a fragment and reticula type thing.”
Step 11: At 14:34 – She adds a continuous line to create “a good-sized space” around the outside of the circle, and then repeats it in order to add a pair of borders around the center.
Step 12: At 15:42 – She adds “I”-shaped pairs of strokes around the ring, dividing into roughly equal sized spaces.
Step 13: At 16:30 – She adds detail to the base of the pairs of strokes in the border and rounding on the inside of the spaces, making them look like pillars or capitals.
Step 14: At 17:21 – She adds “mushroom caps” to the inner ring and extends the strokes to “attach” them to the center.
Step 15: At 18:11 – She adds diagonals in each of the squares, creating an “N” shape.
Step 16: At 18:55 – She adds diagonal strokes in Hollibaugh fashion going in the other direction behind the ones just finished, creating an “X” shape within the squares.
Step 17: At 19:21 – With the graphite pencil she adds shading.
Step 18: At 21:47 – She adds Van Dyke Brown chalk pencil shading and at 22:28 she uses it to add coloring in the border squares.
Step 19: At 23:16 – With the White Gelly Roll pen she adds touches of highlights to the spears.
Step 20: At 24:08 – She introduces the Gold Gouache and demonstrates how to twirl the brush “always in the same direction” to keep the point “alive and crisp“. Then she adds the gold color to the outer border. A reminder that the paint will remain wet for a while, be careful!
Step 21: At 26:31 – She adds gold detail to the brown beads.
Step 22: At 27:10 – She finishes the Zendala by adding her chop.
Day 2
In Day 2’s video (50:41) – Molly and Martha tangle Huggins, Mooka and Doodah on a square Renaissance tan tile.
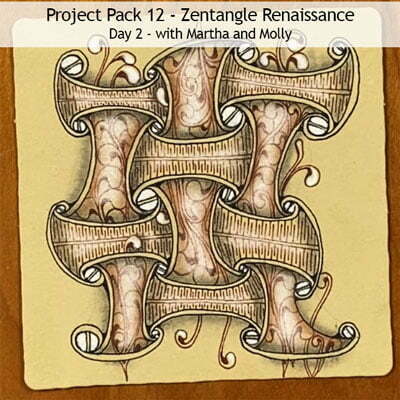
Step 1: At 01:34 – After an introduction about the series and project packs by Molly, Martha begins this lesson with a square Renaissance tan tile and the tangle Huggins (also her last name).
Step 2: At 02:53 – Martha begins with corner dots and connects them with curvy lines.
Step 3: At 04:01 – With the Black Micron 01, she adds the orbs that form the base for Huggins, in this case making them various sizes.
Step 4: At 08:34 – “In a classic Huggins way, we’re going to link them all together” using the take-off-and-land technique.
Step 5: At 16:01 – With the grid completed, Molly begins to embellish the shapes starting with all the orbs.
Step 6: At 18:01 – Molly takes over and adds auras to the tangle and then adds a little rounding at the “joins”.
Step 7: At 23:35 – With the Brown Micron 01, Molly adds Mooka to one direction of the “weave”.
Step 8: At 33:06 – She adds a touch of weighting to some of the Mooka tendrils.
Step 9: At 33:56 – Martha takes over again and adds Doodah to the remaining shapes.
Step 10: At 38:10 – Time for shading! Molly adds graphite and brown and white chalk pencil to her Mooka spaces.
Step 11: At 44:22 – Martha adds graphite and white chalk pencil to her Doodah spaces.
Step 12: At 46:52 – Molly adds white chalk highlights to the Mookas around the outer edge and then a little shading behind them.
Step 13: At 48:24 – With a white Gelly Roll pen, Martha adds highlights to the original white orbs, the “little screwballs“.
Day 3
In Day 3’s video (23:00) – with Maria keeping him company Rick tangles Well on a square Renaissance tan tile.

Step 1: At 00:28 – After a moment of gratitude, Rick adds the underlying grid of the tangle Well on a square Renaissance tan tile using a Brown Micron 01.
Step 2: At 01:28 – He changes to the Black Micron 01 and adds an orb to the middle of each square.
Step 3: At 01:59 – He adds the curved strokes from the orbs into the four corners of each square using the take-off-and-land technique.
Step 4: At 02:52 – In the second square he mirrors the direction of the curves of the first.
Step 5: At 03:53 – He says we’re going to do something a little different and adds an arc from the corner of each square that stops at the previous stroke approximately midway.
Step 6: At 06:50 – He continues each of those strokes “from behind” into the opposite corners.
Step 7: At 08:23 – Using the Brown Micron, he adds auras to the original gridlines, in effect “hiding” the grid.
Step 8: At 09:26 – Rick hydrates his pot of gold gouache and as using a paint brush was a new experience for him, he shows how he tested it various ways to get accustomed to it, “you know, how does it work, what doesn’t work“.
Step 9: At 10:32 – He “colors in” using the gold gouache, leaving some of the shapes unpainted.
Step 10: At 12:26 – He adds shading with his graphite pencil and blends with a tortillion.
Step 11: At 15:01 – He adds white charcoal pencil highlights and blends with a tortillion.
Step 12: At 16:20 – He restates some of the graphite.
Step 13: At 18:10 – With the General’s Van Dyke Brown pastel chalk pencil he adds more shading.
Step 14: At 19:24 – He adds more white chalk highlights.
Step 15: At 21:29 – He adds gold gouache to the four center orbs and finally adds his chop.
Day 4
In Day 4’s video (32:48) – Julie Willand tangles Karry Heun’s Sand Swirl on three 3Z Renaissance tan tiles and glues them together to make a 3D ornament or placecard holder.

Step 1: At 01:22 – After introducing the supplies in the Pack, Julie begins with a Brown Micron 01 on a 3Z Renaissance tan tile and adds the tangle Sand Swirl.
Step 2: At 05:51 – She fills in the “crevices” with brown ink and adds smaller swirls inside of the 3 larger ones.
Step 3: At 08:04 – Switching to the Black Micron 01, she adds black bands to the wider outer auras on each swirl, “kind of in a Marasu fashion“.
Step 4: At 10:59 – “We’re going to fill these orbs with fragments,” Using both the brown and black pens. She starts with fragment H16 from the PRIMER.
Step 5: At 13:47 – She adds fragment E25 from the PRIMER.
Step 6: At 14:51 – She fills the third orb with the tangle Well.
Step 7: At 15:59 – She adds the same fragments and solid ink to the smaller orbs.
Step 8: At 17:06 – With the White Sakura Gelly Roll she adds a white dot to the tiny orbs on the tile.
Step 9: At 17:56 – Add layers using graphite shading and highlights with the white charcoal pencil.
Step 10: At 22:56 – Add blending with tortillions, noting the paper of the Renaissance tan tiles is much softer than the others and to use a light touch so you don’t scratch the tile while blending.
Step 11: At 24:58 – Redefining some of the original lines lost in the layering, as well as the white Gelly Roll.
Step 12: At 27:52 – Add gold gouache to the bottom band.
Step 13: At 29.28 – Julie used three of the 3Z tiles and “tangled them all in a very similar way“. Once the paint has dried on all of them she gently folds each one in half and uses double-sided tape to adhere them together in a 3D shape. She suggests hey can be used for ornaments, place cards etc.
Day 5
In Day 5’s video (27:20) – With Rick keeping her company Maria tangles Fife on a square Renaissance tan tile.

Step 1: At 00:00 – Maria is using a square Renaissance tan tile and begins to tangle Fife using the traditional ways to begin a Zentangle with a pencil and dots, border, string.
Step 2: At 00:40 – With the Brown Micron 01, she lays out the dot grid (“pegboard“) of four orbs on all four sides of the border to begin the grid.
Step 3: At 01:28 – Add rice shapes on the diagonals.
Step 4: At 03:01 – Aura the inside of each rice shape.
Step 5: At 04:01 – In a Hollibaugh manner, add rice shapes behind and through the first ones all going in the same direction.
Step 6: At 05:10 – Turn the tile and add the same shapes in the other direction.
Step 7: At 05:56 – After noting all the possibilities for where to go next with this structure, Maria adds solid ink inside all of the aura’ed rice shapes.
Step 8: At 06:57 – She adds auras to the outside of the “single” ones, “tethering the aura at top and bottom“.
Step 9: At 07:53 – She adds auras to the original rice shapes with the darker fills.
Step 10: At 08:49 – “But wait, there’s more …”, with the Black Micron 01 “we’re going to put a bead in the middle of each of these where they come together.” She also adds “cone shapes” at the outside edge of the border.
Step 11: At 10:28 – She adds some black ink on the solid brown. and restates some of the brown lines with black.
Step 12: At 11:54 – With the brown pen she adds hatching – light, feathered strokes.
Step 13: At 12:21 – With the black pen she adds a wide aura around the entire shape, then switches to the brown pen and adds a narrower aura around the black one.
Step 14: At 13:16 – She adds small strokes at the “corners” of the auras to connect the two, like coffering.
Step 15: At 13:56 – With the graphite pencil she adds gray in the outer aura edges of the rice shapes.
Step 16: At 15:17 – With the Van Dyke Brown chalk pencil, she adds color over the hatching.
Step 17: At 16:32 – She adds brown chalk pencil to ever other space around the “coffered” outer band.
Step 18: At 16:54 – She smooths the graphite and chalk with a tortillion.
Step 19: At 17:52 – She adds while charcoal highlights.
Step 20: At 18:48 – She adds a little bead of gold gouache to the centers and cone shapes.
Step 21: At 20:29 – She uses the brush to add gold striped texture around the outer edge, as though they’re radiating from the center.
Step 22: At 21:42 – After letting the gouache dry, she touches up “go back in and add a little love“.
Step 23: At 22:46 – Adds graphite around the edge and softens it with a tortillion, creating a pillow effect.
Step 24: At 24:02 – With the black pen she restates the outer (brown) aura.
Step 25: At 25:58 – She shows “some of the prototypes” she did earlier.
Day 6
In Day 6’s video (39:32) – Molly and Martha tangle Scena on four Bijou Renaissance tan tiles, temporarily fastened together in an ensemble.

Step 1: At 02:42 – After an introduction to the series and the Pack, Martha lays out the four Bijou tiles face down and temporarily fastens them together in a square with a piece of blue tape on the back. Molly also pre-hydrates the gold gouache with a bit of water so it’s ready for use later in this lesson.
Step 2: At 03:44 – With a graphite pencil, Martha adds a dot to the center of each tile, then uses the dot as the starting point on each tile to add a heart shape overlapping into the adjacent tiles so that all four hearts link together.
Step 3: At 06:36 – Molly comes in to tangle Scena (“senna”), and notes it’s “just a variation of Striping“. She uses the Brown Micron 01 for this step.
Step 4: At 18:30 – After Molly has finished adding Scena to the first heart, Martha takes over to add her approach to Scena in the adjacent heart.
Step 5: At 26:59 – They skip ahead with all four heart shapes filled in and add graphite shading to the tiles.
Step 6: At 29:35 – They add white charcoal highlights to the shaded section then repeat both around the tile.
Step 7: At 32:27 – With all four tiles shaded and highlighted, they reevaluate the overall effect and add additional shading and highlights as desired.
Step 8: At 34:01 – They restate some of the ink that’s been lost in the recent stages.
Step 9: At 36:56 – They add finishing touches with gold gouache.
Day 7
In Day 7’s video (26:05) – Rick tangles Paradox and Flux on a Renaissance tan Phi tile.

Step 1: At 00:34 – Rick set himself the challenge to use all the tools provided in this Pack and starts with putting a wash of gold gouache as a background across the tile. He let the tile dry overnight.
Step 2: At 01:36 – Using the Black Micron 01, he begins to tangle Paradox by adding a triangle.
Step 3: At 04:34 – He adds another triangle and mirrors the strokes of the first triangle and points out the meta shape formed by the two triangles.
Step 4: At 06:40 – He adds a third triangle.
Step 5: At 08:06 – He adds a fourth triangle.
Step 6: At 09:29 – With the Brown Micron 01 he adds an aura around the entire shape.
Step 7: At 10:45 – He adds another aura the width of an orb, then goes back and fills the band with orbs, adding contrast with color and shape. He then fills in the space between the orbs.
Step 8: At 12:42 – He adds Flux to the outer band starting in one of the corners and going around the tile. He purposely leaves some space between the Flux shapes to fill in next.
Step 9: At 15:28 – He adds orbs to the spaces between the Flux shapes then goes back and fills in the spaces left between the orbs.
Step 10: At 18:00 – He adds graphite shading.
Step 11: At 19:12 – He adds white charcoal pencil.
Step 12: At 20:35 – He prefers the golf pencil length to a regular pencil so he saws his General’s Van Dyke Brown pencil in half and sharpens it before adding brown chalk to the Flux and orbs.
Step 13: At 22:18 – He adds more white charcoal pencil.
Step 14: At 23:01 – He frames the whole tile with more intense gold gouache than he used for the background at the start of the lesson.
Step 15: At 24:09 – He emphasizes the orbs with gold.
Step 16: At 24:31 – Using the White Gelly Roll pen he adds his chop.
Day 8
In Day 8’s video (21:55) – With Rick keeping her company, Maria tangles on a prestrung Renaissance tan Zendala tile using a triangle fragment from the PRIMER, and the tangles Moon Pie and Doodah.

Step 1: At 00:00 – As she shows us the 9 different prestrung Zendala tiles, Maria explains how each Pack comes with 2 of the 9 tiles and she was challenged to “design a tile that can go with any one of them” since everyone will have 2 different strings to work with. Her solution: ignore the string!
Step 2: At 01:04 – She marks a tortillion to use as a guide to create a penciled border on the tile – it’s the width of the barcode on the Micron 01. Then adds tick marks to the tile to guide her in making a circle.
Step 3: At 02:07 – She lightly connects the tick marks to create a graphite circle string for a border.
Step 4: At 02:33 – She repeats the process of making the tortillion and making tick marks only this time making a smaller band.
Step 5: At 03:17 – With the Brown Micron 01, she creates a zigzag all the way around the outermost band.
Step 6: At 03:37 – She extends the zigzag into the adjacent band creating diamond shapes.
Step 7: At 04:26 – She connects the points of the innermost band creating an inked circle over the string line.
Step 8: At 04:55 – She auras the inside of the diamond shapes and “coffers” the diamond shapes by connecting their points to the zigzag line.
Step 9: At 06:10 – In the top triangle shapes, she adds a curved aura inside each line and then an orb inside the shape created (this is one of the triangle fragments from the PRIMER). She inks the spaces around the orbs.
Step 10: At 07:46 – She repeats the same process inside the diamond shapes with the except of adding several small orbs in the middle space using a Black Micron 01.
Step 11: At 10:04 – Still with the Black Micron she adds what starts out as Crescent Moon shapes inside the outer triangles but at 10:46 she turns them into the tangle Moon Pie, finishing it off with the Brown Micron.
Step 12: At 13:30 – She adds “good sized orbs”.
Step 13: At 14:04 – She adds a wide aura to the inner circle in the middle and adds Doodah to the band.
Step 14: At 15:13 – She adds a “real close aura” inside the Doodah band.
Step 15: At 15:30 – With the Van Dyke Brown chalk pencil she “aggressively” adds brown chalk to the edge of the tile and softens it with a tortillion.
Step 16: At 16:38 – After sharpening her graphite pencil she adds gray just outside the Doodah. Then to one side of the diamond shapes.
Step 17: At 18:10 – She adds brown chalk pencil over the gray and softens the two together with a tortillion.
Step 18: At 19:00 – She adds white charcoal highlights.
Step 19: At 19:40 – She “adds a little gold here and there“.
Step 20: At 20:48 – “Once you’ve put your border on then you can go back and play with whatever the string is in your particular pre-strung tile” to fill the middle of the tile. Maria displays a couple of her earlier examples.
Day 9
In Day 9’s video (52:55) – Molly and Martha tangle Festune, Purk and Stiritup on a Renaissance tan Phi tile.

Step 1: At 3:17 – After an introduction to the Project Pack, Molly and Martha choose a Renaissance tan Phi tile and Molly lays down “a really, really simple string”.
Step 2: At 03:59 – She explains she’ll be playing around with combining Purk and Festune,
Step 3: At 05:04 – Using her oval string, with a Brown Micron pen she begins to create “a big Festune and use it as a reticula” (should be reticulum = singular).
Step 4: At 06:57 – “Now we’re going to add Purk” by adding orbs to the “channel” she created in the Festune shape.
Step 5: At 12:05 – With her Black Micron 01 Martha adds an aura around the “bubble blossom” Molly created.
Step 6: At 14:15 – Playing with the bumps created with the aura, Martha adds alternating long and short strokes emanating from the bumps.
Step 7: At 15:34 – She adds “an interesting line” connecting the ends of the strokes she just added creating another border.
Step 8: At 16:44 – She adds Bales-like rice shapes to the “rectangular” spaces created in Step 7.
Step 9: At 17:45 – She decorates the rice/seed shapes with orbs.
Step 10: At 20:23 – Changing to the Brown Micron 01, Martha auras the rice shapes and repeats the auras until they touch in the middle.
Step 11: At 24:10 – With the Black Micron 01, she fills in the triangle-shaped interstices in that band, then she adds another aura to the outside of the shape.
Step 12: At 27:27 – She adds a thin band of Stiritup around the aura with the Brown Micron.
Step 13: At 29:42 – “Just to contain it”, she adds an aura to the Stiritup band, letting the pen nib touch the tips of the Stiritup.
Step 14: At 30:04 – Molly takes over and adds White Gelly Roll dots around the edge of the Stiritup fringe.
Step 15: At 32:30 – She colors in the orbs in the rice shapes band.
Step 16: At 34:02 – After making certain that all of the white Gelly Roll ink is thoroughly dries, Molly adds graphite to the edge of all the Purk orbs.
Step 17: At 36:15 – She softens the graphite with a tortillion.
Step 18: At 38:00 – With the General’s White Charcoal pencil (“my magic wand“), she adds white to each of the Purk orbs she’s just shaded.
Step 19: At 41:38 – After adding the white charcoal she goes back in with the graphite to darken the center of the “blossom” as well as the radiating lines between the orbs. She finishes by adding a stroke of white charcoal up each row as a highlight.
Step 20: At 44:44 – Martha moves to the “Bales” band and adds graphite to the top and bottom of the seeds.
Step 21: At 47:14 – Before she uses her tortillion she adds Van Dyke Brown chalk to the edges of the graphite then adds white charcoal to the centers.
Step 22: At 50:54 – She adds a touch of graphite to the Stiritup band and softens it with a tortillion. Then she adds a small surprise in one corner at the end.
Day 10
In Day 10’s video (10:56) – With Rick keeping her company, Maria tangles the Crescent Moon tangleation called Moon Pie on a 3Z Renaissance tan tile,

Step 1: At 00:00 – With a Brown Micron 01 on a 3Z Renaissance tan tile, Maria begins the tangle. She creates a paisley pear shape in one corner of the tile and adds auras to it. She calls them “tethered auras”, as they’re “tethered” to the point of the shape (rather than going equally spaced all around the shape).
Step 2: At 00:53 – Switching to the Black Micron 01, she adds Knightsbridge-style ink to the inside of the aura.
Step 3: At 01:42 – She adds another aura and then places orbs around the edge of it, each with another “black pearl” orb inside it.
Step 4: At 02:00 – “And that is the whole tile in a nutshell.“
Step 5: At 02:16 – She extends a small paisley pear or teardrop shape from where two of the orbs meet and starts the process over again: Tear drop, auras, Knightsbridge fill, aura, orbs. “The whole tile grows kind of like Pokeroot.” She fills the tile almost all the way to the top with Moon Pie.
Step 6: At 06:05 – [Ahah! She finally calls it a paisley pattern 😉 ] She adds graphite shading to the base of each teardrop shape.
Step 7: At 06:37 – She adds white charcoal pencil highlights.
Step 8: At 07:52 – “We’re hoping that you’re going to do two more of these, and I will demonstrate that in a second.“
Step 9: At 08:17 – She adds gold gouache to the background area of the tile she left blank on one side of the triangle.
Step 10: At 09:09 – She demonstrates how three of these tiles look when placed together as an ensemble.
Step 11: At 09:39 – She then shows how they can go together in 3D as a pyramid for an ornament or table decoration.
Step 12: At 09:50 – She shows “roughly” how you can put them together as a pyramid using tape.
Day 11
In Day 11’s video (24:38) – With Maria keeping him company, Rick tangles Drawings on a Renaissance tan Zendala tile.

Step 1: At 00:00 – Rick begins tangling by putting a large orb slightly off center on his Zendala tile with the Black Micron pen.
Step 2: At 01:05 – With the Brown Micron he adds a subtle S shape that lands on the orb.
Step 3: At 01:18 – He determines how far from the edge he wants to be and adds a second S shape connecting to the orb at the point where the previous one landed.
Step 4: At 01:44 – Noting that he’s not going to put too many of these, he adds a third S shape spaced quite a way away from the second one, again connecting to the orb at the base of the previous S shape.
Step 5: At 02:00 – Each of the S shapes starts about the same distance from the edge of the tile even though the orb is off center, thus giving different lengths to each.
Step 6: At 02:34 – After determining a landing spot about 2/3 of the length of the adjacent S shape, he adds a line of arcs (scalloped line) from the tip of one S to that adjacent 2/3 spot. He repeats that around the tile for each S stroke.
Step 7: At 03:55 – Using the concept of take-off-and-land, Rick adds strokes: “I’m imagining drawing an s-shape almost to that center orb but not getting there.” He repeats this all the way around the tile.
Step 8: At 04:54 – “This is pretty much all of the basic shape with the ink.“
Step 9: At 05:00 – With the Van Dyke Brown chalk pencil, “I’m going to approach shading as a pattern.” He adds brown chalk along the outside edge of each of the most recent S strokes – “inside the wing” – and softens it with a tortillion.
Step 10: At 06:58 – He adds white charcoal pencil highlights to the edge of the initial S strokes and softens it with a tortillion.
Step 11: At 08:43 – He adds brown chalk pencil around the outer (scalloped) edges and softens it.
Step 12: At 10:13 – He adds more white contrast and softens it, then follows with brown chalk, alternating and softening to get the light and dark effect he’s going after.
Step 13: At 13:33 – To get more contrast he adds graphite pencil “to delineate the wing elements“.
Step 14: At 14:28 – He uses the Black pen to restate the original orb.
Step 15: At 14:50 – He does restates the brown inked lines. “Almost all of the lines in this tangle, I restate.“
Step 16: At 17:55 – He adds gold gouache to the entire background.
Step 17: At 18:28 – While Rick works on the background, Maria talks a bit about her favorite kind of gold gouache (Turner’s) and that you can get different tints of gold.
Step 18: At 20:12 – After the gouache background is dry (about an hour), Rick adds more graphite
Step 19: At 22:46 – He adds brown chalk “heavily” around the edge of the tile and softens it with a tortillion.
Step 20: At 23:52 – He adds graphite over the brown chalk edge.
Day 12
In Day 12’s video (29:22) – With Rick keeping her company, Maria tangles Mi2, Mooka and Therefore on a regular square Renaissance tan tile.

Step 1: At 00:00 – With a tangled bandage on her finger, Maria begins the tangle Mi2 with a Black Micron pen. “It’s a tangle from Mimi Lempart early on … I think that this tangle changed the way we thought about doing things and it was a pivotal moment when we saw this. It’s so simple and it’s a magic trick.”
[ Editorial note: Although they don’t say so in the video, I’m proud to say Mimi’s fantastic tangle debuted right here on TanglePatterns.com! 🙂 ]
Step 2: At 01:39 – Maria notes than when Mimi does Mi2 there are many lines that go together, but Maria’s “is a little bit different in that we’re just using one line of Mi2. I’m going to take it in a direction that hopefully will be interesting to you.“
Step 3: At 02:02 – She has completed one line of Mi2 from corner to corner on the tile and darkens up the rice/seed shapes.
Step 4: At 02:15 – With the Brown Micron 01, Maria says “we’re going to aura around this, but watch, there’s a very specific way to aura this.” She auras the outside of the curves.
Step 5: At 03:29 – Still with the Brown pen, she starts opposite one of the strokes and adds a Mooka frond that looks like it’s going under the aura and is a continuation of the pattern. She does this along the length of one side of the Mi2.
Step 6: At 04:38 – She turns the tile and repeats this along the opposite side.
Step 7: At 05:12 – “I decided to give these Mookas a cape.” She adds a wiggly line that starts at the tip of the Mooka and goes down the stem and ends at the base of the Mooka.
Step 8: At 05:44 – “And then we’re going to extend these lines in a very specific way,” which gives a ruffled effect.
Step 9: At 06:14 – “The inside edges to to the stem and then the outside edges just stop where it has to stop.” She adds ruffles to each Mooka frond.
Step 10: At 07:55 – “I’m going to put another one just for fun,” as she adds another Mooka frond coming out of the ruffle. She adds a ruffle to it and continues to add these extra ruffled fronds where space calls for them.
Step 11: At 09:40 – “So now I’m going to go back and do another aura.” She adds an aura around the first one that goes behind the Mooka fronds.
Step 12: At 10:48 – She adds another aura to the previous one.
Step 13: At 11:59 – She adds Van Dyke Brown chalk pencil to color in the insides of the ruffles, leaving the outer parts unfilled.
Step 14: At 13:45 – She softens the brown chalk with a tortillion.
Step 15: At 14:35 – She a little adds brown chalk to the “original structure around the black shapes” where it’s coming off the Mooka and then softens it with a tortillion.
Step 16: At 15:40 – With the graphite pencil she “aggressively” adds shading between the two black shapes all along each side of the Mi2.
Step 17: At 16:37 – “It seems like it’s too much, but wait until you soften this and you’ll see this come to life.“
Step 18: At 17:26 – With the white charcoal pencil she adds highlights to the middle of the aura band then blends it with a tortillion.
Step 19: At 18:48 – With the white charcoal pencil she adds white to the background around the ruffles and softens it with a tortillion.
Step 20: At 20:00 – She adds brown chalk to the edge of the tile then softens it into the background with a tortillion.
Step 21: At 21:55 – She adds graphite to “the last aura we put down” and then softens it up.
Step 22: At 22:59 – “I’m going to go in and do some detail drawing … this is my favorite part, adding the love at the end and just tidying up things.“
Step 23: At 23:37 – She adds Therefore all over the background with a Black Micron.
Step 24: At 24:18 – “After you’ve got all your Therefores done then you go through and add single dots where there’s space, where you think that it’s off balance.”
Step 25: At 25:08 – She adds some rounding on the ends of the Mookas.
Step 26: At 26:02 – She adds gold gouache to the middle aura band, and then her chop.
Step 27: At 28:40 – She shows other versions of the same tile she had done previously during filming mishaps.
Wrap-Up
In the final video in the Project Pack 12 Series (05:11) – With the camera focusing on a large ensemble of all the tiles created during this series, Rick and Maria discuss some aspects of what we’ve learned and explored, and of Zentangle.

This recap of Zentangle’s Project Pack #12 will make it easy for you to find all the related videos and any parts of them you may wish to refer to again.
Remember the images above are linked to their YouTube video, simply click the image to go to the video. Also: each of the complete videos are included on the corresponding tangle’s page on TanglePatterns.
For a complete list of Zentangle’s Project Packs click the PROJECT PACKS link in the pink alphabetic tangle menu bar.
|
.oOo. |
|
Enhance your Zentangle experience while supporting TanglePatterns: |
|
BRAND NEW! TanglePatterns.com TANGLE GUIDE, 2026 Edition |
|
 |
The 15th Edition of the TanglePatterns.com TANGLE GUIDE is an instant-download 123-page interactive digital eBook/PDF containing over 2,300 tangles on the site from May 2010 through December 31, 2025. It's a great resource and a must-have digital tool for using the site. Visit the STORE > E-BOOKS page and help keep TanglePatterns.com going by getting your copy now! |
|
"Linda, Thank you! I was relying on too few and getting stuck after 3 years of daily working with Zentangle. This has inspired me to ‘begin again’ with renewed excitement." ~ Barbara R. |
|
| See the BOOK REVIEWS page for more details on its features and view a sample page. Note: this is a digital product to download immediately when ordering, nothing will be physically mailed to you. | |
| If you're new to Zentangle® and tangling, my TanglePatterns.com BEGINNER'S GUIDE TO ZENTANGLE is just what you need to get started. Also available en Français and en Español. | |
|
|
|
 |
This is the only Zentangle book you'll ever need: the fabulous Zentangle PRIMER Vol 1. It's your CZT-in-a-book by the founders of Zentangle®. For more about the content and to read the rave reviews, visit the BOOK REVIEWS tab. |
| Available in KINDLE format for $9.99. Spanish Edition here. Japanese Edition here. | |
| "Absolutely the best Zentangle Book yet! As an accomplished artist I used to think I did not need instruction on this art form. How wrong I was! My tangling improved by leaps and bounds after reading this book. If you think you have Zentangle down then you need this book more than ever!" ~ Kris H | |
|
|
|
|
.oOo. |
|


Summary of PP 12 was excellent – thank you. One of my favorite PP’s to date.
Thank you Linda for your yearly summary of the 12 Days of Zentangle, it is truly a labor of love and makes it so much easier by having all the days in one easy-to-get-to spot and summarized too! Wonderful!
Hi Linda,
Thank you once again for this detailed summary of the latest project pack – 12 days of Christmas 2020.
Talk about a fantastic holiday gift of the complete PP12 series all in one place!! Linda, thank you so much for the work and time that goes into these exhaustive PP summaries. It’s a deep commitment to the community and it’s very appreciated!
Happy holidays and stay safe in your neck of the world 🙂
Linda, you are a pillar of the Zentangle community. Thank you. Be well.
Thanks once again for such an informative gem of a resource – so invaluable for any tangler & so exact.
Merry Christmas
Linda, this is a great summary of Project Pack 12 – the 12 days of Zentangle. I actually ordered the Project Pack from Rick & Maria this year. I loved the color of the tiles and the uses of the colored chalk pencils and the gold paint. I worked on this project every day before I got the pack on white tiles, and then I did the whole thing on the Renaissance tiles. I finished it just before the end of the year. Perfect. Now I’m looking at doing this again on a different color tile. That could be interesting. Time to start experimenting. This project pack got me back into tangling. I’d gotten into a kind of a funk on doing anything with just staying home. I had so much fun with this project and I would say that using the Renaissance tiles really made a difference. The colors used on them made wonderful patterns. Thank you for all you do Linda. I will be here more often now. 🙂