


 Happy Monday to you, thanks for joining me once again.
As always, I’m delighted to have your company 🙂
Today we have something a little different from our usual easy Monday tangle: some fun, educational, and inspiring Zentangle video lessons for you to explore.
Zentangle’s Project Pack #11 wrapped up yesterday and today we’re reviewing each of the Fee-PHI-Fo-Fun! project videos. There are 10 in this series and it’s highly recommended you watch the Introduction first for the underlying ideas behind the series, then the remaining nine can be watched in any order.
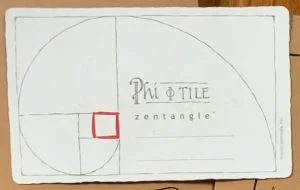
This project introduced Zentangle’s new Phi tile — “a new place for tangles to live” — and Maria’s new Markus Operandus II tool (available as a free download below). Each video focused on tangling on the new tiles and using the Markus Operandus II to create underlying strings for the tangles.
Note: At this publication date the new Phi tile is only available in the Project Pack, it isn’t available for separate purchase yet. (Tile dimensions: 5″x 3.09″, 12.7 cm x 7.8486 cm).
This Phi tile series took place over 8 days and consisted of 10 instructional videos to go along with the Project Pack tools and supplies.
From the Zentangle HQ introduction to Project Pack #11:
In Zentangle Project Pack No. 10, we learned there are many stories that lie beneath the surface and history of the Zentangle Method™.
One particular story we often tell is Rick and Maria’s shared fascination with geometry and the divine proportion or phi ratio, which is related to the Fibonacci sequence.
Discovering and studying how patterns in nature, art, architecture and even behavior resonate with geometric proportions continues to be a significant part of their journey together.
Don’t panic though, just as the sunflower and the nautilus did not consult a calculator to grow, the lessons within this project pack require no mathematical planning or skills. We will explore a new place for tangles to live, we will dig deep into the concept of Fragments and Reticula and take pleasure in the delicate techniques of shading with both graphite and color.
SUPPLIES: This Project Pack is available here ($32.95) in the zentangle.com store and it’s certainly a convenient way to get all the supplies for the project. However, the first video reviews the items in the Project Pack and you might discover you have suitable alternatives in your own Zentangle supplies.
- new Zentangle Phi rectangular white tiles (12)
- Zentangle’s new Markus Operandus II (I’m abbreviating to MO II henceforth) – download a free copy here
- Sakura Micron 01 Black, Sakura Graphic 1 Black
- 3 random colors of General’s MultiPastel® Pastel Chalk color pencils– click the image below for the full-size color chart of MultiPastel® Pastel Chalks on the General Pencil website
- “General’s® MultiPastel® #4400 Series
Professional, Artist Grade Pastel Chalk Pencils. Made with a Smooth, Pigment Rich Pastel Formula. Handcrafted in the USA with Sustained Yield Incense Cedar Wood. A smooth, pigment rich, dry pastel pencil. Use alone or combine with pastel sticks to create bold or delicate drawings. Pencil tip is ideal for lettering arts, chalkboard art, and adding lines and details to fine art drawings Additional uses: Apply patterns on cloth.”
- “General’s® MultiPastel® #4400 Series

- General’s Pencil Sharpener
- Zentangle graphite pencil
- tortillions (4)
The following chronology is a summary of the videos for this Project Pack with links to the individual videos. Either click the Day #’s title link or the image itself to view the full video on YouTube. Where applicable, the complete videos are also included on the relevant tangle pages on the site.
It isn’t necessary to watch the videos in sequence, but it is recommended that you watch the Introduction video first.
CZT Molly Hollibaugh also recommends we watch the videos completely through once before beginning our tiles:
“You’re going to have a little more confidence, you’re going to be a little more aware of what’s happening next. Then you might try something different, you might explore it in a different way”.
Day 1 – Introduction
In the introductory video (23:04) Rick and Maria introduce you to the new Zentangle Phi tile and the Markus Operandus II – “PHInally, a simple mark-maker for phinding Phi proportions” – from the Zentangle Project Pack No. 11.
They talk about about the Phi Ratio (aka Golden Ratio, Golden Mean, Golden Section) and give some examples from their garden.

Day 1
In Day 1’s video (35:17) – Zentangle HQ’s dynamic sister-duo of CZTs, Maria’s daughters Molly Hollibaugh and Martha Huggins, begin by introducing the new Phi tile, “a wonderful canvas to learn a little about the magic of Phi and also explore the Zentangle Method“.

Step 1: At 2:20 – Molly selects a Phi tile included in this Project Pack, and reviews the remaining tools included in the pack.
Step 2: At 4:00 – She explains how they’re using the Markus Operandus II (download here) and the proportions of the Phi Ratio (aka Golden Ratio) to create strings. They add tick marks on the tile using the MO II and lightly connect them with pencil lines.
Step 3: At 6:50 – Molly tangles Pokeroot in a “methodical” Verdigogh-like way.
Step 4: At 10:26 – Molly turns it over to Martha who continues adding Pokeroot to the base and stem established by Molly, weaving them beside and behind the originals.
Step 5: At 16:28 – Molly adds “a little bit of love” with another spray and inking in the spaces between the berries and stems and adding rounding around the edges.
Step 6: At 19:05 – After making sure all your ink is thoroughly dry, “We’re going to start putting in some color“.
Step 7: At 20:20 – They recommend using the pencil on the back of the tile first to soften the tip a bit “and get familiar with the colors and how they might play with each other“.
Step 8: At 20:36 – Martha demonstrates a different way to hold the pencil in order to work with the side edge of the pencil for “a softer delivery“. She also reminds us that color can be added in layers so she works with a light touch to start, “you can always go back and add deeper hues even after you’ve blended“.
Step 9: At 22:01 – After adding lavender to the right side of the Pokeroot, Martha “wants to see how this color takes to the paper once I start blending.” Martha adds color and blending on the right side of the tile.
Step 10: At 28:06 – Molly takes over, “Oh, I got plans for the berries, Martha“, as she adds red chalk pencil to the berries.
Step 11: At 31:29 – Adding graphite shading and dimension.
Step 12: At 32:39 – Molly encourages us to watch the videos through once and then doing our tile while watching a second time, “you’re going to have a little more confidence, you’re going to be a little more aware of what’s happening next. Then you might try something different, you might explore it in a different way“.
Day 2
In Day 2’s video (19:35) – Rick keeps Maria company as she tangles Gourdgeous on a Phi tile. Again we are encouraged to watch the video once through first before watching it again to do our own.

Step 1: At 00:21 – Maria begins by demonstrating how to mark the Phi tile using the MO II so that where the two string lines intersect, “that’s where the sweet spot is“. The two intersecting lines create a string that divides the tile into four sections.
Step 2: At 02:13 – She begins a monotangle of Gourdgeous using the tile vertically and creating the tangle along the string line, alternating between the 01 for the strokes and the Graphic 1 for filling in the larger inked areas. A reminder that the Graphic 1 ink takes longer to dry.
Step 3: At 09:00 – She adds another Gourdgeous motif on the top of the first one.
Step 4: At 10:11 – She adds another at the bottom that goes behind the first motif.
Step 5: At 12:45 – She adds “a little graphite to give it some contour and some energy“.
Step 6: At 14:42 – She finishes the tile by adding color with the Chalk Pastel pencils.
Day 3
In Day 3’s video (18:52) – Maria keeps Rick company as he tangles today’s Phi tile.

Step 1: At 00:20 – Rick tangles Crescent Moon on the back of the Phi tile using the printed Fibonacci or Phi Spiral as the string.
Step 2: At 15:12 – “So now it’s graphite time.”
Step 3: At 16:20 – He adds colored “ladybugs”, adding Crescent Moon around the outer edge of the spiral shape using one of the Chalk Pastel pencils. This “adds texture, sort of like a ghost tangle“.
Day 4
In Day 4’s video (16:11) – Rick keeps Maria company as she tangles a Fescu / Hollis type of Mooka on her Phi tile.

Step 1: At 00:10 – As in earlier episodes, Maria preps her Phi tile using the MO II.
Step 2: At 01:31 – “I couldn’t go through a whole Project Pack without doing some Mooka but I thought I’d do a different Mooka.” She adds a Fescu / Hollis type of Mooka with a grouping “growing” from each end of the tile.
Step 3: At 07:01 – She adds rounding to the intersections.
Step 4: At 07:44 – She adds Bronx Cheer at the X focal point determined in Step 1.
Step 5: At 10:32 – She uses a colored Chalk Pencil (4435 Sap Green) to add an aura to all the inside spaces, “an easy technique that adds nice texture“.
Step 6: At 11:15 – She uses a tortillion to blend out the green pencil.
Step 7: At 11:49 – She adds Chalk Pencil (4410 Pink) to the Bronx Cheer.
Step 8: At 12:12 – She adds graphite shading.
Step 9: At 12:46 – She uses the third color Chalk Pencil (4430 Indigo Blue) to add auras around the outside of the shape in the same way she did with the green.
Step 10: At 13:13 – She uses a tortillion to blend out the blue pencil, taking a very pale blue all the way to the edges of the tile.
Step 11: At 14:34 – She uses the now-blue tortillion to blend with some of the green spaces, “making the colors more complex and a little more sophisticated“.
Day 5
In Day 5’s video (40:46) – Molly & Martha share today’s lesson where they each use Ing as a reticulum on a Phi tile and “have some fun putting different fragments inside of the Ing.”

Step 1: At 00:14 – Molly first reviews the contents of the Project Pack and uses two of the Phi tiles. She also advises to watch the Introduction video first for helpful background information if you haven’t already.
Step 2: At 02:45 – Molly explains the background of her Ing tangle and using the MO II she prepares the first of two tiles for this lesson’s tangling.
Step 3: At 04:51 – Using the Graphic 01, Molly guides us through creating Ing as a reticulum on the first tile.
Step 4: At 09:12 – She creates the same Ing reticulum on the second tile.
Step 5: At 11:53 – “When you’re playing with Ing as a reticula, it’s really just playing with any triangular fragment, there’s a ton of them in the PRIMER.“
Step 6: At 13:06 – Using the Micron 01, Molly puts the same fragment into each of the triangles.
Step 7: At 18:00 – She adds a couple more finishing details before allowing the ink to dry before shading.
Step 8: At 19:34 – Martha takes over to fill her Phi tile and begins by putting a thin aura inside each triangle shape.
Step 9: At 22:03 – She continues by adding the tangle Well inside each space.
Step 10: At 25:36 – She adds “peppering” to all the Well triangles.
Step 11: At 28:50 – She adds an aura around the outer edge then puts the tile aside for the ink to dry.
Step 12: At 30:03 – Molly returns with her tile and two of her colored pencils, 4425 Bright Blue and 4435 Sap Green. She adds color to the tile then blends the two together using a tortillion.
Step 13: At 32:00 – She adds graphite to the original Ing zigzag.
Step 14: At 33:48 – Martha returns with her tile and two different colors of chalk pencil. With the 4417 Yellow Ochre she adds color around each circle and blends it out with a tortillion.
Step 15: At 36:35 – She adds an aura of 4405 Scarlet Red around the Yellow Ochre then blends it out with a tortillion.
Step 16: At 38:16 – She adds graphite to the original Ing zigzag line.
Day 6
In Day 6’s video (19:03) – With Rick keeping her company, Maria tangles “a little fragment in reticula on this Phi tile“.

Step 1: At 00:11 – Maria uses the MO II to “find my little sweet spots and mark them very carefully with my little pencil“. She marks both sides and both ends.
Step 2: At 01:20 – With a Micron 01 she creates a square shape centered around the intersection of the pencil string.
Step 3: At 01:51 – With a Graphite 01 she adds a bold inner aura to the square.
Step 4: At 02:06 – Switching back to the Micron 01, she “drops some lines” using the initial square “as the seed for the whole reticula“, and “I‘m really not concerned about the lines being straight … I want some character to them“.
Step 5: At 03:00 – She very lightly adds strokes crossing the original lines to create an overall grid.
Step 6: At 03:24 – Still with the Micron, she adds an aura inside each square, “following the casualness of the line“.
Step 7: At 04:05 – She connects the corners of the squares with an X, creating a mitered corner.
Step 8: At 04:37 – She adds a “tight” aura to the Graphic 1 square, then adds that same thin aura to each square.
Step 9: At 05:28 – With one of the colored Chalk Pastel pencils, she adds color to the inside of the Graphic 1 square “so we wouldn’t touch that by mistake“.
Step 10: At 05:42 – “We’re going to do two different fragments and we’re going to do them in every other square … so pay attention to what you’re doing.” She puts a small circle in every other square.
Step 11: At 06:28 – “Now we’re going to go back into the ones that are empty and we’re going to put a diagonal in each one, following that miter.“
Step 12: At 06:55 – Going back to the squares with the circle in them, “we’re going to put in something like a version of Well“. She adds the curved strokes of Well with them all “spinning clockwise”.
Step 13: At 07:53 – Much like Martha did yesterday on her tile, Maria adds peppering to each of the Well squares with one weighted stroke in the middle between each of the Well curves.
Step 14: At 09:28 – She puts a square in the upper left corner of each of the squares with the diagonal created in Step 11.
Step 15: At 09:50 – With the Graphic 1, she fills in the squares she just created and goes back with the Micron 01 to touch up the edges, “sculpting” them the way she wants them to look.
Step 16: At 11:38 – She lightly adds graphite to the lower left part of each fragment, then goes back with the tortillion to smooth out the graphite.
Step 17: At 12:36 – In the Well fragment she uses graphite to color in every other section and the tortillion to smooth it out.
Step 18: At 13:21 – She adds graphite to the left side of the frame of each grid square.
Step 19: At 14:03 – She adds graphite from the tortillion around the center circles of the Well fragments.
Step 20: At 14:21 – Using the three color pencils – Ochre, Orange, Green – she adds random patches of all three to the Graphic 01 square then blends them with a tortillion, “starting from the outside and bringing it towards the middle“.
Step 21: At 16:15 – To help frame that square, she adds graphite around the outer edge and blends with a tortillion.
Step 22: At 18:11 – She shares another tile done previously that used the same concept but different colors.
Day 7
In Day 7’s video (26:18) – with Maria keeping him company, Rick says he’s “going to play with a fragment or two on a Phi tile.“

Step 1: At 00:10 – Rick uses the MO II to add marks for a penciled string creating the “sweet spots” on the tile.
Step 2: At 01:15 – Using a second Phi tile as a “guide” he adds a set of parallel pencil lines from both the width and the length markers. He also adds a diagonal pencil line from top left to bottom right corners of the tile.
Step 3: At 01:58 – With a Micron 01, he restates the lines of a square formed in the bottom right corner of the tile.
Step 4: At 02:30 – He turns the tile so the square is oriented at the upper left and begins to add a fragment to the square. He draws an arc from one corner to the opposite corner and then adds auras to fill in the corner section.
Step 5: At 03:24 – He adds a large Crescent Moon shape on the inside of the arc and uses the Graphic 1 to fill it in.
Step 6: At 04:37 – He adds auras to the inked in rice shape.
Step 7: At 05:29 – He shows a fragment page in the PRIMER and points out the one he’s using with a variation.
Step 8: At 06:00 – He begins to add the same fragment in an adjacent but smaller square on the tile.
Step 9: At 08:00 – He goes back to the MO II to “find the phi of these sections” and adds descending sizes of squares and adds the same fragment into those squares.
Step 10: At 10:36 – Referring to the Primer again, he shows he’s going to use fragment K4 for the other side of the tile.
Step 11: At 10:45 – He turns the tile and adds the same set of boxes to the other side of the tile.
Step 12: At 11:23 – He adds the fragment’s inner square in the corner of the large corner box and uses the Graphic 1 to fill it in.
Step 13: At 12:04 – A reminder that the Graphic 1 ink takes longer to dry, then he adds the same width of aura to both sides of the Graphic 1 square.
Step 14: At 13:20 – He creates and fills the remaining boxes on the same side of that tile.
Step 15: At 15:13 – Returning to the first fragment section, he begins to lightly add color with the chalk pastel pencils starting with 4417 Yellow Ochre, then adding 4405 Scarlet, or 4406 Burnt Carmine) Red and then 4407 Green, and blends them with a tortillion.
Step 16: At 18:26 – He turns the tile and adds color to the opposite side containing the second fragment.
Step 17: At 21:05 – He sharpens his pencils using the General’s sharpener from the Project Pack, noting he wants to add something to the three remaining blank spaces using the chalk pastels and needs a sharper tip. In the first one he lightly adds Flux shapes and some orbs.
Step 18: At 21:40 – He adds lightly Mooka and orbs to the second and third spaces.
Step 19: At 23:12 – He goes over those areas lightly with his fingertip to soften the strokes.
Step 20: At 24:26 – After adding his chop, he adds graphite shading to the tile and blends it with a tortillion.
Day 8
In Day 8’s video (18:09) – Rick keeps Maria company as she tangles Molygon, Pokeleaf and Doodah on her Phil tile.

Step 1: At 00:10 – Maria prepares her Phi tile using the MO II.
Step 2: At 01:08 – With the Micron 01 she uses the “sweet spot” at the intersection of the lines to begin the tangle Molygon.
Step 3: At 02:41 – She adds detail and auras to the inside of the Molygon shapes, “using the Molygon as a reticula“.
Step 4: At 04:20 – With the Graphic 1 she adds an aura around the whole Molygon shape.
Step 5: At 05:06 – With the Micron 01 she adds layers of Pokeleaf around the outer edge, growing out of the Graphic 1 aura.
Step 6: At 07:40 – With the Graphic 1 she again adds an aura around the entire shape.
Step 7: At 08:00 – With the Micron 01 she adds another aura but “gives it a lot of space”.
Step 8: At 08:53 – She adds “coffering” to the space just created.
Step 9: At 10:18 – She auras the pencil line creating a band connecting the center motif to the edge of the tile.
Step 10: At 10:40 – She fills the band with Doodah.
Step 11: At 11:13 – With the Graphic 1 she adds an aura around the shapes.
Step 12: At 11:40 – She adds graphite to the Molygon shapes and around them, then blends it with a tortillion.
Step 13: At 13:33 – She adds graphite to the coffered, ruffled band, coloring in “roughly every other little section” and smooths it with a tortillion.
Step 14: At 14:27 – She adds graphite to the Doodah band.
Step 15: At 14:37 – She brings in color, first with the 4417 Yellow Ochre to the Molygon and blending it out.
Step 16: At 15:25 – She adds reddish brown to the Pokeleaf and blends it out.
Step 17: At 16:00 – She adds blue to the coffered ruffle area, again blending with a tortillion.
Wrapping Up the Series
In the final video in the Project Pack 10 Series (23:25) – Rick and Maria visit with us and share some of their Phi inspirations.

Step 1: At 00:26 – Maria talks about the tile pictured above being first tile she tangled with the new Phi tiles, using an illuminated letter. She used Ellish to create the letter P.
Step 2: At 01:40 – They show a painting done by their 7-year-old grandson Wyatt and Rick demonstrates how it is composed in Phi proportions.
Step 3: At 04:27 – “Another story” – a Phi-oriented gift Maria made for Rick in 2003 for his birthday, when they first got together.
Step 4: At 04:59 – A discussion of how Phi proportions are arrived at by the Fibonacci sequence.
Step 5: At 07:29 – They share two books that have inspired them: “Geometry of Design” by Kimberly Elam; “The Power of Limits” by Gyorgy Doczi;
Step 6: At 10:37 – Rick demonstrates how price charts in the stock market have similar repeating patterns even though they are moving in time.
Step 7: At 12:00 – Rick talks a little about the “gizmos” he’s been using to demonstrate Phi proportions throughout the series as well as a source for obtaining handmade wooden golden ratio calipers.
Step 8: At 13:30 – He demonstrates how the original Zentangle tile incorporated Phi into its design, as indeed do all of their products.
Step 9: At 14:39 – For the rest of the video Maria shares “different iterations of the tiles that we did” in this series.
Many beautiful tiles, fun viewing!
And that’s a wrap. 🙂
This recap of Zentangle’s Project Pack #11 will make it easy for you to find all the related videos and any parts of them you may wish to refer to again.
Remember the images above are linked to their YouTube video, simply click the image to go to the video. Also: each of the complete videos are included on the corresponding tangle’s page on TanglePatterns.
For a complete list of Zentangle’s Project Packs click the PROJECT PACKS link in the pink alphabetic tangle menu bar.
|
.oOo. |
|
Enhance your Zentangle experience while supporting TanglePatterns: |
|
BRAND NEW! TanglePatterns.com TANGLE GUIDE, 2026 Edition |
|
 |
The 15th Edition of the TanglePatterns.com TANGLE GUIDE is an instant-download 123-page interactive digital eBook/PDF containing over 2,300 tangles on the site from May 2010 through December 31, 2025. It's a great resource and a must-have digital tool for using the site. Visit the STORE > E-BOOKS page and help keep TanglePatterns.com going by getting your copy now! |
|
"Linda, Thank you! I was relying on too few and getting stuck after 3 years of daily working with Zentangle. This has inspired me to ‘begin again’ with renewed excitement." ~ Barbara R. |
|
| See the BOOK REVIEWS page for more details on its features and view a sample page. Note: this is a digital product downloaded immediately when ordering, nothing will be physically mailed to you. | |
| If you're new to Zentangle® and tangling, my TanglePatterns.com BEGINNER'S GUIDE TO ZENTANGLE is just what you need to get started. Also available en Français and en Español. | |
|
|
|
 |
This is the only Zentangle book you'll ever need: the fabulous Zentangle PRIMER Vol 1. It's your CZT-in-a-book by the founders of Zentangle®. For more about the content and to read the rave reviews, visit the BOOK REVIEWS tab. |
| Available in KINDLE format for $9.99. Spanish Edition here. Japanese Edition here. | |
| "Absolutely the best Zentangle Book yet! As an accomplished artist I used to think I did not need instruction on this art form. How wrong I was! My tangling improved by leaps and bounds after reading this book. If you think you have Zentangle down then you need this book more than ever!" ~ Kris H | |
|
|
|
|
.oOo. |
|


Linda, thank you so very very much for the hard work that went into this thorough summary of the project pack 11 series. It’s fantastic to have everything on one page, and that you take the time to list each step and time in the video is exceptional! You really give so much and it is appreciated 🙂 Cheers!
Thanks so much, Jenn. I wonder at times if it’s worth the time and endeavor that goes into these summaries, and if they’re even helpful. So I REALLY appreciate your comment of support for the effort 🙂 THANKS.
Great job Linda!! Thank you for your time doing these summaries. You have a lot of patience:)