While shading certainly isn’t necessary on your Zentangle® drawings, it can add real dimension to your creation. And sometimes a ho-hum drawing becomes something you really love after you’ve applied a little shading to it.
For me, there’s as much fun doing the shading as there was doing the drawing. And one of the best guides on shading, especially if you are a total drawing novice like me, is in Sandy Bartholomew’s Totally Tangled book. She discusses “four basic uses and techniques for shading: color, contrast, depth, and roundness.” And shows you how. I found that page alone worth the price of admission.
UPDATE: October 2012 – Be sure to check out the FREE 2-Part TanglePatterns.com Shading Mini-Clinic:
In all three of her Zentangle books to date, Zentangle Basics, Zentangle 2, and Zentangle 3, Suzanne McNeill gives tips and suggestions on where and what to shade and relates them to specific patterns.
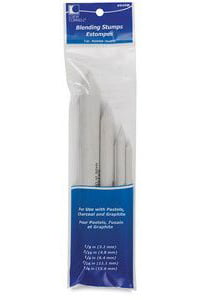
Loew-Cornell Blending Stumps
 When you have completed your Zentangle, and assuming you’ve used permanent ink and it’s completely dry, you can shade sparingly and very lightly using the side of a well-worn soft-leaded pencil.
Then some people use their fingertip {*cringe*} to “smudge” the pencil marks to soften and blend them.
However, I use these great blending tools:
They come in various sizes allowing you to shade broad areas or get into tiny corners if that’s what you desire. And you don’t end up with oily finger greebies (a technical term 🙂 ) all over your beautiful creation.
According to Wikipedia, a tortillion (or tortillon) is “an artist’s tool used to smudge and blend drawings made from charcoal, graphite pencil, or pastel. The tool consists of a tightly-wound stick of soft, fibrous paper … A blending stump is similar to a tortillon but is longer, more tightly wrapped, and pointed at both ends. Blending stumps produce slightly different textures than tortillons when blending. They are typically made of paper but can also be made of felt or leather.”
At many art supply stores you can find single blending stumps if you prefer not to get the whole package – but they’re not very expensive anyway and they last forever.
These are great blenders and I highly recommend you use them instead of your fingertip!
Visit more TIPS & TOOLS pages
Check out the other pages under TIPS & TOOLS at the top of the page. There are recommendations if you want to add colored ink to your Zentangle-inspired art, or watercolor, as well as ideas for strings, and much more to come.
|
.oOo. |
|
Enhance your Zentangle experience while supporting TanglePatterns: |
|
BRAND NEW! TanglePatterns.com TANGLE GUIDE, 2026 Edition |
|
 |
The 15th Edition of the TanglePatterns.com TANGLE GUIDE is an instant-download 123-page interactive digital eBook/PDF containing over 2,300 tangles on the site from May 2010 through December 31, 2025. It's a great resource and a must-have digital tool for using the site. Visit the STORE > E-BOOKS page and help keep TanglePatterns.com going by getting your copy now! |
|
"Linda, Thank you! I was relying on too few and getting stuck after 3 years of daily working with Zentangle. This has inspired me to ‘begin again’ with renewed excitement." ~ Barbara R. |
|
| See the BOOK REVIEWS page for more details on its features and view a sample page. Note: this is a digital product to download immediately when ordering, nothing will be physically mailed to you. | |
| If you're new to Zentangle® and tangling, my TanglePatterns.com BEGINNER'S GUIDE TO ZENTANGLE is just what you need to get started. Also available en Français and en Español. | |
|
|
|
 |
This is the only Zentangle book you'll ever need: the fabulous Zentangle PRIMER Vol 1. It's your CZT-in-a-book by the founders of Zentangle®. For more about the content and to read the rave reviews, visit the BOOK REVIEWS tab. |
| Available in KINDLE format for $9.99. Spanish Edition here. Japanese Edition here. | |
| "Absolutely the best Zentangle Book yet! As an accomplished artist I used to think I did not need instruction on this art form. How wrong I was! My tangling improved by leaps and bounds after reading this book. If you think you have Zentangle down then you need this book more than ever!" ~ Kris H | |
|
|
|
|
.oOo. |
|






A fun discovery re shading, while playing with Nzeppel: quick explanation – I prefer using rolled paper tortillion to the paper stumps pictured above. They have a firm tip that doesn’t need to be constantly sharpened or reshaped (and they’re so cheap I buy them 1 gross at a time on eBay!
On with the story…
I have been doing a ‘one square a day’ tangle calendar this year (my one and only New Year’s resolution for 2011!). A blank calendar, to which I add one tangle a day. On the 2nd January, I decided to do Nzeppel. Wanting a very light and floaty effect for such a small space, I was loath to add in too much pencil shading. I dabbed at the page with my tortillion while thinking – and made a wonderful discovery.
It made a delicate, soft, light grey shading – just by dabbing the tortillion directly on the paper (no pencil)!
So I shaded the rest of Nzeppel using the same technique – with stunning results! There was enough graphite sitting on the end of the paper to leave a lovely delicate shading and, when it began to fade away to nothing, I ‘topped it up’ by running the tortillion tip along my pencil led a could of times.
Initially, I suspected this would work best on the super smooth paper of the calendar… but I tried it on a Zentangle tile and it worked very nicely there too!
I will shortly be putting this info up on my blog (http://kalligrafix.blogspot.com/) with a photograph of the effect, if you’d like to see what it looks like.
Happy tangling! 🙂
And thanks Linda, for encouraging me to share. ?
Thanks so much for sharing Kit. Please keep it up (and everybody else too, hint hint)!
I haven’t actually had to sharpen or reshape my blending stumps or replace them yet. So I guess they’re all pretty durable depending on what you’re drawing and the surface you’re using, of course.
Whatever option we choose, it’s way better than the oily fingertip!
Thank you Linda and Kit for this lesson on shading and shading tools. I did find some what I thought were blending stumps at my local art supply store but when I looked for tortillons on ebay I discovered that is what I have! Just have to get used to working with them. 🙂
Thanks for the shading tips, excuse the pun… will try this on my next great adventure in my drawings…
OMG why did I not read this before yesterday. I was shopping for a new art supplies when I saw these blending stumps and I almost bought them but was not sure what they were used for. They were super cheap and I was in a discount store. I was using my finger but I thought that was just putting oil on my zentangles so have stopped shading. It will be a month before I go out again to that shop grrr. Oh well at least I know what they are now and will add them to my kit.
For those not used to shading, shade what you want UNDERNEATH. So along the OUTSIDE edge of what you want on top is where you want to shade. It will make the top tangle look as though it is raised above the tangles underneath. If you want an image to look round, shade the edges. I hope this makes sense.
If your in a pinch and don’t have a stump or tortillion you can sometimes us softish paper that has good tooth to it.I’ve used a clean sheet of newsprint. I just fold it in half and roll it as tight as possible and either glue or tape the lose end. Itworks best if you roll it so that the fold ends up at the point.I used to do that as a kid when mom didn’t have extra for art supplies!
If you do a google search on “tortillion” there is at least one tutorial on how to make your own “blending stump”. That being said, some “tortillions” do seem to be better than others. The gray ones are softer which makes it easier to just blend the graphite without destroying the texture of your paper. They are also easier to clean and/or re-sharpen with a plain old emery board (especially since those aren’t good for your nails anyway!). 🙂
I have been experimenting with other ways of adding shading to tangles. I use Derwent Inktense (either the block or pencil form). If you have used a permanent pen to draw your tangles then you can add these and blend with a paint brush and water. Once dry, these are also permanent. You can get the blocks and pencils individually and a little goes a very long way! They are also a really great way of adding colour – yes I know purists say you shouldn’t!
I have just discovered that Faber Castell make a range of their waterproof ‘Pitt Artist’ pens in shades of grey. I already use their black ones for doing tangles (I had a pack lying around in the draw). The brush one in the 4 pack (S F M and B) is great for filling in larger areas of black in the tangles! Has anyone tried the grey ones for shading? I’m tempted to get some but if anyone has experience of them, I would be interested in their views.
I haven’t tried the gray ones, but I did buy the 4-pack of black Faber-Castell Pitt Artist Pens you mentioned, and for my money I don’t think they compare at all well with Sakura Microns. The Faber-Castells felt very hard and scratchy on the page. So with than in mind, I doubt they’d be much good for shading but do let us know if you try them.
Hi Linda
Interesting what you say about the Fabet Castells – I actually rather like the black ones, but then I haven’t tried the Sakura. True, the thinner ones are quite hard, but the brush pen in the set is soft and flexible and the greys are apparently like that.
I’ll certainly let you know what they are like if I do get hold of a set.
When they first started Zentangle, Rick and Maria rigorously tested “every pen known to man” before deciding on the Sakura Microns – the 01 specifically – for their Kits and recommendations. So I wasn’t very surprised when I used the Faber-Castell (for tangling) and found it lacking by comparison. It’s interesting that I could actually feel the difference. Others may really like them, but they just weren’t my cup of tea.
Juliet I have some of the copic fine liner pens that I already had in black gray and sepia, I have used the gray to shade the black, but the effect while it does work is sort of flat because you can’t get all those blended tone you can get in just a few seconds of blending with a good pencil and a blending stump.One of the tricks I do use with the pencil is to scrible pencil onto a seperate piece of paper and pick it up one a stump then start blending the color where I want it starting at the center of my tangle and working out so I don’t rub over anything that I already put down when I get to the center. I have tried several different types of pens lots of brands and have to agree with Linda when I’m tangling I like the look and feel I get for the Sakura’s the best. I do use the micron pens but lately I’ve been using the Sakura Pigma Sensei. It has quickly become my go to for zentangles unless I want a super fine line.
Juliet thank you for the tip about the intense pencils can’t wait to try it out!
Hi Pamela. I totally see your point about the fine degree of shading that you can get with a pencil and stub as opposed to a single block from a grey pen. What I like about pens is the permanence although I can see many advantages to using pencil for shading – get it wrong and you can always go back in with an eraser (tut tut).
As to Inktense, I have had them for quite a while now and love the colours. It will be interesting to hear what you think of them when combined with Zentangle.
I am still rather a novice with Zentangle and appreciate that others have more experience where pens etc are concerned. When I get around to buying new supplies I will certainly try the Sakura pens for myself. As with many things, it is easy to be satisfied with something when you don’t have anything better to compare it with!
Happy Tangling.
Following on from discussions about paper stubs for shading, I recently visited my local ‘Hobbycraft’ store here in the UK. They do a range of ‘basics’ – cheaper versions of basic craft essentials. Amongst the selection I found a pack of 3 different thickness stubs for just £1 sterling. The quality is basic, but they do the job reasonably well although they may not last as long as the better quality ones others have recommened. However, for anyone wanting to try using stubs for shading and is on a tight budget, these are an option.
A few other notes for those new to venturing in shading from a Mixed Media artist. Often in using charcoals, pastels, chalk, and various pencils up to 8B I like to use some of those facial cotton squares for blending, or even a plush paper towel, or cotton rag over my fingertip. It can result in a different shading value range from a stump with fingertip control for an area of shading, plus I often will use the blotted gray/color on the cotton as the actual marker for shading areas in an artwork. A kneaded eraser is a handy tool as well in shading or working in reverse, or to pick up pencil shaded zones in removal of shading. The kneaded eraser can be twisted to a fine point to work in a very specific area. Hope that is helpful.
As a challenge, try shading a whole square in using a softer pencil, 2B, 4B, 6B…ebony black, and get a full value grade of grays from lightest to darkest, then section off areas to see what tools work best for you, stump, cottonball, rag, or eraser. The experiment will help you learn a lot about your shading preferences. It should be noted that the type of paper can make a big difference in shade quality, giving different ‘drag’ responses for pencil to paper. Also simply varying the amount of pressure you use putting pencil to paper can change to depth of value. The higher the number/B the darker the mark in the drawing pencil scale.
I enjoy blending with my fingertip from time to time. Unlike the tortillion, which embeds the graphite into the paper, the fingertip carries the graphite across the surface, giving a more textured, grainy appearance. With some tangles, it is quite striking. I also use a tortillion without adding any graphite to the tile; there’s always a decent amount in the tip from the last application and it allows a much gentler, lighter shading. Happy tangling, all!
I am BRAND new to Zentangling and just got my kit. There is a tortillion in the kit. I have yet to actually do a Zentangle on a tile. I am worried myine won’t be as nice as all the hundreds I have seen online. Time to accept there are no mistakes in Zentangle!
Jump in there, Ginny! You’re gonna have a great time! And you can make Zentangles just as beautiful as the ones you see online. With regard to shading, I’ve been using the qtips that are for make up application because one end is rounded and the other has a tip. Very handy…