Greetings friends, Linda here with another great resource for your drawing skills — everything you need to know about shading your Zentangle® art. Grab a cup of coffee or tea and sit yourself down for a spell, you’re going to learn some great stuff today.

Marizaan van Beek, CZT®, Pretoria, South Africa
Part 1 of the TanglePatterns Shading Mini-Clinic two-part series is by guest contributor, former Social Worker and Art Therapist and now Certified Zentangle Teacher Marizaan van Beek of Pretoria, South Africa.
Marizaan created the lovely Angel Fish tangle and recently one of her students, Carla du Preez, referred to her as “a master shader” with Carla’s tangle Aura-Leah. I invited Marizaan to share her thoughts on shading with you and she’s done a master-ful job.
Each artist will have their own thoughts on and techniques for this subject and Marizaan shares hers with us today. Although in Zentangle our supplies include just one pencil, drawing artist Marizaan takes it a step further and explains how — if we choose to — we can use a range of pencils to enhance our Zentangle art.
She reviews shading tools, gives her personal guidelines, and demonstrates her method of shading Zentangles, step-by-step. I think you’ll find Marizaan’s article a wonderful reference and I have no doubt you will find tips that will greatly improve your enjoyment of Zentangle and the art you create.
And now, here she is …
* * *
Thank you Linda, it is an honor to be here on TanglePatterns. Let’s get right to it.
Shading Tools
The Pencil
 First we have to know our tools. It is important to understand the pencils you work with. Pencils are all marked on a European system called the degree scale where H is hardest and B is blackest. We all know the HB pencil with which we draw. The ‘lead’ in pencils is graded — 9H is generally the hardest one finds and this grades downwards to 1H and H. Softness is graded upward from B, 1B, all the way to 9B.
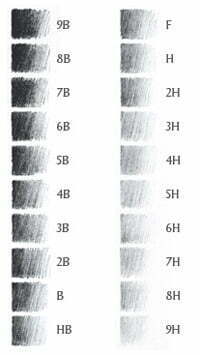
Pencil grading chart courtesy of Wikipedia – click the image to learn more about the fascinating history of pencils.
H pencils have a higher concentration of clay than graphite, whereas B pencils have a much lower percentage of clay. B pencils make soft, dark marks, whereas the H pencils have a much harder, lighter line.
In Zentangle we use a 2B pencil to shade. This is also a standard tool in the Zentangle Kit. The soft graphite pencil is good for fine detail and perfect for shading your tangles.
The higher the number on the B, the softer the graphite, and the darker it becomes. This is important because when you put graphite to paper, you put pigments on the paper. When shading, these pigments are moved around on the paper, so the blacker the pencil, the darker the shade or tone would be.
The Blender
Also included as a standard tool in the Zentangle Kit is the Tortillion, also known as a Tortillon or Blending Stump. We use this to blend our shading. You can also use a Q-tip, your finger or invent your own blending tool. Why not ?
![]()
And now for the shading
Shading is an enhancer we use in Zentangle, along with Aura, Perfs, Dewdrop, Sparkle and Rounding. Shading adds dimension and depth to your tangles and just makes it come alive.
As an artist, I know you look at light – the way it falls and where it reflects. And normally if I draw, I will keep this in mind.
But in Zentangle “I DON’T HAVE TO”. In Zentangle there is no right or wrong, and no up or down on your tile, so no fast rules as in art when it comes to shading.
However, there are guidelines I like to follow and that I teach my students as well. First, look at your finished tile.
- Is there any pattern that is underneath another pattern?
- Have you used the string?
- Do you have a pattern that as a whole looks almost round in your string? For instance, Bales.
- Did you use a lot of black lines?
- Did you use a lot of detail?
- What pattern stands out?
Now decide what you want to stand out. Remember shading is about light and dark, and shadows. We see them all the time just like patterns. So don’t be afraid. You can do it.
Stage 1
I tangled a tile to show my method of shading. I used Rick’s Paradox, Mooka, Nzeppel and Flux. Normally I would use my 2B and then my 5B pencil. The 5B is blacker so it gives more depth.
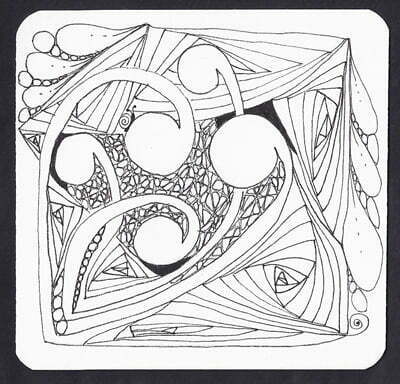
Marizaan’s original, ink-only Zentangle.
Stage 2
After tangling my tile, I added Rounding to Paradox. It is like putting butter on your bread, just because you can.
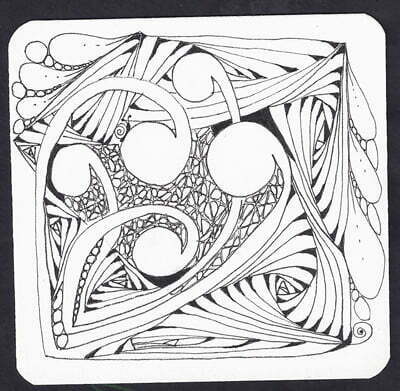
Stage 2 – the tangle enhancer Rounding has been added to Paradox
Stage 3
I want my Mooka to stand out on this tile, so lets begin.
If you used tangles with round lines, like Flux, Pokeleaf or Pokeroot, or Mooka for example, you will do your shading only on the one side of the rounding not the whole.
Note the lines I did with my 2B pencil. Only on the one side. I also made a pencil mark on the edges of Paradox to emphasize the curve.
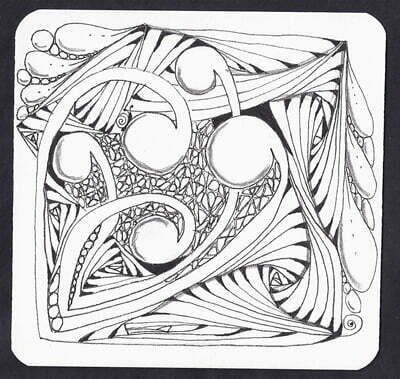
Stage 3 – pencil strokes added to prepare for shading
Use a soft touch. You can always add more graphite if you want more shading. Please note that I am not working with light at all but with the shapes of the patterns.
Stage 4
Now with your tortillion move in small circles over the pencil marking towards the inside of the shape. This makes it look round.
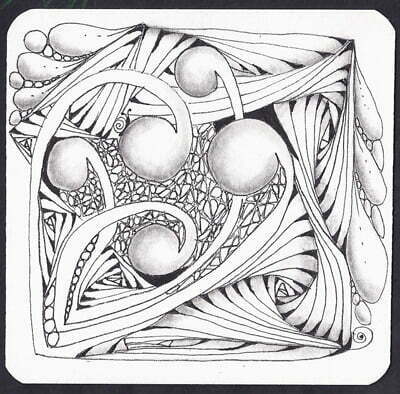
Stage 4 – Pencil strokes from Tile 3 are blended with the Tortillion
Awesome, isn’t it? You can repeat any line if you want it to stand out more. Remember, to make it darker you can use a softer pencil like 3B, 4B etc.
Stage 5
I want the Mooka to stand out even more, so I used my 5B pencil to make a line around the edge of every round shape to create a drop shadow.
Remember anything that is on top of something else will always cast a shadow. I want the shadow to be darker than the inside shading. To achieve this I used the 5B.
Again, don’t press too hard, just a little bit goes a long way.
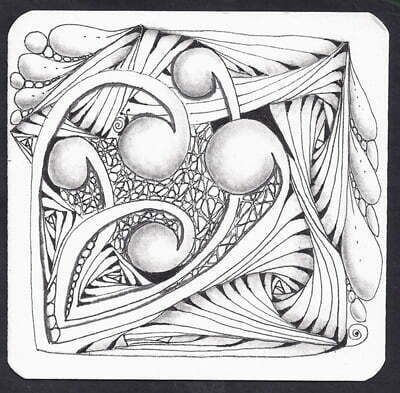
Stage 5 – Adding drop shadow to Mooka
Stage 6
Again with your blender, make small circle movements towards over the pencil line to the outside or the space you want to shade.
I used Nzeppel as a background, not shading it at all.
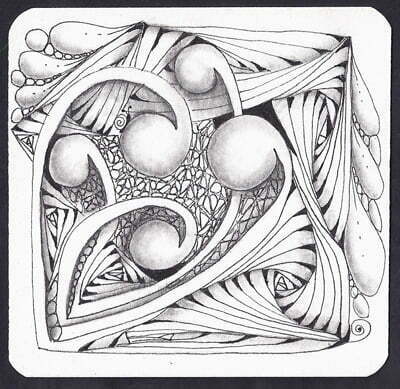
Stage 6 – Blending Mooka’s drop shadow
Stage 7
The finished Zentangle. I wanted to emphasize the round shapes of Mooka and used my Micron 01 to draw a line underneath every round shape (rounding). Just giving it a bit of weight. (Note: Only on the one side.)
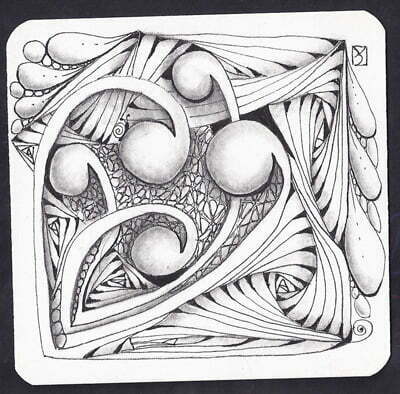
The Finished Zentangle – Pen rounding added to give Mooka weight
And lastly I added my signature “chop” to complete my Zentangle.
My Final Guidelines
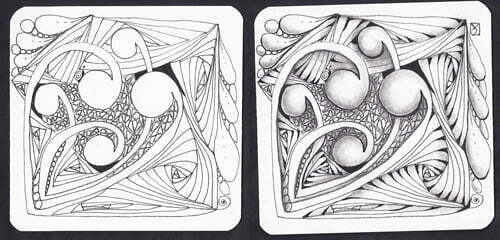
Before and After. “Shading adds dimension and depth to your tangles and just makes it come alive.”
So to review, my final Guidelines are as follows:
- Have a look at your tile.
- What do you want to stand out? A single pattern, or every pattern on its own?
- Smaller patterns look better if shaded inside the completed string. Ahh, the “elegance of limits “
- Are there any rounded lines you want to emphasize?
- Shade only on one side of a rounded pattern through your whole tile. It gives it a play of light and dark. This is not a fast rule, you can alter sides as well.
- Is there a pattern on top of another pattern? Remember something on top will cast a shadow.
- Did you use a lot of black lines? The more pen the less pencil.
- Start with your 2B pencil.
- Use a sharp pencil and blender, it just gives you more control.
- Don’t press too hard, you can always add more.
- Move your blender in small circles across the tile to the area you want to shade. You are literally spreading pigment around, so the harder you pressed on your pencil the more pigment you have on your tile.
- Make your shading darker with blacker pencils. 5B is to be recommended.
- Have FUN!
“Anything is possible one stroke at a time.”TM
* * *
Thank you, Marizaan for your hard work and sharing your knowledge with us, excellent tutorial.
I don’t think Marizaan will mind me sharing she was a little nervous when she sent her article, but didn’t she do a great job?! Please be sure to leave her your thanks and feedback in the comments. And share your own shading tips there too if you’d like.
In Part 2 of the TanglePatterns Shading Mini-Clinic coming up on Friday, CZT® Sandy Steen Bartholomew (author of Totally Tangled and more) answers your shading questions with her personal suggestions and illustrates her recommendations using tiles submitted to TanglePatterns for this series.
PS – Please remember to share on your favorite social networking sites using the icons below to “vote” and show Marizaan how much you appreciate what you learned today. Thanks!
* * *
For more tutorials on TanglePatterns, visit the TIPS & TOOLS > TUTORIALS page. There are more excellent articles there about shading art in general by Sandra Strait and CZT® Geneviève Crabe. Check it out!




Thanks to both of you for this article. I find shading is the hardest part for me. I love the tangles, getting them down, all the varieties, but without any shading they do look flat.
Even the info about the difference in pencil leads and how to find which lead I want is very useful.
Thank you again.
Stacy
Thank you so much for this, Linda and Marizaan!!
Where does a beginner go to start doing Zentangle HOw do you decide what looks good together? Thanks.
Donna,
I’m sure Linda will have some excellent advice for you, but I’ll give you my 2 cents to start 🙂 First you’ve found a wonderful resource here on TanglePatterns.com. Linda has worked very hard to provide us with so much information on Zentangle, just check out the top of the page. She has how to’s on so many patterns, all listed alphabetically, and with more added all the time.
As far as what looks good together, well that’s up to you 🙂 Just start practicing the patterns and put several together. One thing I did was to Tangle my family’s names. I took each letter of the name and picked a pattern that started with that letter then did all the patterns on a page in my sketch book. Sign up for the email patterns on the right side of this page too! You can also check out the list of Certified Zentangle Teachers (CZT’s) to see if there’s one in your area.
Hope this helps you get started, I could go on all day! 🙂
Traci
Thanks, Traci! Couldn’t have said it better myself. The main thing is to just jump in and play. Once you practice a tangle to be comfortable with learning it (and using my free steps template is a great way to learn each tangle – visit the DOWNLOADS tab at the top of the page), then you will find yourself exploring ways to play with tangles. Just follow your instincts, Zentangle is not about planning but following your intuition and having fun.
Yes, indeed! Thank you, Marizaan for this wonderful tutorial!
This shading tutorial is amazing. I realize that when I am creating a picture this is what I am missing. Shading brings my pictures to life. Thank-you so much for this amazing tutorial.
Thank you for this fantastic explanation! For us non-artists this is just the information we need to make our tangles sparkle. Thank you!!
Thanks – well done instructions – clear and do-able! Appreciate.
Awesome! Thanks for sharing this. I can’t wait to try it.
Aloha from the Big Apple! I’m a recent CZT (CZT#10) and I’m an “art newbie.” And this mini-clinic rocked my world.
A giant MAHALO, thank you, to Marizaan for the awesome tutorial and clear demonstration. And, as always, to Linda for sharing this! So helpful!!! (And I can’t wait to see Part 2!)
Thank you, Marizaan!! I love the step-by-step illustrations and instructions. Very easy to follow. I will review this more than once.
Happy Tangling!!
I understood the basics of shading, but had forgotten the ‘shadow’ idea. I’m so glad for this great information.
Thank you so much! You have no idea how much this article helped me.
Greetings and peace from Brasil!
Namaste!
Nina
Thanks Linda, for including Marizaan’s article on shading, most enlightening! I tend to mostly use a Derwent Sketching Medium Wash 4B Water Soluble Graphite pencil, which I find lovely and ‘soft’ and easily blendable. Also if I am using watercolours, it blends and melts into it quite deliciously!
Marizaan, thanks SO much for sharing your article, into which you put so much work, I found it very helpful indeed and isn’t it refreshing not to have to worry about “which side” to shade……it’s all about enhancing a shape!
Thanks again!!
Great tutorial! I loved seeing the before and after side by side.
Awesome! Thanks to the both of you! 🙂
Thank you! I find shading so difficult. I’ve been expanding with putting colour into my tangles – and I realize now it’s because I really didn’t know how to shade! Look forward to the second part.
Thanks so much, Marizaan, for such clear instructions. I’m also a new CZT (Jason and I were classmates in CZT10), and it will be fun to incorporate your tips into my tangling. Tangle on!
This article is very helpful and clear especially the information about pencil leads. Thank you so much, the pictured stages were very helpful, sometimes I had to look hard to see where the shading had been put, it was so subtle and yet made such a difference. You have inspired me.
This will definitely get pinned! Thank you both so much for the wonderful tutorial. I was looking at pencils in the art store today (before I read the tutorial), and had no idea what to buy. Now I do! Thanks.
This was a wonderful article! Shading is something that I have always struggled with, even avoided at times. You really made me understand how to use the different pencils and what a difference that can make. Thank you for taking your time to write this for us, it is a wonderful reference! I am printing it out and adding it to my CZT materials.
Kathy Shabowski, CZT #10
Geneva, Illinois
Hey, these are great tips, even I can put them to use and that’s saying something. And the contrasting before and after really help too. Thank you M.
Marizaan thank you so much for this truly awesome tutorial. I tend to think of dark and light so your emphasis on shape inspired me no end. Your instructions were well written and easy to understand. It was interesting seeing the tile come alive!
Linda, thank you for providing the platform for Marizaan to share this valuable information.
I look forward to Friday’s classes.
Thank You! This is a wonderful and helpful article. Not worrying about where the light comes from will make Zentangle even more relaxing!!!
Thanks – wonderful tutorial – shows what a difference shading can do to draw you into the image and make it come alive!
Thank you Linda and Marizaan. This will be a great resource for many of my students who are not painters nor “artists’ of any kind before Zentangle, and when I mention the word shading, look at me like a deer caught in the headlights. Truly, appreciate the information and the time you took to put it together. Kudos!
Marizaan- thank you so much for compiling such a great shading tutorial for Zentangle, this was super helpful!
Thanks so much Marizaan! What a wonderful review. As Karen Lynn noted above, I now know which pencils I want and which one’s I don’t. Your before and after pictures of your tile say it all. Just wonderful!
What an awesome tutorial! Shading is always the hardest part for me. Marizaan made it make sense. 🙂
Marizaan, this was an amazing tutorial! The before and after pix are so different. You not only illustrated the shading but also explained it. I like the idea of using a 5B as well as the 2B and also your rounding on Paradox. Mooka is much more lively after you shaded it. Thank you for your helpful tutorial — all the way from Maine, USA!
This was so easy to follow – and it answered many questions I had about shading – espeically liked the explanation about the types of pencils, and which work best on tangles. I’ll be looking at my tangles much differently now. Thank you so much for taking the time to do this!
Awesome tutorial! Thank you Marizaan!
Marizaan, your beautiful work continues to enrich my classes. I share one of your tangles with my advanced class when we delve into shading; and now I will also direct my students to this wonderful resource you have compiled. Thank you so much for your generous gesture to the Zentangle world. When we shared a cab ride to Boston last year I didn’t know your background, just the awesome fact that you flew half way around the world to attend CZT school! Your work continues to inspire me. Thank you.
Marizaan, I have been tangling for several years and realize that shading makes all the difference in the world. But when I think about it too hard, I freeze as to where to start or overdo. Thank you SO much for your work. It will help me explain the art to my students much more clearly. Thanks again.
Awesome tutorial…the instructions were great. I love the look of the shading. I kind of had given up tangling because I thought they looked flat but now I can add life to my tiles. Thanks again…
Thanks so much! I struggle with shading. It’s the hardest part of tangling for me. I feel a bit better seeing the step by step process, not feeling so lost anymore! I can’t wait for pat 2! Thank you too Linda for this fantastic recourse. I just found Zentangle about 6 weeks ago and am completely hooked. I hope to become a CZT someday and teach others this fantastic art form!
This article is fabulous! Thank you for helping with one of the harder technical art skills. Shading has always been a difficult thing for me to execute successfully. I need all the help I can get!
Thank you so much for this wonderful tutorial. I just found Zentangle about 2 weeks ago and I’m tangling like mad. Can’t wait to try your technique.
Marizaan, I really appreciate your tutorial. I have been doing Zentangle since Jan. of this year, but I really had no idea how to shade, so I just didn’t do it! This is a great help. I think I will go back in my book and see what I can do with shading.
Thank you Marizaan and Linda for this invaluable information! I didn’t really understand shading before, now I do! 🙂 Marizaan you did a wonderful job explaining how to achieve balance with shading and I really liked the step by step photos, so glad you incorporated them. The before and after really brought it all home.
Thanks again!
I feel like I have just taken an art class! I have literally gone from not having a clue to shading with confidence! I appreciate the pencil tutorial in the beginning of the article. How thorough ! Thank you Marizaan!!!
Wow, this is a wonderful tutorial. It’s very nice to follow and I love the great tips you’ve shared! Thanks so much!
That was a great tutorial with a lot of information. A lot of hard work and thought went into it and it really shows in the precise instruction and flow. I picked up a lot of valuable tips and can’t wait to go try them myself! Thanks to you both!
How wonderful! Thanks to Marizaan and Linda for sharing these skillful techniques. Like everyone else here, shading has been no-go zone for me, but not any more.
and thanks Linda for a fabulous site.
Thank you so much for this article; it’s so nice to have the illustrations and explanations handy.
Wow! I didn’t see the importance of shading ’till reading this article. The side by side illistration is really effective. And your explanations make it so clear-I want to go do a tangle with shading right away! Thank you so much for sharing the ‘mystery’ about all those letters and numbers on the pencils-I’d go out and buy a set if I didn’t already have one, (a gift from my son). Thank you for everything you have shared, Marizaan. Great Job!
Wonderful! Thank you for the tutorial. There seems to be a lot of us struggling with shading, I myself included. I have definitely found this helpful.
I want to thank both of you for this wonderful article. Marizaan, the tips and explanations you gave will go a long way in making my Zentangles and ZIA’s much more lively. Knowing that it’s more important to shade the shapes and not important to be concerned about where the light is coming from was something I never even considered. I can’t wait to try all the tips you presented. Thanks so much for sharing you knowledge.
Thank you to all for all the uplifting comments. At first I was scared to publish my thoughts, but after reading your comments I just feel grateful that the article can help you in understanding shading better. Thank’s again Linda for inviting me and for this opportunity. Happy Tangling.
Marizaan! Thank you so much for this entire instructional. I have always been confused about the differences in pencils. Now I can print out your section on pencils and take it with me to purchase the correct ones! I will be taping it on the cover of my Zentangle notebook so I will always have it (after I have it laminated so it stays fresh for a long time). And your description and ssmples of side by sides is amazingly helpful. Thank you for taking the time to share your expertise. Ss you can tell by all of these comments, you have helped many people and should be very proud of your ability to simplify the process. Much appreciated. From a Beginner!
Thank you so much for this wonderful tutorial. It is very clear and understandable. I really appreciate the giving spirit you have to teach your art to new ones!
Wonderful artical and great explanation. I taught art for 34 years, so I know about shading and pencils. I thought Marizaan presented this info in such an organized way. I read the whole article and felt refreshed! Nice job and I look forward to more!!
Marizaan , this clinic is just what the Dr. ordered! With appreciation and thanks for giving of your time to assist those of us who needed help , thanks Linda for your wonderful website.
Thank you for sharing your knowledge and talents with us. I’m now in the hunt for a 5B pencil. I’m hoping I can fashion a blender of my own. This tutorial has gone far in teaching me about shading ABC’s. Forever grateful,
Merrie
Thanks girls for the tutorial, the text was perfectly clear and the visuals detailed exactly what to do. A job well done!
Thank you Marizaan. Beautifully explained.
Thanks so much for this liberating article. I am not naturally gifted in any art which is what drew me initially to Zentangle. I liked the freedom… but then I started worrying about the shading because I knew enough to know that there are principles concerning where light falls onto an object and I don’t seem to have the eyes to see that conecpt very clearly. So I was delighted to have permission 😉 to use shading to enhance the shapes of the tangles instead!
Wow – more to this shading business than I had thought. I know it has totally altered my tangles when I have used it, and see that I need to use it more! Thanks for sharing this with the Zentangle world!
Thanks Marizaan and Linda! It is great to play, but so helpful to have this great reference! Well done! 🙂
I have been doing Zentagle for about a year or so. It has been a lifesaver for me. I have a suggestion to help compare the before & after in each step. Run the before & after next to each other all the way through the demo. It would easier to show the differences side by side. Going up & down is harder to keep track of what you are comparing.
Thanks for all the information janie
Well this is my first time even knowing about Zentangle and i find it fascinating!! I’m an artist in many forms, IE: quilting, drawing, oils etc. My curiosity got the better of me and I found this site..TY this is the best, funny thing i clicked on the shading because as an artist shading is important..but what I found is something so much freeer and whimsical and I cant wait to get me some pencils and get started..by the way ty Marizaan and Linda I learned more in a couple of paragraphs than I could taking an art class!! Now Im off to start learning what a Mooka is 🙂
Awesome! I’ve been playing with the tangles this week and am ready to kick it up a notch, and this is just what I need! I’ve been using my blue Bic ballpoint pen, but am planning to go get some actual Zentangle supplies today (now that I know I’m seriously addicted to this stuff!)
Thank you for this wonderful and informative article. I am looking forward to playing with the shading techniques discussed here and already know that it will improve the look of my tiles immensely. Thanks again!!
Thank you so much for the step-by-step demonstration. So helpful to see your tips and to see that I’ve been somewhat on the right track.
This tutorial is eexactly what I needed to bring my tangles to life. Thank you, thank you, thank you.
This tutorial is exactly what I needed to help me with shading…I’m a newbie and have fallen in love with tangling. This article will help me tremendously in my shading technique! Thanks so much for all the work that you both have provided with all the info…
I have been experimenting with shrink wrap and making tangle bracelets. The composte is black shiny shrink film. I have tried the assorted gel pens out there and was quite perplexed on the outcome of getting the ink to be smooth and easy flowing.
I went to my local arts supply store and found Galaxy Marker by American Crafts..designed as permanent, archival,opaque, and acid free. You can get them various colors.
I am working with the white Galaxy marker for the black shrink film. I am using the black and white market on a matte board.
Shrink film/wrap comes in black, white and clear.
Your post is really useful as I have tinkered with shrinkable plastic in the past. I will give it a try again. Thanks.
Thank you so much for the lesson on shading. This will go into my notebook for future reference.
Thank you for the time you spent for all of us!
Thank you so much for all this wonderful information. I have just discovered Zentangle and I’m hooked! Your tutorial helps enormously with shading. Thanks for taking the time to do it. Janet from Australia
Your tutorial on shading is a wonderful gift! Thank you for taking the time to share all these fine points with us.
I, too, had put tangling aside, feeling (in my typical self-critical “I am not REALLY an artist” manner) that they just weren’t “good enough.” Everyone I know (mainly non-artsy types) thought they were great, but I just KNEW I wasn’t “getting” something. Now I know why! While I KNEW about shading and its importance, I realized I was avoiding it, thinking I was somehow missing that artistic concept behind where the light is coming from. You made something that was previously scary to me SAFE and EASY! Thank you so much … for your brilliantly written instructions and pics, for sharing with the Zentangle community so generously, and above all (for me), inspiring me to return to something I always loved….tangling! Joyful creativity and confidence await!!!
I am honoured to be a personal friend of Marizaan. She introduced me to Zentangle yesterday and I am hooked!!! I am in awe and dreamed of patterns last
night. Thanks dear friend, you gave me a present which worth can not be described!!!
Thank you for a very clear instruction on Zentangle shading. I am art trained but can always use more insights. Today I learned more about using the tortillon tool.
Thank you for this very helpful tutorial. I’ll be watching part 2 of course. Finding the right way to shade my work has always been difficult to me, but with this help I may get it under control after all.
great how you explain the magic of the shading in words. i call it magic because for me to eplain shading with words to my students is a challenge….may be because for me it is very relaxing and somehow simple to do it. you did a great job, it helps me alot to explain it in a clear way to my next class. thanks a lot, tina-akua
Dankie, Marizaan! Well done!
Oh my goodness. This is so informative and brings the tangles to life. I am new and made tangled letters for the family for Christmas. I did not expect the reaction I got. They were thrilled. Most of them were for boys so I did not think they would enjoy them but they did. I WISH I would have seen this article about shading before I gave them but will certainly use it now. I am a very visual person and to have all the pictures in this article really helped me see the magic of shading. Thank you so much for taking the time to present this tutorial to us. Can hardly wait for the 2nd half.
Hi Linda, I’m delighted you found this so helpful. Shading in Zentangle is very different from “the rules” of art. This 2-Part tutorial is from two years ago and the link to the second part is included at the end of Part 1. You can also find Part 2 by scrolling down to the very bottom of the Part 1 page (below the “Leave a Comment” box) and you’ll find the link there too. Another way to find it is by visiting the TUTORIALS tab on the pink alphabetic menu bar – there are many more great tutorials you will want to check out!
Thank you for sharing this. I’m new to Zentangle and it was most informative!
Very glad you had these tips on how to shade. Have put them to use already!
Thankyou Marizaan for this article. I am a new tangler and just took the beginner class Jan 3/15. I was amazed to learn the HB coding for the pencils because I used to draw in high school and pencil and shading were my thing. I am so enjoying this art form and see great possibilities. I am excited to start trying different pencils for my shading!!! The before tile was beautiful but the after tile jumped out at me. It’s like it came alive!
Thanks so much for your info well done!
By the way I live in Calgary Alberta Canada and I have been to your Beautiful city in South Africa!
Marizaan, danke für wunderbare Darstellung der Schattierung eines Musters. Ich bin erst seit einem Jahr am Zeichnen und nehme jede Anregung zur Perfektionierung dankbar auf. Ich habe es nachgearbeitet und bin erstaunt wie viel Leben man einer Zeichnung geben kann.
Google translation: Marizaan, thanks for wonderful representation of the shading of a pattern. I’m only a year of drawing and take every suggestion for perfecting gratefully. I refinished it and am amazed at how much life you can give a drawing.
Thank you so much for the refresher for me any way i have been drawing and painting for several years but sort of stopped when my house was full of pictures. Now i have found tangles and i am really enjoying it. some of them i find very hard to try to duplicate but i think it is good to work until you get it.
Wonderful lesson on shading. Thank you.
This was amazing. I have been tangling for about a year now, and my tangles just were lacking. The shading tips are really simple and easy to follow. I may not draw for a few days….I’ll be busy shading all of my old strand making it” pop.” Thank you do look much!
I am new to zentangle, and I was totally flummoxed on this shading business. I do not have a background in drawing, and felt inadequate. Now, with this helpful article, I feel so much better!!! I can hardly wait to look at the numbers on my pencils!
Thanks for all the great info, Marizaan! Very well done! And I like how you gave a final summary.
Thank you for the informative article. I am not artistic by any sense of the word, so any assistance is appreciated!! I look forward to Part 2.
love your work and thank you for sharing….
I didn’t do Zentangle back in 2012 and so I missed this the first time around. I appreciate your putting these things in the newsletter because us “new” tanglers find it for the first time and also because the information is always relevant.
I’m not an “artist” but have read enough to know about the light rules and never really understood that it doesn’t matter (so much) with tangling. The way it was explained was very clear and with the different step by steps made it clear as glass. Thank you. Also, the subtle things (thickening one side of the Mookas) were made very clear. I’ve downloaded it and have put little arrows where these subtle things occur so that I can learn to use them each time I pick up a tile. Many thanks for being there for us tanglers who don’t have CZTs and depend on GOOD websites, blogs and books!
I am late joiner to the Zentangle fun. A friend told me about the fun she was having about 2 weeks ago. I have been immersed in all things Zentangle ever since! I love your tutorial on shading, thank you so much,Marizaan van Beek, for sharing your expertise with us.
Awesome tutorial! Thank you Marizaan.
Thank you for advancing our knowledge. I’ve read the above comments. I agree with them the shading is what I ha w been looking for. I stumbled on a gold mine tonight.. Thank you Linda for bringing Marizann to those of us that follow you.
Thank you so very much for this detailed explanation of the steps in shading Zentangles. I am new to this, but I really love learning to do Zentangles. You have shown us a way to really bring them alive. Again, Thanks and I for one really appreciate the effort you have put into sharing with us!
This is awesome, and will be such a big help to me, I know. I also love your signature “chop” Marizaan. I’m trying to work one out for myself, but with the initials CAC I’m not sure how to do one. I’ll keep working on it though.
I’ve seen the different graphite pencils when I visit the local art store, but never knew what they all did, until now! Thank you So Much!! Now I can go buy… And play????
Beth
Merci de votre partage. Je adore votre sites. J’ai découvert le zentangle par un livre et je vous au acheter votre dernier livre numérique trop génial. Merci de tout vos conseil.je vous lis comme une bible de zentangle . Bonne journée à vous tous depuis la France. Département Languedoc Roussillon. Nîmes.
Marizaan – thank you so much for your user-friendly tutorial on shading. So easy to follow and understand. I’d been searching for shading tips and am wondering why I didn’t go to ‘tanglepatterns.com’ first – I should’ve realised what I was after would be there. Linda, your site is fantastic – thank you. From now on in, tanglepatterns.com will definitely be my first stop for anything related to Zentangles. I’ve learnt so much. Thank you … Robby
Thank you so much for this very helpful tutorial. Appreciate the information on pencils and the steps you provided.
Thanks for this tutorial Marizaan. Lovely to find something from my CZT. A year and a half later and I’m still tangling and learning all the time. Val
Thank you so much for this tutorial! Very helpful!
Well, here we are in May, 2018 and I do believe I have discouvered this post for the first time since I was introduced to Zentangle in 2016….Linda, your page is a treasure, and, Marizaan, you have been Tangling for another 6 years since this post!!! What amazing treasures must have flowed from your pens in all that time !!! ???