


 In their introduction to Zentangle’s “Spring has Sprung” Project Pack #09, the folks at Zentangle HQ explain:
In the northern latitudes we celebrated and welcomed Spring on March 19. It is the time of year when nature comes out of hibernation and so many beautiful plants and animals begin a new cycle. Springtime is symbolic of renewal and rebirth. It is a time to take a breath and let go the years past to allow room for the growth of newly planted seeds.
This project pack will feature working in the round. Each lesson in this series will live independently but also contribute to a greater mosaic.
This series will illuminate organic tangles, reflect on inspiration from nature, and introduce some fun ways to create your own unique radiating and blossoming strings.
We will focus on ways to create balance in your compositions and play with techniques of layering tangles.
Lastly this project pack will bring light to the first step in the Zentangle Method: Gratitude.
SUPPLIES: The Project Pack is available here ($26.95) in the zentangle.com store and it’s certainly a convenient way to get all the supplies for the project. However, the first video reviews the items in the Project Pack and you might discover you have suitable alternatives in your own Zentangle supplies:
- white, gray and tan Zendala tiles
- graphite pencil, white charcoal pencil, tortillions
- Sakura Micron 05 pens in two shades of Green
- Zendala Markus Operandus for 2, 3, 4, 6 8, and 12 points — a tool Maria Thomas put together to help divide a Zendala tile into even sections. The printed tool is included in the Project Pack but Zentangle has also made it available at this link as a FREE DOWNLOAD
The following chronology is a summary of the videos for this Project Pack with links to the individual videos. Either click the Day #’s title link or the image itself to view the full video on YouTube.
For this particular Project Pack it is recommended that you watch the videos in consecutive order.
Preparation Part 1
The first of two preparation videos (16:38) with CZT Molly Hollibaugh – “Molly goes over the Project Pack No. 09 materials and shows you how to set up your tiles using a new tool, we are calling the Markus Operandus.” (See the SUPPLIES section above for the free download link.)

Step 1: At 4:06 – We begin by choosing 6 blank Zendala tiles from the White, Gray and Tan tiles included in the Project Pack, any combination of our choice. These are the 6 tiles we will be working on for the next six days.
Step 2: At 5:23 – Place one of the Zendala tiles on the center of the Markus Operandus (MO), then with a pencil place a light mark at the edge of the tile at the 1, 2 and 4 positions.
Step 3: At 6:01 – Putting the first tile aside, we take the remaining 5 tiles and mark each of them in the exact same positions as the first tile: at the 1, 2 and 4 positions.
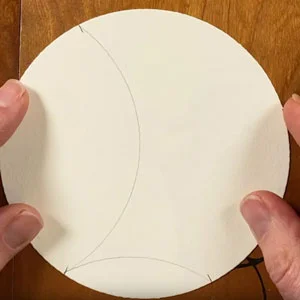
Step 4: At 7:08 – Having set the MO aside for now, Molly begins with one of the Zendalas. She uses one of the other Zendala tiles as a tracing guide to connect positions 1 and 2 with a lightly penciled arc.
Step 5: At 8:01 – She repeats the process and connects points 2 and 4 with an arc.
Step 6: At 8:52 – Repeat on all 6 tiles, “this is the string we’re going to be playing with” over the whole Project Pack series.
Step 7: At 9:42 – Molly explains “we’re not going to be taking every tile from start to finish, … we’re going to be chipping away at all six tiles as we go along.“
Step 8: At 10:04 – Molly uses the Dark Green Micron 05 (she notes you can use a Black one of you don’t have the Green, they’re using the green as a “springy” variation).
Step 9: At 10:39 – In the smallest “pea pod” shape, “we’re going to put the same thing inside all six of these tiles“.
Step 10: At 11:29 – Molly traces over the arc line defining the shape, then adds an inner aura around the shape.
Step 11: At 12:25 – She fills the space with the tangle Purk starting with a large orb in the middle of the space.
Step 12: At 13:42 – She fills in the spaces between the orbs.
Step 13: At 14:26 – “I’m going to invite you all to do that on all six of your tiles.“
When all 6 tiles are done, we are ready to move on to the next video.
Preparation Part 2
Maria joins her daughter Molly for the second preparation video (33:20).

Step 1: At 1:54 – Molly explains that before we get to the tiles Maria is “just going to do some demonstrating for a while“. They suggest simply watching the demonstration or as Maria suggests, take an Apprentice Tile and practice all the tangles on one tile because “we want you to experience each of these tangles before you do them on the Zendalas.“
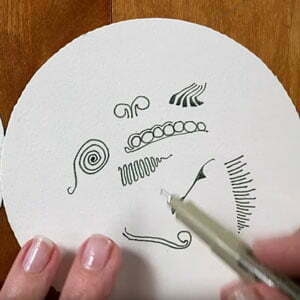
Step 2: At 3:00 – They discuss the nature of organic tangles before Maria begins her demonstrations.
Step 3: At 4:15 – Maria demonstrates how to tangle Pokeleaf
Step 4: At 7:53 – She demonstrates how to tangle Pokeroot
Step 5: At 10:40 – She demonstrates how to tangle Rixty
Step 6: At 14:30 – She demonstrates how to tangle Rick’s version of Flux
Step 7: At 16:59 – She demonstrates how to tangle her version of Flux
Step 8: At 19:19 – She demonstrates how to tangle Sampson
Step 9: At 22:36 – She demonstrates how to tangle Springkle
Step 10: At 25:51 – She demonstrates how to tangle Verdigogh
Step 11: At 31:58 – HOMEWORK: Molly instructs us to choose the tangle we think we’d like to use from the above demonstrations (watch the video demo again if needed) and place it along the same string line that Maria used. Keep the tangle leaning towards the right side, leaving the left side of the tile free.
At first Molly instructs us to place the same tangle on all six tiles, but as they discuss it they decide we can use whichever ones of them we’d like, just add one along the string on each prepared tile as directed.
When our homework on all 6 tiles is done we’re ready to move on to Day 1’s video …
Day 1
In Day 1’s video (30:40) – Molly guides us through adding the tangle Umble.

Step 1: At 1:55 – Molly explains we will only be working on one of the six tiles we prepared in the prior two videos.
Step 2: At 3:48 – Molly uses the space on the left side of the tile to pencil in “something I am grateful for today“.
Step 3: At 5:20 – She begins to add the tangle Umble with her dark green Micron 05 pen for the bands and the lighter green one to fill the bands.
Step 4: At 16:56 – After all the ink is thoroughly dry on the tile, Molly adds shading with a graphite pencil and highlights with a General’s white charcoal pencil.
Day 2
In Day 2’s video (36:16) – CZT Julie Willand from Zentangle HQ uses the tangle Marasu as her foundation and also fills it with a fragment and ‘Nzeppel.

Step 1: At 1:55 – Working with another prepared tile. Before we get started on the tangling part of today’s video, as Molly did yesterday with her Zendala, Julie adds her gratitude sentiment in the left space of her Zendala tile.
Step 2: At 3:08 – Julie begins with the dark Hunter Green Micron 05, and in the right side section of the tile she begins to “draw a big Marasu“.
Step 3: At 4:09 – She adds two more large Marasu shapes in the remaining space of that section.
Step 4: At 5:20 – In the first Marasu shape, she adds the typical Marasu bands.
Step 5: At 8:26 – She fills in every other space within the bands.
Step 6: At 12:00 – With the lighter green Micron 05, Julie adds an aura to each of the remaining bands.
Step 7: At 12:36 – Returning to the darker green Micron 05, Julie adds a fragment to each by adding strokes to divide the Marasu bands roughly into squares.
Step 8: At 15:05 – With the light green Micron, she fills each square with a fragment.
Step 9: At 19:55 – Switching back to the dark green Micron, Julie works on the third Marasu shape and fills it with the “grid” lines of ‘Nzeppel.
Step 10: At 21:19 – Switching to the light green Micron, she “squishes like an egg or a little nerf ball” into each of the spaces created by the dark green grid.
Step 11: At 24:15 – Julie shades the Marasu with a graphite pencil and adds highlights with a General’s white charcoal pencil.
Step 12: At 34:00 – Once her shading and highlights are done, she restates some of the tangle lines with the dark green Micron.
Day 3
In Day 3’s video (9:10) – Zentangle co-founders Rick Roberts and Maria Thomas appear and Rick keeps Maria company as she tangles Knightsbridge.

Step 1: At 0:50 – After adding her gratitude word to the left side of the Zendala, Maria begins to add the tangle Knightsbridge to the right side of her tile using the dark green Micron 05 pen.
Step 2: At 0:58 – She divides the section into four spaces, planning to add Knightsbridge going in four different directions. Rick explains the origin of the name for this tangle.
Step 3: At 2:42 – Maria changes to the lighter green Micron 05 and begins to color in each square created by the foundation she just created.
Step 4: At 3:15 – She explains the “kissing corners” technique for filling in the checkerboard.
Step 5: At 5:34 – Using the darker green, she restates some of the initial grid lines.
Step 6: At 6:10 – She adds shading with a graphite pencil.
Step 7: At 8:30 – She adds highlights with a General’s white charcoal pencil.
Day 4
In Day 4’s video (12:36) – With Maria keeping him company, Rick tangles his version of Flux then inspired by a piece of malachite, adds auras radiating out to fill the right side section of the gray Zendala tile.

Step 1: At 0:26 – with the dark green Micron 05, Rick tangles his version of Flux on the string between the two large sections.
Step 2: At 3:11 – Inspired by a piece of malachite, Rick uses its shifts from light to dark as his inspiration to come up with a formula (shown at 3:41) of thick and thin strokes he plans to aura the Flux with.
Step 3: At 3:49 – With the light green Micron 05, Rick lays down the first aura of the Flux.
Step 4: At 4:34 – Changing to the dark green Micron 05, Rick continues to add auras.
Step 5: At 6:28 – Rick realizes he forgot to say what he was grateful for, and adds the word Air to the left side of the tile, explaining the reason for this choice.
Step 6: At 7:02 – “He’s going off in a different direction,” adding the auras in a “corner” of the previous auras and creates a layering effect.
Step 7: At 7:44 – He adds shading to Flux with a graphite pencil and smooths it with a tortillion then uses the graphite on the tortillion to add “a little bit a smiley face” to the orbs.
Step 8: At 9:53 – He adds graphite to the aura section emphasizing the curvature created by the lines.
Step 9: At 10:56 – With a General’s white charcoal pencil he adds highlights.
Day 5
In Day 5’s video (28:45) – CZT Martha Huggins chooses her Zendala tile with Verdigogh as the dividing organic tangle and adds California tangler Barbara Finwall’s Zonked tangle to the right side section.

Step 1: At 2:04 – Martha adds her gratitude message to the left side of the tile, “Walks“.
Step 2: At 2:36 – With the dark green Micron 05, Martha “maps out a grid” as the base for Barbara Finwall’s tangle Zonked and lays in an X and a center diamond in the first square.
Step 3: At 6:41 – Switching to the light green Micron 05, Martha adds auras in each space and tops each aura with rounding.
Step 4: At 8:42 – Changing back to the dark pen, Martha adds the X and diamond centers to each of the grid’s squares, noting as she finishes the meta-pattern formed and that she enjoys going back to “sculpt” the center diamonds into a nicer shape.
Step 5: At 12:47 – Changing to the light green pen, Martha adds auras to all of the remaining spaces.
Step 6: At 16:42 – Martha explains the importance in aura-ing to keep the spaces between auras equidistant from each other, a “deliberate space“.
Step 7: At 20:51 – “So now I’m going to do a little bit of shading.“
Step 8: At 25:58 – She adds highlights with a General’s white charcoal pencil.
Day 6
In Day 6’s video (15:27) – With Rick keeping her company, Maria tangles Diva Dance with some fun add-ins.

Step 1: At 0:07 – To begin, Maria has chosen her tile with Sampson as the organic tangle dividing the spaces and adds her gratitude word: “Rick”.
Step 2: At 0:30 – With her light green Micron 05, Maria “down a beautiful squiggly line and we’re doing a tangle called Diva Dance, but you know I couldn’t just do plain Diva Dance, that’s not my style. … so I came up with a bunch of different things we can add within Diva Dance.“
Step 3: At 1:10 – Maria adds in her first different shape, “like a court jester hat“.
Step 4: At 1:37 – She adds an aura going around the shapes.
Step 5: At 2:27 – She adds Fescu tendrils. “Making shapes that the auras will have to go around.“
Step 6: At 2:59 – She adds the next aura.
Step 7: At 3:50 – She adds some traditional Diva Dance “thickening” of the line, like rounding.
Step 8: At 4:17 – She adds several small shapes growing from the aura, first showing another tile where she had explored some different embellishments to add.
Step 9: At 5:45 – She continues to add auras and shapes to the right side of her initial squiggly line, including perfs (6:45) and a spiral (7:40).
Step 10: At 9:34 – She adds Pepper in one of the interior spaces.
Step 11: At 10:05 – She switches to the left side of the Diva Dance squiggly line and adds a Mooka element growing from the line and some “antennae“.
Step 12: At 11:36 – She adds “a little bit of Knightsbridge“, followed by more perfs.
Step 13: At 12:46 – Rick observes, “there’s a lot of times where Maria will pause and sort of digest where she is, and we encourage you do that. Look at your tile, maybe hold it at arm’s length, turn it this way and that.“
Step 14: At 13:00 – Maria switches to the dark green Micron 05 and goes over some spots “just to give it some depth“.
Step 15: At 13:42 – With the graphite pencil she adds shading.
Step 16: At 15:07 – With the General’s white charcoal pencil she adds highlights.
Day 7a – Ways to use the Markus Operandus to create unique Zentangle Strings
In the first of two final day videos of Project Pack 09 (12:19) – Rick and Maria explore a PP09 tool, Markus Operandus and the endless ways you can use it to create new strings for your Zendalas and other Zentangle tiles.

Step 1: At 0:41 – Maria describes the layout of the Markus Operandus (MO) tool (free download link here).
Step 2: At 1:41 – She displays one of the string patterns it’s possible to create using the tool and with each tile below she shows how she created the string.

Step 3: At 2:40 – A second idea with an 8-pointed star string.
Step 4: At 3:26 – Maria notes that instead of tracing the tiles on top of the MO, “if it’s easier for you you can mark the little divots and then take it away and then work from there“.
Step 5: At 3:35 – A 3-pointed flower string.
Step 6: At 4:21 – “A cool trapezoid, two rectangles.” Rick saw 2 rectangles, and Maria saw 2 kite shapes.
Step 7: At 5:08 – A string using all 12 marks on the MO.
Step 8: At 5:50 – Another string using all 12 marks, “the little diamond shapes will give you 12“. This example creates 3 overlapping squares. The points are connected by hand, there are no rulers in Zentangle, we are only using the tools that we have.
Step 9: At 6:35 – A string of “moon shapes“.
Step 10: At 6:58 – “An unanticipated string.” created by doing the previous “moon shapes” opposite directions (using opposite poles).
Step 11: At 7:20 – A string that plays with opposite arcs.
Step 12: At 7:43 – Rick takes over to demonstrate how he used the MO tool with other Zentangle tiles. His first tile used opposing arcs and then he positioned a Bijou tile in the center and traced it.
Step 13: At 8:26 – “That led to, what if we did it with a different shape“. This string uses a 3-pointed Flower with a 3Z tile traced in the background behind the flower.
Step 14: At 8:50 – “Now I’m on a roll … what could we do just with the tiles themselves?“
Step 15: At 8:58 – Rick shows how he used a regular square tile to trace a string on a 3Z tile.
Step 16: At 9:30 – The reverse of the above, Rick uses used a 3Z tile to trace a string on a regular square tile.
Step 17: At 10:05 – He used a Zendala tile to trace a string on a regular square tile.
Step 18: At 10:22 – He used a Zendala tile to trace a string on a 3Z and ponders what it would look like if several of these were done in the same way and arranged together in a mosaic.
Step 19: At 10:43 – He used the MO to mark a Zendala tile and then a Bijou tile to “connect the dots” to create another string. “I used a Bijou because it has a slightly rounder corner than the square tile.“
Step 20: At 11:14 – He marked another Zendala tile with 6 points using the MO, and used alternating Bijou and 3Z tiles to create a “Star Trekky looking thing“.
Step 21: At 11:40 – “This is just a fun idea of all the things you can do with this lovely tool.“
Day 7b – Wrap-up and Mosaic
In the final video in the Project Pack 9 Series (6:51) – Rick and Maria look at how all of our completed tiles fit together as one piece.

Step 1: At 0:34 – Rick and Maria bring back some of the Zendala tiles that we have worked on over the whole series.
Step 2: At 1:20 – First they arrange all six tiles in a Flower of Life shape.

Step 3: At 2:10 – Rick explains that Maria had the idea to fill in the part of each tile where we had put our gratitude messages and Maria said she wanted to add a bit of color to it.
Step 4: At 2:40 – The first thing she did was add two more “pods” on each of the six tiles. By adding more pods there are more options on how the six tiles go together.
Step 5: At 4:09 – They explore various ways and combinations of arranging different numbers of tiles in sets.

Step 6: At 4:20 – One of the tiles from today’s Part a video “called” to Maria, “so I said what if we tangled that and that became the basis for another set.”

Step 7: At 5:48 – “This is just another idea of things you can do, and you can add more and build this out.”
And there you have it. This recap of Zentangle’s Project Pack #09 will make it easy for you to find all the related videos and any parts of them you may wish to refer to again.
Remember the images above are linked to their YouTube video, simply click the image to go to the video. Also: each of the complete videos are included on the corresponding tangle’s page on TanglePatterns.
For a complete list of Zentangle’s Project Packs click the PROJECT PACKS link in the pink alphabetic tangle menu bar.
|
.oOo. |
|
Enhance your Zentangle experience while supporting TanglePatterns: |
|
BRAND NEW! TanglePatterns.com TANGLE GUIDE, 2026 Edition |
|
 |
The 15th Edition of the TanglePatterns.com TANGLE GUIDE is an instant-download 123-page interactive digital eBook/PDF containing over 2,300 tangles on the site from May 2010 through December 31, 2025. It's a great resource and a must-have digital tool for using the site. Visit the STORE > E-BOOKS page and help keep TanglePatterns.com going by getting your copy now! |
|
"Linda, Thank you! I was relying on too few and getting stuck after 3 years of daily working with Zentangle. This has inspired me to ‘begin again’ with renewed excitement." ~ Barbara R. |
|
| See the BOOK REVIEWS page for more details on its features and view a sample page. Note: this is a digital product downloaded immediately when ordering, nothing will be physically mailed to you. | |
| If you're new to Zentangle® and tangling, my TanglePatterns.com BEGINNER'S GUIDE TO ZENTANGLE is just what you need to get started. Also available en Français and en Español. | |
|
|
|
 |
This is the only Zentangle book you'll ever need: the fabulous Zentangle PRIMER Vol 1. It's your CZT-in-a-book by the founders of Zentangle®. For more about the content and to read the rave reviews, visit the BOOK REVIEWS tab. |
| Available in KINDLE format for $9.99. Spanish Edition here. Japanese Edition here. | |
| "Absolutely the best Zentangle Book yet! As an accomplished artist I used to think I did not need instruction on this art form. How wrong I was! My tangling improved by leaps and bounds after reading this book. If you think you have Zentangle down then you need this book more than ever!" ~ Kris H | |
|
|
|
|
.oOo. |
|


Thank you for this extensive summary of Project Pack 09 – really appreciate all the work you’ve done in breaking it down & the whole presentation is such a valuable resource for finding specific aspects.
Thanks so much Evy, your appreciation is appreciated 🙂 I’m pleased you find these summaries as useful as I do.
I was so proud to have my tangle “Zonked” used in Project Pack 9 and they even used my name.
They wouldn’t have known about it if it weren’t for you, Linda, and your wonderful website.
Barbara
Thanks, Barbara. I was very pleased to see Martha give you credit for your tangle, congratulations!