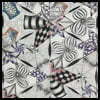
 “Zentangle Project Packs are a curated collection of supplies that pair up with an online video tutorial, or series of tutorials, all on the same theme.
These packs are numbered and made available for purchase prior to the release of each video in the series. Enjoy the Zentangle tools and tiles as you tangle along with Rick, Maria and others from Zentangle HQ.”
From the video introduction to Zentangle’s Project Pack #17:
“A kaleidoscope is an instrument that has tiny pieces of glass or plastic encased between flat pieces of clear glass and mirrors that are specifically arranged so that the small pieces of colored glass or plastic reflect and create beautiful patterns. As the bits of colored glass move, so do the patterns, never duplicating the same pattern twice. The kaleidoscope was invented by David Brewster in 1817. He named his invention using the Greek word kalos, meaning beautiful, and the Greek word eidos, meaning shape. What a perfect name. One could use this pairing of words to describe much of the art we create using the Zentangle Method™.
Project Pack 17 is inspired by the kaleidoscope of our lives. We will honor the artistry of the patterns they form as they pair and layer with others to form new patterns and create works of art. Taking advantage of the geometric shapes of tiles, we will gradually guide you through adding tangles to the tiles and watch how they interact with other tiles to create meta-patterns that change as you rearrange the tiles, like a kaleidoscope. We will explore a fun selection of tools that allows us to dig deep into layering shades of gray with accents of jewel tones.”
SUPPLIES: This Project Pack is available here ($32.95) in the zentangle.com store and it’s a convenient way to get all the supplies for the project. However, the first video reviews the items in the Project Pack and you might discover you have suitable alternatives in your own Zentangle supplies:
- Sakura Micron 01 pen, Black
- Sakura Micron 01 pen, Light Gray
- Sakura Micron 01 pen, Dark Gray
- General’s Pastel Chalk pencils: 2 random colors (for a color chart and description of the entire range of General’s® MultiPastel® #4400 Series colors see this Project Pack)
- Zentangle graphite pencil
- tortillions
- (24) white 3Z Zentangle tiles: 3 different sets of six pre-strung tiles plus 1 set of six blank
The following chronology is a summary of the videos for this Project Pack with links to the individual videos. Either click the Day #’s title link or the image itself to view the full video on YouTube.
CZT Molly Hollibaugh recommends we watch Project Pack videos completely through once before beginning our tiles:
“You’re going to have a little more confidence, you’re going to be a little more aware of what’s happening next. Then you might try something different, you might explore it in a different way”.
Jump to: Day 1 – Day 2 – Day 3 – Day 4 – Day 5 – Day 6 – Day 7 – Day 8 – Wrap Up
Introduction
NOTE: For this Project Pack IT IS RECOMMENDED TO WATCH THE VIDEOS IN SEQUENCE starting with this Introduction video.
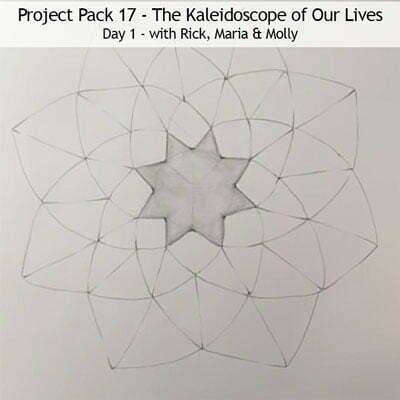
In the introductory video (14:36) – Rick, Maria and Molly introduce us to this Project Pack, explain the Kaleidoscope theme, and Maria demonstrates an alternative Dreamcatcher version to work with (shown in this illustration) for those who do not have the supplies in this Project Pack.
Step 1: At 00:01 – Rick, Maria and Molly introduce themselves and Maria gives an overview of the theme of this Project Pack.
Step 2: At 02:56 – Molly explains the project was inspired by Zentangle’s 3Z tiles. Each Project Pack contains 3 of the 6-available pre-strung 3Z tiles, and 2 General’s Pastel Chalk Pencils, so everyone’s Pack will contain different sets of pre-strung tiles and pair of colored pencils.
Step 3: At 05:26 – Molly points out that the approach to this Project Pack is different from previous ones in that “we’ll be doing a little bit on a couple of tiles, the next day we’ll be doing a little bit on some other tiles, and then we’ll come back and revisit some of the tiles we’ve already tangled. So this Project Pack is sequential. So you’re really going to want to start with Day One and then follow with the days that come after it. You can’t really skip around.“
Step 4: At 05:56 – Rick explains that Maria is going to walk us through some alternate supplies in case you did not get the Project Pack.
Step 5: At 06:30 – Maria walks us through “an alternate option” for those unable to get a Project Pack.
Step 6: At 07:05 – On an Opus tile, or any large sheet of paper we want to work on, we’re going to do a string that will enable you to exactly pretty much do what we’re doing.
Step 7: At 07:13 – Rick explains, “We counted our all the spaces in the Project Pack and there’s 72 spaces, and we’re going to give you 72 spaces in this string.”
Step 8: At 07:22 – Maria proceeds to create the string which is the tangle Dreamcatcher by CZT Daniel Lamothe.
Day 1
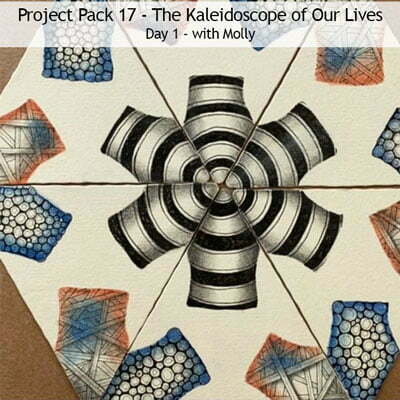
In Day 1’s video (39:26) – Molly works with one pre-strung design and fills the corner sections with Tipple, Hollibaugh and Braze/Striping. For our homework, we’re to finish the remaining 5 tiles of the same pre-strung design so we have something like the mosaic in the following illustration. (Our pre-strung tile design may differ from this one.)
Step 1: At 00:00 – Molly introduces herself and this Project Pack and reminds us that we should watch the Introductory video first, especially if we weren’t able to get the Project Pack because an alternative way of following this Project Pack is provided there.
Step 2: At 02:04 – She displays the contents of the Project Pack and introduces two new Gray Microns: a cool gray and a lighter cool gray.
Step 3: At 03:11 – We each have 3 different designs of pre-strung 3Z tiles, Molly instructs us to separate and group our tiles into the 3 different designs.
Step 4: At 04:41 – After showing us all 6 designs, Molly separates two specific ones that she’s going to modify and if we have either or both of these we’re to do the same as she proceeds to add extra string lines to those two designs. We’re do add those lines on all 3 of those particular tiles. IF YOU DON’T HAVE THESE TWO PARTICULAR TILES YOU CAN SKIP AHEAD TO THE NEXT STEP.
Step 5: At 09:47 – Molly suggests we put the tiles in 3 stacks at the top of our drawing space. “I want you to choose just one of those stacks that we’re going to work with today … but I actually only need one tile to begin, so you can put the rest of those tiles aside and we’re going to be revisiting them toward the end of this lesson.“
Step 6: At 11:05 – “So you should have just one pre-strung tile in front of you right now“, and our Project Pack tools nearby, as Molly moves to the first step in the Zentangle Method of gratitude and appreciation and talks us through some moments of pause and mediation …
Step 7: At 13:58 – She instructs us to choose one of the spaces at a corner of our tile, and we’re going to tangle Tipple.
Step 8: At 14:42 – “We’re going to be working just the corners today, and just pick one space and we’re just going to fill one at a time so don’t jump ahead.“
Step 9: At 15:49 – With the Black Micron 01, Molly chooses one corner and carefully smooshes Tipple‘s orb shapes into the space and fills the interstices with ink.
Step 10: At 19:03 – With the Light Gray Micron 01, she creates an inner aura in each Tipple orb.
Step 11: At 21:17 – She begins to add color (Indigo Blue #4403) shading around the edges of the Tipple section with the Pastel Chalk pencil. “I’m putting it down pretty heavy-handed because I want it to be really intense near the edges and then have it fade toward the middle.” She blends the color towards the middle with the tortillion, leaving the middle space white for now. “Your tortillions should be specific to the color so you don’t muddy up the color.” Molly uses this one for her blues.
Step 12: At 23:43 – For her next tangle, keeping the Tipple section to her left she moves to the next corner and with the Dark Gray 01 she adds Hollibaugh.
Step 13: At 26:00 – Changing to the Light Gray pen, she adds detail to Hollibaugh by putting a stripe right through the middle of each board.
Step 14: At 27:10 – She adds shading with the graphite pencil, emphasizing how a few of the boards fall behind the others. Next she adds shading at the tip of the tile then blends the graphite with a tortillion.
Step 15: At 28:40 – With her second color of Pastel Chalk Pencil, red (Sanguine #4429), she adds color around the outside then uses her red tortillion to blend the color towards the middle.
Step 16: At 29:36 – She adds a tiny bit of blue in the top corner and blends it with her blue tortillion.
Step 17: At 30:29 – Molly moves on to the last space, and with the black Micron she adds Braze/Striping. So we’ll have texture with the Tipple section, layering with the Hollibaugh section, and now boldness with the Braze section on the same tile. “Braze is a tangle … if you jumble up the letters it spells zebra, so it’s all about the stripes.“
Step 18: At 36:01 – After cautioning us to make sure the ink is dry, Molly adds graphite to the edge of the section and blends it towards the middle with her graphite tortillion.
Step 19: At 37:20 – “For your homework I want you to create … five more of these, so you have six total.“
Step 20: At 37:58 – “We will return tomorrow for more tangling and we’re going to gradually be filling in all of these pre-strung tiles.”
Step 21: At 38:25 – For those who don’t have the Project Pack, but instead are working on the large Dreamcatcher version Maria demonstrated in the Introduction, Molly explains the procedure to work on that from today.
Day 2
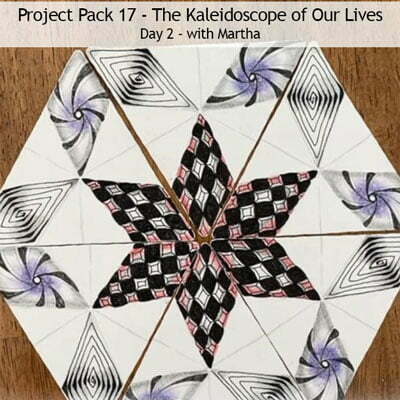
In Day 2’s video (29:23) – Martha works on the second set of 3Z tiles, adding Knightsbridge, Spoken then a single “giant” Printemps in the corners of the tile. For our homework, again we’re to finish the 5 tiles in the set just as we’ve done the first tile today.
Step 1: At 02:27 – After introducing herself and taking us through a moment or two of gratitude and appreciation, Martha shows us which one of the six pre-strung 3Z tiles she’ll be tangling on today. Once again we’ll be working just in the corners of the tile we’ve selected, and she begins with the Black Micron 01 and the tangle Knightsbridge.
Step 2: At 08:42 – “And now I’m going to do something a little bit different and I’m going to add a feature we call coffering. Inside each one of these square that we didn’t fill in, I’m going to put a a four-sided shape …” She continues to finish the coffering inside the Knightsbridge shapes.
Step 3: At 11:30 – Martha moves on to the next corner, and with the Dark Gray 01 she adds “a weighted Spoken“. We also call this technique peppering.
Step 4: At 16:40 – With the Light Gray 01, Martha adds auras on each side of the weighted lines.
Step 5: At 17:44 – For the last corner Martha uses the Black Micron to add “One giant Printemps“, following the shape of the section so it’s more angular. She then adds rounding to some of the edges.
Step 6: At 21:05 – After the ink has dried on all the sections, Martha adds color to her tangles beginning with her Scarlet Pastel Chalk pencil on the edges of the Knightsbridge section. She blends it out with a tortillion. She then adds a perimeter of graphite inside the red.
Step 7: At 23:51 – For the Spoken section, Martha uses her Violet Pastel Chalk pencil then smooths it out with a tortillion. She then adds graphite around the edges of the section and blends it out.
Step 8: At 25:32 – Martha adds graphite over the rounded corners and the tips of the Printemps section.
Step 9: At 26:55 – She shows how all 6 tiles completed in the same way can be put together various ways to create different mosaics. She emphasizes that it’s important for the finished project to maintain the same sequence/orientation of the tangles in the corners of all six of our tiles.
Step 10: At 28:50 – “Let’s take a look at the progress on our alternative project with the larger piece for those people who are working in a different way.”
Day 3
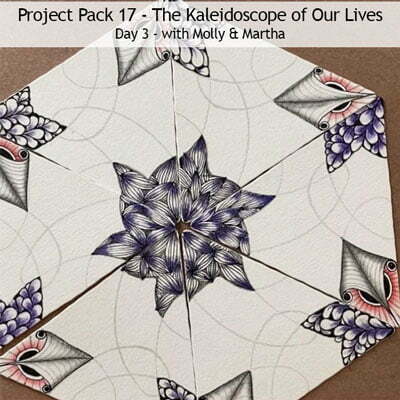
In Day 3’s video (31:47) – Molly and Martha remind us that this particular Project Pack is intended to be done in sequence and they tangle the last string in our three sets of 3Z tiles using Well, Well, Who, Flux and Ravel.
Step 1: At 02:05 – After reviewing this Project Pack, Molly introduces the pre-strung 3Z tile she’s working with today. We should each have 1 set of unused tiles left and those are the ones we’ll use today. She then begins with the beginning steps of the Zentangle Method: gratitude and appreciation.
Step 2: At 04:52 – Molly starts with the tangle Well, Well, Who using her Black Micron 01. She demonstrates how the fragment should be placed on the other two types of strings as well.
Step 3: At 10:58 – With her Light Gray Micron, she adds detail to the Well, Well, Who.
Step 4: At 13:43 – She demonstrates how that would look on the other two sets of strings for those who are working with them.
Step 5: At 14:42 – She adds shading to Well, Well, Who with the graphite pencil and blends it out with a tortillion.
Step 6: At 16:08 – She adds color with her Scarlet Pastel Chalk pencil then blends it out with a tortillion.
Step 7: At 17:47 – She turns the tile to the next corner section and begins to add Flux.
Step 8: At 20:35 – She adds detail to Flux with the Light Gray Micron.
Step 9: At 21:28 – She adds “a purple-ish color” (Violet 4411) to the Flux section with the Pastel Chalk pencil and blends it out.
Step 10: At 23:23 – Molly hands the tile off to her sister Martha to be completed.
Step 11: At 23:56 – Martha adds the tangle Ravel to the last corner of this tile.
Step 12: At 26:40 – She switches to the Light Gray Micron to fill in the interstices.
Step 13: At 28:17 – She adds Violet Pastel Chalk pencil to the Ravel section and smooths it out with the tortillion.
Step 14: At 29:48 – Together they show how all six tiles look together and how the mosaic can be rearranged like a kaleidoscope creating different patterns.
Step 15: At 31:04 – They show what the alternate Dreamcatcher project looks like at this stage.
Day 4
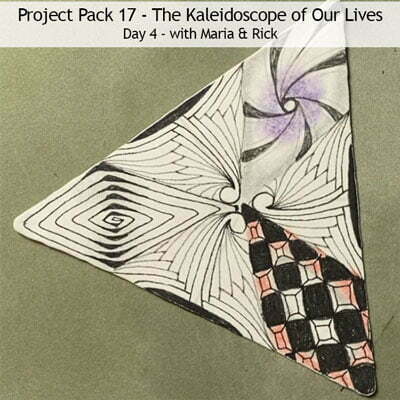
In Day 4’s video (12:47) – With Rick keeping her company, Maria tangles a Crescent Moon, with Mooka and Betweed in the remaining space on Martha’s Day 2 Tile.
Step 1: At 00:31 – After explaining that this series should be done in sequence starting with the Introductory video, Maria explains that she’s using the tile Martha did in Day 2 and she’ll be working on the remaining spaces in the tile. She begins by adding a crescent shape centered in the middle along the edge of the tile.
Step 2: At 01:03 – She takes another tile from that set and matches it up to the crescent shape she just did and make another crescent the same size and shape as the first. “So I’m going to imitate the shape of that on each one of the sides on each of the tiles … and I’m going to put all of these crescents down first on all of the sides of my tiles.“
Step 3: At 02:49 – The next steps is to add “a Mooka-ish tendril” going from the center of the Crescent Moon to the top of the section.
Step 4: At 03:50 – “So we’re going to aura around that Mooka frond,” she first puts an aura around the Crescent Moon shapes, then (04:37) adds a tethered aura on each side of the Mookas, working on one Mooka after the other and rotating the tile.
Step 5: At 05:27 – After the first round of auras on the Mookas is finished, she returns to the Crescent Moon to add another aura to them, “and this aura is going to go to the very edge and this is going to allow all of these to match up when you put them side to side.“
Step 6: At 05:53 – With the Dark Gray Micron, she adds auras back and forth like Betweed, creating a woven effect.
Step 7: At 08:45 – Maria repeats this entire process on another tile, “once more so you can follow through and then I’ll let you do all four of the rest of your tiles on your own.“
Step 8: At 10:35 – She adds some rounding under the Mookas for an accent and then adds graphite in the middle of the tile.
Step 9: At 11:32 – Using a different pre-strung tile she shows us how today’s tangles look when added to a different string.
Step 10: At 11:41 – She puts today’s tiles together in a mosaic demonstrating “this whole kaleidoscopic impact“.
Step 11: At 12:08 – She shows how progress is coming on the Dreamcatcher version of this project.
Day 5
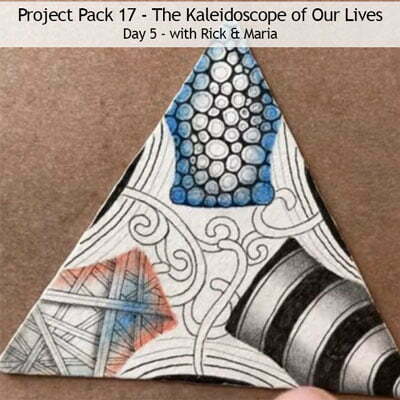
In Day 5’s video (14:11) – With Maria keeping him company, Rick tangles Hollis on the set of tiles Molly began on Day 1.
Step 1: At 00:00 – Rick begins by showing all three sets of tiles we’ve been working on, he’s going to work on the set Molly completed in Day 1.
Step 2: At 00:52 – With his Black Micron 01 pen, “I’m going to use one of Maria’s tiles as a reference so that when we put these tiles together in a kaleidoscope, they’re going to fit together,” and he adds an arc matching the Crescent Moon on Maria’s tile and fills it in. He repeats this on the other two sides of the tile.
Step 3: At 02:52 – He then uses his tile as a reference to repeat the crescents on the remaining tiles.
Step 4: At 03:22 – With the Dark Grey Micron 01, Rick adds Hollis growing from the middle of the crescent.
Step 5: At 04:42 – He adds two auras around the crescent and going behind it.
Step 6: At 05:46 – With the Dark Gray pen he adds “Hollis-like sprouts that branch out from that first one“.
Step 7: At 07:14 – He aligns a second tile next to the first one’s Crescent Moon and uses that as a guide to make the next Hollis stem emerge from the same spot as if it is growing from the first one.
Step 8: At 08:20 – “Once the first set of fronds are down, we’ll put our auras in with a Black pen.”
Step 9: At 09:20 – “Once I’ve got that down, I’m going to take my Light Gray pen and just add a couple more auras, sort of like ripples on a pond that are fading away as they expand.“
Step 10: At 10:45 – On another tile in this set, “I just want to show you a couple other approaches” and using the Dark Gray pen he adds another type of Hollis frond and completes the tile with the auras and more Hollis.
Step 11: At 13:27 – “Have fun with this and when you’re done you can put them together on your desk.“
Step 12: At 13:38 – He shows how the Dreamcatcher version is looking at this stage.
Day 6
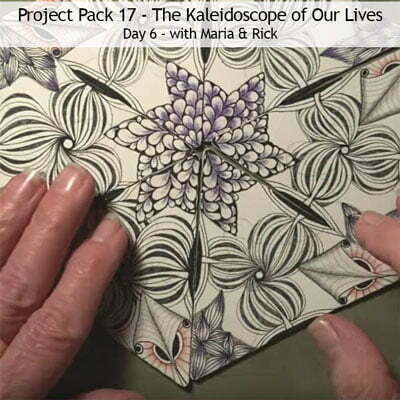
In Day 6’s video (11:58) – With Rick keeping her company, Maria completes the final section in the last set of tiles using the tangle Gourdgeous.
Step 1: At 00:43 – Working on the final remaining set of tiles that were begun by Molly and Martha, with the Black Micron 01 Maria adds the black crescent the same as we’ve done the last two days: using another tile as a guide so they match up when placed together in a mosaic.
Step 2: At 01:31 – She uses Rick’s Hollis from yesterday’s tile to mark the Crescent Moon so she has a starting place when she continues. She completes all three sides in this manner.
Step 3: At 02:34 – “We’re going to do a tangle called Gourdgeous,” with the Dark Gray pen. She adds an orb to the middle of the tile and using take-of-and land, she adds an S stroke from the orb to one of the marks she made earlier and repeats that to land on the second mark.
Step 4: At 03:14 – Maria repeats this on the other two sides of the tile.
Step 5: At 04:26 – She adds a “tethered aura” to one side, and fills in the space created, “then we’re going to continue to do that over and over, sometimes putting down two of these tethered lines before we add the darkness … and there’s no rhyme or reason other than what comes out of your pen.”
Step 6: At 05:48 – “You can see now I’m going to have those weighted lines going towards the bottom, drawing behind those beautiful tangles that Molly or Martha did.” Rick notes that there’s a feeling of Diva Dance.
Step 7: At 07:42 – She auras the Crescent Moon so it makes Gourdgeous appear to be growing out of it.
Step 8: At 07:57 – Turning the tile, Maria repeats the same process on the second side, adding Gourdgeous and then auras.
Step 9: At 08:35 – She repeats this on the third side of the tile.
Step 10: At 09:46 – She repeats the entire sequence on a second tile in the set of six.
Step 11: At 11:12 – Maria has assembled all six tiles into a kaleidoscope mosaic.
Step 12: At 11:40 – They show the Dreamcatcher version at this stage.
Day 7
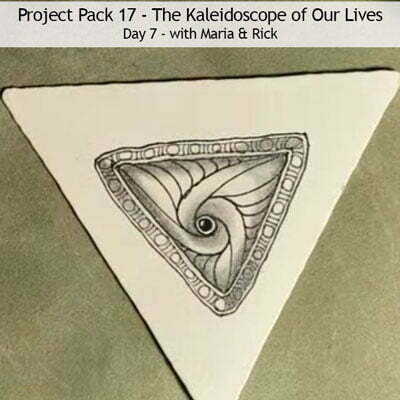
In Day 7’s video (21:37) – With Rick keeping her company, today we tangle more versions of Well along with Maria on final section in three tiles in the last set of blank 3Z tiles from this Project Pack.
Step 1: At 00:00 – The video begins with a regular square Zentangle Maria explains she had sitting on her desk and she felt it would make “a quick demonstration to show people just how magical Zentangle can be.“
Step 2: At 01:29 – “So grab your 3Z and a Black Micron 01“, and Maria makes a triangle then adds a circle within that.
Step 3: At 02:06- “We’re going to shoot some number 9’s (noting this is the third time we do a version of Well in this Project Pack), and we’re going to bring these 9’s down to the corners of the triangle.“
Step 4: At 02:42 – “I’m going to do tethered auras here,” as she adds one into each corner of the triangle.
Step 5: At 03:13 – “We’re going to do another tethered aura just on the other side so it creates sort of like a leaf shape or a petal shape.“
Step 6: At 03:30 – She adds additional auras around the leaf shape to fill the space, “almost bigger than the space and it feels like it’s popping out,” adding more dimension.
Step 7: At 04:06 – She auras the inside of the circle and colors it in but leaving a little highlight. She then restates the original triangle shape to tidy it up and wiggles the pen a little to give it thick/thin aspects.
Step 8: At 04:45 – Maria changes to the Light Gray (“but you could use the black too“) and adds a thin aura around the triangle and then a second wider one around that leaving enough space to fill in with “a gorgeous border”.
Step 9: At 05:15 – “Now we’re going to fill this border with a circle and then two lines, a circle and two lines.“
Step 10: At 05:45 – With the Black Micron she adds a “tight aura” around the border.
Step 11: At 06:12 – She adds some simple shading inside the first triangle, around the center orb, and a bit on the corners of the border. Then she blends/softens it all with a tortillion.
Step 12: At 07:31 – “I’m going to tell you now that we’re going to do it three times, but a little bit different each time,” as she begins the second tile and challenges us to do our own even different from hers.
Step 13: At 14:07 – She begins tile number three, another slightly different version from the first two.
Day 8
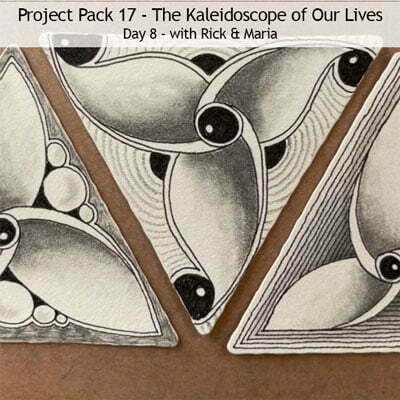
In Day 8’s video (15:42) – With Maria keeping him company, Rick tangles Well on the last three blank 3Z tiles, repeating what Maria did in the Day 7 video, he notes this is “a chance for you to get to see a little bit different style and approach using the same tile and the same tangle.”
Step 1: At 00:00 – After introducing themselves, Rick explains he’s going to working on the last 3 blank 3Z tiles and he’s going to repeat what Maria did in the previous video. As he adds the outer triangle with the Black Micron 01.
Step 2: At 0:42 – He adds the orb in the middle, and then adds the number 9 shapes but he starts from the outer corner (Maria drew from the orb) and landing on the center orb, thus using number 6 shapes.
Step 3: At 01:23 – He adds a stroke creating “that leaf shape“, and then adds an aura inside the original shape 6 strokes.
Step 4: At 02:24 – He adds an aura inside the orb then inks it in leaving a white highlight.
Step 5: At 02:46 – He auras inside the original triangle then continues adding auras inside the first one, “really thin auras” to add texture, repeating this on all three sides of the tile.
Step 6: At 03:24 – “Once I’ve done that I thought I’m just going to let this go off the edge, so I’m doing the same auras around the outside, keeping that similar gap.“
Step 7: At 04:42 – He adds graphite shading and blends and softens it with the tortillion, “it’s fascinating how you can spread that out.“
Step 8: At 06:06 – On tile number two Rick begins with the center orb (instead of the outside triangle), then using the outside of the tile as his guide “I’m going to repeat what I did the last time with those three 6’s or 9’s“.
Step 9: At 06:40 – He adds the stroke completing the leaf shape on all three sides.
Step 10: At 07:09 – He adds the stroke “like a little fold over the petal” on all three sides.
Step 11: At 07:19 – “I like that inner orb shape and I’m going to resonate that orb shape out,” as he fills the space between the leaf shapes.
Step 12: At 08:05 – He auras inside the center orb and fills it in again leaving a highlight.
Step 13: At 08:13 – He fills the interstices between the orbs with ink.
Step 14: At 08:24 – He adds an aura around the outside of the shapes.
Step 15: At 08:50 – With the Light Gray Micron, he “colors in the gap“.
Step 16: At 09:43 – He adds graphite shading then blends it out with the tortillion.
Step 17: At 10:28 – On tile number three, again Rick starts in the middle with the orb, then the 6’s, then uses an S stroke for the outside of the leaf shape to give it some curve, and then the inside aura.
Step 18: At 12:03 – Rick explains that Well “was inspired by a jewelry box at the Higgins Armory Museum. This pattern was done in wire.”
Step 19: At 12:24 – He auras the center orb, fills it in leaving a highlight.
Step 20: At 12:47 – “I’m going to take the idea of those orbs and at the end of each petal is going to hold an orb that goes off the edge” of the tile.
Step 21: At 13:12 – He auras and fills those orbs, also leaving a highlight.
Step 22: At 13:33 – He adds an aura around the outer edges
Step 23: At 14:03 – “I’m going to put a Crescent Moon here.”
Step 24: At 14:14 – He has added graphite shading the blended it out.
Step 25: At 14:30 – He uses the graphite pencil to add auras around the Crescent Moons. He then places all three of today’s tiles together to show their different styles, “same tangle, totally different style, totally different approach.“
Wrap Up
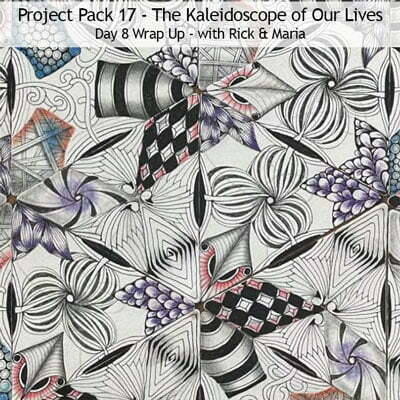
In the final video in the Project Pack 17 Series (11:24) – Rick and Maria review the tiles we’ve tangled in this series and show how they fit together in various ways.
Step 1: At 00:23 – They show how putting the sets of tiles together in totally different ways create mosaics with a beautiful center pattern. “You can also mix and match, you can play with this in so many different ways like a kaleidoscope.” The begin with the first set of six tiles.
Step 2: At 01:12 – They show different configurations of the second set of six tiles.
Step 3: At 02:05 – The third set of six tiles.
Step 4: At 02:52 – Then they put “almost all of them together in one large mosaic“.
Step 5: At 03:48 – The put the six extra blank tiles with versions of Well together.
Step 6: At 04:04 – The additional Dreamcatcher piece they created “for those who weren’t able to get the Project Pack so they could follow along … and really tied it all together with added shading.“
Step 7: At 04:49 – Maria demonstrates how to get the shading effect Molly did, “this is what you need to consider” by following the curve from the tip of the star.
Step 8: At 07:17 – Maria shows several prototypes of the Dreamcatcher version, “when I was sitting down at my desk one day I decided to do something a bit different and filled each one of those spaces with a little bit of watercolor.” She adds shading to this one.
Step 9: At 08:05 – Maria explains how Molly added color with her Purple Pastel Chalk pencil inside the the curves where she had previously added graphite. “These are all things you can do after you think you’re done. When you’re sure you’re done, then these are things you can add just for fun.”
Step 10: At 09:09 – Rick demonstrates how to make our own reflecting mirrors using plastic camping mirrors and duct tape, then shows it in action using the tangled Dreamcatcher.
This recap of Zentangle’s Project Pack #17 will make it easy for you to find all the related videos and any parts of them you may wish to refer to again.
Remember the images above are linked to their YouTube video, simply click the image to go to the video. Or, you can view the complete video on the corresponding tangle’s page on TanglePatterns, they make a fascinating “historical” record of Zentangle videos on each tangle.
For a complete list of Zentangle’s Project Packs click the PROJECT PACKS link in the pink alphabetic tangle menu bar.
|
.oOo. |
|
Enhance your Zentangle experience while supporting TanglePatterns: |
|
BRAND NEW! TanglePatterns.com TANGLE GUIDE, 2026 Edition |
|
 |
The 15th Edition of the TanglePatterns.com TANGLE GUIDE is an instant-download 123-page interactive digital eBook/PDF containing over 2,300 tangles on the site from May 2010 through December 31, 2025. It's a great resource and a must-have digital tool for using the site. Visit the STORE > E-BOOKS page and help keep TanglePatterns.com going by getting your copy now! |
|
"Linda, Thank you! I was relying on too few and getting stuck after 3 years of daily working with Zentangle. This has inspired me to ‘begin again’ with renewed excitement." ~ Barbara R. |
|
| See the BOOK REVIEWS page for more details on its features and view a sample page. Note: this is a digital product to download immediately when ordering, nothing will be physically mailed to you. | |
| If you're new to Zentangle® and tangling, my TanglePatterns.com BEGINNER'S GUIDE TO ZENTANGLE is just what you need to get started. Also available en Français and en Español. | |
|
|
|
 |
This is the only Zentangle book you'll ever need: the fabulous Zentangle PRIMER Vol 1. It's your CZT-in-a-book by the founders of Zentangle®. For more about the content and to read the rave reviews, visit the BOOK REVIEWS tab. |
| Available in KINDLE format for $9.99. Spanish Edition here. Japanese Edition here. | |
| "Absolutely the best Zentangle Book yet! As an accomplished artist I used to think I did not need instruction on this art form. How wrong I was! My tangling improved by leaps and bounds after reading this book. If you think you have Zentangle down then you need this book more than ever!" ~ Kris H | |
|
|
|
|
.oOo. |
|







Thank you so much for this summary of Project 17.
Hi Linda,
Thanks so much for your latest “labor of love ” project pack summary, it’s so wonderful to have all the sessions in one easy to get to place and I greatly appreciate all your hard work! Be healthy!
Carolyn