


 Zentangle’s Project Pack #18 introduces us to Zentangle’s exciting new vellum Translucen-Z tiles and helps us get familiar with how different media behave on this unique surface.
(NOTE: as of this writing the new vellum tiles are only available as part of Project Pack #18 however this Friday, September 2 they will be available for your local CZTs to order. They’ll be available to everyone on zentangle.com “early this fall“.)
As the newsletter introduction tells us,
The Zentangle Method has a beautiful way of illuminating the artist within us. Isn’t it magical what we can do with paper, pencil, and pen? Each stroke connects directly to the artist, no two ever the same. Each stroke layers with others to create amazing compositions. Delicate bits of graphite and white chalk create illusions of light passing through. Or is it an illusion at all? Perhaps the light is truly coming through.
Join us for our eighteenth Project Pack as we tackle uncharted Zentangle territories. This very special Project Pack welcomes a new paradigm in the Zentangle world. Using this special new tangling surface, we are eager to share techniques that allow us to explore creating layers with light and shadow.
SUPPLIES: This Project Pack is available here ($36.95) in the zentangle.com store and it’s a convenient way to get all the supplies for the project. However, the first video reviews the items in the Project Pack and you might discover you have suitable alternatives in your own Zentangle supplies:
- One Sakura Micron 01 pen, Black
- One Sakura Micron 10 pen, Black
- Sakura Gelly Roll 08 pen, White
- Sakura Gelly Roll Silver Shadow pen, random selection from 5 available colors
- two random colors of General’s Pastel Chalk pencils (for details on the color range available see Project Pack #11)
- Zentangle graphite pencil
- Zentangle General’s White Charcoal pencil
- four tortillions
- 15 square Zentangle Translucen-Z (vellum cardstock) tiles
The following chronology is a summary of the videos for this Project Pack with links to the individual videos. Either click the Day #’s title link or the image itself to view the full video on YouTube.
It isn’t necessary to watch the videos in sequence, but it will be very helpful for you to watch the Introduction video first for help with using the new tools introduced.
CZT Molly Hollibaugh recommends we watch Project Pack videos completely through once before beginning our tiles:
“You’re going to have a little more confidence, you’re going to be a little more aware of what’s happening next. Then you might try something different, you might explore it in a different way”.
Jump to: Day 1 – Day 2 – Day 3 – Day 4 – Day 5 – Day 6 – Day 7 – Day 8 – Day 9 – Day 10 – Wrap Up
Introduction
In the introductory video (25:32) Molly Hollibaugh and Julie Willand from Zentangle HQ introduce us to the new Translucen-Z tiles and share tips on using the various tools in the Project Pack with this novel vellum cardstock surface.

Step 1: At 01:07 – Julie introduces the tools in the Project Pack.
Step 2: At 03:20 – Julie reminds us to try to keep the four tortillions separate for each purpose: graphite, white charcoal, each chalk pencil color. Suggests putting a letter on each one as a reminder.
Step 3: At 03:47 – Molly introduces the new vellum tiles Zentangle are calling their Translucen-Z tiles. Explaining their level of excitement, Molly says that each of their products go through a very long process of research and development then manufacturing and packaging, so they take a long time from idea to availability. “So it’s actually been maybe a year and a half to two years since we started this project.“
Step 4: At 05:30 – Julie explains some of the properties of this new acid-free archival translucent surface. They also point out that folding or using a lot of water or “really wet” materials on the surface “isn’t a great match” because it causes buckling.
Step 5: At 07:41 – They recommend we keep one of the tiles to use for practicing and experimenting to learn about the tools.
Step 6: At 08:15 – Molly begins a demonstration of some of the tools in the pack and how they perform on these tiles. They begin with the Sakura Microns and talk about how to deal with pens skipping.
Step 7: At 11:29 – They move on to discuss how the Shadow Gelly Rolls perform, the composition of the ink (dye stuff ink and metallic powder), long drying times: “keep in mind these are very wet Gelly Rolls” and they take a very long time to set. The metallic powder can even be rubbed off several days later. The ink also spreads, “so you might not want to do a really close-together pattern“.
Step 8: At 14:13 – Molly shows a tile that Rick had done testing all of the different colors to see what they look like, also flipping the tile to show the color from the back side.
Step 9: At 15:54 – Molly covers the White Sakura Gelly Roll and how it behaves. “It’s really different than the other Gelly Roll we were just playing with. They have really different characteristics. While it is beautiful and frosty and it looks great on this vellum, it’s slightly problematic at times … but the results were so cool.” This pen can be “a little skippy“. They do create awesome orbs. “In the projects we use it predominantly for little fill-ins, highlights and dots.”
Step 10: At 19:11 – They move on to discuss the General’s Chalk Pastel pencils and how easily they can be blended for dimension on the vellum surface.
Step 11: At 20:44 – They cover the graphite and white charcoal pencils, “they spread like butter” and you can often use just the graphite left on a tortillion with this surface.
Step 12: At 23:58 – Molly shows some demo tiles using the tools from the Project Pack including a double-sided “warm up” tile Maria did (23:58).
Day 1
In Day 1’s video (45:02) – Molly Hollibaugh and Martha Huggins guide us through the first lesson in this Project Pack as they take turns tangling a spiral filled with a fragment.

Step 1: At 01:02 – Molly notes, “All the lessons in this series play with how tangles can play with light and shadow and how this particular surface allows both tangles and light to pass through in fun and unexpected ways.“
Step 2: At 02:16 – Martha selects the Micron 01 to work with and they briefly discuss how “we have found these materials are definitely exploratory“, emphasizing the importance of watching the Introductory video to see the issues/solutions covered with each. Martha recommends having a piece of scratch paper handy at all times so we can clean our pens off as we’re working on the vellum surface.
Step 3: At 04:25 – Martha begins without the traditional border or string and draws a big bold spiral in the center of the tile. “One thing that’s really really unique about this tangling experience is we’re going to be working on both sides of the tile.” She flips the tile over and traces over the spiral, then goes back and weights the line where ever there are “little misses” in tracing the original spiral.
Step 4: At 07:47 – She flips it back to the front and repeats the line-weighting process to “marry those two images front and back“.
Step 5: At 08:04 – She divides the spiral into “squarish type fragment spaces that we’re going to fill in“, using the center point of the spiral as a reference.
Step 6: At 10:29 – Molly reminds us how the ink stays wet, “so just take your time with it and try your best not to rub your hands over the surface while it’s fresh, and make sure it’s completely dry” to prevent smudging.
Step 7: At 11:19 – Molly takes over and adds “this awesome new fragment“.
Step 8: At 17:13 – Martha resumes and finishes the remaining squares around the outside edge of the spiral.
Step 9: At 21:47 – Martha puts the Micron 01 away and takes one of the Chalk Pastel pencils to “add some enhancing color“. Using the edge of the pencil rather than the point, she adds Ultramarine around the inside edge of the spiral. “This pastel goes on like butter so you just need a little“.
Step 10: At 24:33 – Using her designated tortillion, Martha smooths and blends the color.
Step 11: At 25:59 – “Molly’s going to come and add another layer.” Using the graphite pencil, Molly adds pencil to the other edge of the spiral then blends it out with the graphite tortillion. They note how the graphite appears shimmery when the tile is tilted in the light.
Step 12: At 28:55 – Molly adds another layer using the White Sakura Gelly Roll pen beginning at the center adding dots down the double bars and working towards the outside to prevent smudging. When she’s done she lets the tile dry completely.
Step 13: At 32:59 – When it’s dry Molly adds graphite over the orbs at the edge to regain the shadow effect.
Step 14: At 34:30 – Martha goes back with the Micron 01 and restates the whole spiral again, carefully retracing the original spiral.
Step 15: At 36:48 – She adds “a little inked detail right at the end” where each column meets the spiral around the outer edge.
Step 16: At 38:15 – She flips the tile over and adds the same detail to the spiral on the back.
Step 17: At 39:28 – With the Silver Shadow Gelly Roll, Martha fills in the large orbs almost to the edges of each, bearing in mind the ink spreads – and it takes a LONG time to dry. Be careful not to smudge.
Step 18: At 43:25 – They allowed the tile to dry “for about 20 minutes“.
Step 19: At 44:04 – They display several more demo tiles.
Day 2
In Day 2’s video (16:34) – With Maria keeping him company, Rick tangles Hollibaugh, Shattuck and Indy-Rella on his Translucen-Z tile.

Step 1: At 00:33 – Rick starts out his tile with Hollibaugh, first using the wide tip Micron 10 pen.
Step 2: At 01:40 – He switches to the finer Micron 01 pen and continues Hollibaugh.
Step 3: At 04:06 – With one of his Pastel Chalk pencils, he fills in a section of one of the Hollibaugh ribbons.
Step 4: At 04:30 – He changes to the second color of Pastel Chalk and fills in additional sections.
Step 5: At 05:07 – He softens the chalk pencil areas with a tortillion.
Step 6: At 05:57 – With the Micron 01, he adds short accent strokes where the colored sections meet. He also adds ink where the chalk went over this original strokes, “to bring its sparkle back“.
Step 7: At 06:53 – He adds Shattuck to one of the wide Hollibaugh bands.
Step 8: At 09:45 – He adds color to the Shattuck section “as a type of shading” with the Pastel Chalk pencil and blends it with a tortillion.
Step 9: At 11:24 – He flips the tile over and using the Silver Shadow Sakura Gelly Roll he adds Indy-Rella to the reverse side.
Step 10: At 14:20 – He talks about the characteristics of the Silver Shadow ink as he turns the tile back and forth to show us the front and back.
Step 11: At 15:06 – After adding his chop in a different way taking advantage of the tile’s translucence, he adds graphite on the front side of the tile then smooths it out with a tortillion.
Day 3
In Day 3’s video (25:03) – With Rick keeping her company, Maria tangles Verdigogh on a Translucen-Z tile.

Step 1: At 01:14 – After she adds a pencil “string-so-to-speak” area, Maria begins to tangle Verdigogh using the Micron 01.
Step 2: At 04:18 – After she has completed the first set of “needles”, she turns the tile to add the second set starting right above the first set up the spine and going behind them.
Step 3: At 06:52 – She adds a third layer in another direction, starting right above the second set on the spine.
Step 4: At 08:30 – She adds a fourth layer, always drawing behind in Hollibaugh-fashion.
Step 5: At 10:35 – She restates the pencil lines with her graphite pencil then retraces the same lines with the 01 Micron making them appear to be cut lines where the sprig of Verdigogh goes underneath.
Step 6: At 11:24 – She adds the detail making it look like an opening.
Step 7: At 11:50 – She turns the tile over “and what we can do now with this paper is pretend that the sprig of Verdigogh is actually going through the paper”.
Step 8: At 12:13 – She restates the original pencil lines. “This is what Joris Hoefnagel was so good at.“
Step 9: At 12:32 – She draws the stem coming out the other side then builds up the needles/leaves in the same way she did the first side.
Step 10: At 17:20 – She adds weight to the stem.
Step 11: At 17:34 – She inks her original pencil line for the “cut” in the paper.
Step 12: At 18:17 – She turns the tile over so we can see the details, then adds weight to the stem on the front side of the tile.
Step 13: At 18:40 – She adds shading with the graphite pencil, noting “now shading this is very specific“.
Step 14: At 21:52 – She adds Orange Pastel Chalk pencil to the leaves on the front side of the tile.
Step 15: At 22:16 – She adds more shading with the graphite pencil. She repeats this on the reverse side of the tile.
Step 16: At 23:20 – She adds her chop.
Step 17: At 24:08 – She shows a couple more demo tiles she had done earlier.
Day 4
In Day 4’s video (22:17) Julie Willand tangles Aquafleur and Sand Swirl on her Translucen-Z tile.

Step 1: At 01:37 – Julie begins with the broad nib Micron 10 and draws a large orb that fills “a good portion” of her tile. She adds a smaller orb inside the first and slightly off center.
Step 2: At 02:34 – “We’re going to be drawing inspiration from Aquafleur today,” as she adds and fills bands around the orb that appear to wrap slightly around the outside, leaving a good amount of space between each band to add tangles later.
Step 3: At 06:10 – She changes to the Micron 01 to add Karry Heun’s Sand Swirl tangle. She adds weight at the base of each of the aura strokes where they meet the base swirl.
Step 4: At 11:05 – With the graphite she adds shading and blends it with a tortillion.
Step 5: At 12:55 – She adds color around the outer orb just inside both edges with the Ultramarine Pastel Chalk pencil.
Step 6: At 14:00 – She blends it with a tortillion to create shading and dimension.
Step 7: At 14:55 – With the General’s White Charcoal pencil she adds a white highlight around the middle of the “donut” and softens it out with a tortillion.
Step 8: At 16:01 – She adds more White Charcoal pencil at the edge of the black Aquafleur bands and blends that out with a tortillion.
Step 9: At 17:05 – With the Ultramarine Pastel Chalk pencil, she adds small radiating bands coming out from the Aquafleur bands towards the outside edges of the tile and softens it with a tortillion, “creating this gradient ombre effect“. As she’s working on this effect she explains she was inspired by a tile by Molly Hollibaugh from February 2019 which Molly had captioned, “What if the sun and the moon were one and what if it cast shadows and light at the same time.”
Step 10: At 21:23 – She adds her chop with the Micron 01.
Day 5
In Day 5’s video (15:03) – With Maria keeping him company, Rick tangles Tripoli and Paradox, with a touch of Zinger on his Translucen-Z tile.

Step 1: At 00:21 – With the color Silver Shadow Gelly Roll, Rick adds Tripoli to the tile. For the second and subsequent triangles he explains that you don’t think about drawing a triangle but just about aura-ing one side of the adjacent triangle, “It’s the key,” says Maria. Then while turning the tile add the two lines to finish it off while working to keep the gap between triangles fairly similar.
Step 2: At 02:12 – Using the gap between two triangles he “has a little bit of whimsy coming out of that“, as he adds a Zinger.
Step 3: At 03:39 – The tile has dried and we see the change of color of the Silver Shadow pen. Depending on the humidity, he has allowed a couple of hours for the tile to dry. With the Micron 01 he goes over all of the triangles, “basically tracing, redefining” the inside and outside lines of each triangle to increase the contrast.
Step 4: At 05:49 – With his Pastel Chalk pencil he adds color to the inside of the triangles, alternating between the blue and orange pencils, then softens it out with the tortillion.
Step 5: At 07:39 – He adds white charcoal in the middle of each triangle and spreads it with a tortillion.
Step 6: At 09:04 – He turns the tile so we can see through it, then turns it over to work on the other side.
Step 7: At 09:15 – With the Micron 01 he fills each triangle with Paradox, mirroring adjacent triangles. He explains how to mirror at 11:43.
Step 8: At 13:40 – He flips the tile over for us to see the Paradox effect through the tile.
Step 9: At 14:26 – He adds his chop.
Day 6
In Day 6’s video (42:53) – Molly and Martha create a tile together using Ravel to fill a star-shape Molly creates for the basic shape.

Step 1: At 02:49 – After an introduction and Zentangle’s first step of a pause for gratitude, Molly chooses the broad nib Micron 10 pen.
Step 2: At 04:30 – She adds a straight line down the center of the tile, not quite to the edges, then turns the tile and adds another creating a cross in the center.
Step 3: At 05:07 – She divides the spaces by drawing straight through the middle of each one with a long stroke.
Step 4: At 05:48 – Creating a star, she puts a dot halfway between the spaces then adds strokes from the dots to the end of each line, reminding us to be careful of drying time and smudging.
Step 5: At 07:24 – She adds a stroke connecting the center to the points she just created, turning the tile as she goes.
Step 6: At 08:39 – Once the tile is dry, she turns the file over and using the White Gelly Roll pen together with a piece of scratch paper in case the pen nib needs cleaning, she adds lots of dots for texture within the boundary of the star shape.
Step 7: At 15:18 – The shape is now filled with white dots of varying sizes, “we’re always going to try to make sure our ink is dry before we do anything else.”
Step 8: At 15:54 – With the black Micron 01, Molly adds an outline all the way around the outside of the star shape.
Step 9: At 17:53 – She adds one more detail of a short stroke “almost a crease” in the corners and adds a bit of rounding to them whee they meet the edge.
Step 10: At 19:20 – Martha takes over and with the Micron 01 and she adds the tangle Ravel around the outside of the star on the dotted side of the tile, adding orbs in the spaces left and filling the surrounding area with black ink.
Step 11: At 28:32 – When she finishes adding Ravel she turns the tile over so we can see it from the other side.
Step 12: At 28:53 – With the bolder nib Micron 10, she fills in the tile with black ink around three sides just outside the edges of Ravel.
Step 13: At 32:17 – With the white Gelly Roll, she fills the small orbs she added in the Ravel spaces.
Step 14: At 35:12 – “If you had room in your Ravel pods, I’m just adding little tiny dots.“
Step 15: At 37:06 – After making sure the Gelly Roll ink is dry, Molly takes over to add graphite to the star shape and softens it with a tortillion.
Step 16: At 40:38 – She adds graphite to the Ravel areas, then blends it with a tortillion.
Day 7
In Day 7’s video (22:35) – With Rick keeping her company, Maria tangles Mooka on a Translucen-Z tile.
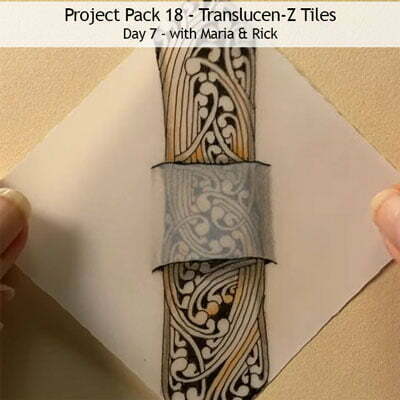
Step 1: At 01:00 – Maria opens her book illuminated by Joris Hofnagel, “Mira Calligraphiae Monumenta” and explains we’re going to be working with a technique from the book.
Step 2: At 02:29 – With her graphite pencil, from one corner of the tile she draws a ribbon a bit over an inch wide leaving space in the middle then repeats it on the opposite corner.
Step 3: At 03:10 – “We’re going to ‘cut’ this paper,” as she gently adds another stroke to the end of each to make it appear as if the ribbon goes through the paper, then she adds a small detail at the end of each.
Step 4: At 03:54 – She adds Mooka to the ribbon, “we’re going to use Mooka as a texture tangle, or a background tangle“.
Step 5: At 08:01 – She fills in the spaces between the Mooka fronds with black ink.
Step 6: At 08:31 – She turns the tile and again fills in the remaining part of the ribbon with Mooka.
Step 7: At 11:33 – “We’re going to delineate this cut in the paper.“
Step 8: At 12:05 – She turns the tile over and adds graphite to make the ribbon appear as if it’s going over the Mooka.
Step 9: At 12:46 – She adds more Mooka fronds in the center of the ribbon area, making them appear to meet up with the lines from the front of the tile.
Step 10: At 14:51 – She fills in the interstices with black ink just as she has on the other side.
Step 11: At 15:56 – Turning the tile back to the first side, Maria adds color with a Pastel Chalk pencil.
Step 12: At 17:03 – She turns it to the back side and adds color.
Step 13: At 17:25 – She adds graphite on the front side and blends the shading with a tortillion “to add dimensionality“.
Step 14: At 19:44 – Turning the tile to the back, she adds more graphite shading.
Step 15: At 20:52 – She shows use two more example tiles done when she was “trying things out“.
Day 8
In Day 8’s video (31:28) – Martha and Molly tangle Scoodle and Scena on today’s Translucen-Z tile.

Step 1: At 01:50 – Martha shows the tools from the pack and explains which ones she’s going to be using in this lesson.
Step 2: At 02:53 – She notes, “We’re not going to be working with a string or a border,” and selects the Silver Shadow Gelly Roll pen to begin.
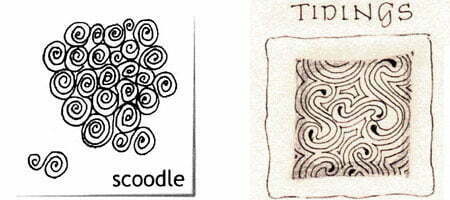
Step 3: At 03:47 – Although Martha inadvertently calls it Tidings in this video, we’re actually working with the very early Zentangle-original Scoodle. They’re both similarly constructed using the elemental S-stroke but Scoodle is a more embellished Printemps-like stroke. Martha starts off with her first stroke the same as Tidings, but then changes to Scoodle for the rest of the tangle. She builds it from the center outwards to cover about 2/3 of the tile.
Step 4: At 06:50 – She adds some “larger nice big bold orbs” around the edges and smaller dots throughout in the open areas for interest.
Step 5: At 08:48 – After allowing the tile to dry, Molly uses the black Micron 01 and adds “a little aura-ing“, all around the perimeter of the design.
Step 6: At 10:40 – She adds auras inside the design in the open spaces.
Step 7: At 11:36 – She adds a thin aura around the perimeter.
Step 8: At 12:22 – With the Silver Shadow Gelly Roll, Molly adds more dots in the spaces.
Step 9: At 13:51 – Martha uses the Black Micron 01 to work on the other side of the tile and begins by tracing over the first aura around the perimeter of the Scoodle grouping.
Step 10: At 15:48 – Then she moves to the center of the shape and adds a starting point then a stroke from that point out to a point on the aura line for the beginning of tangling Scena. “And I’m going to work my away all around, working to hit each one of these little points.“
Step 11: At 19:18 – She adds rounding where the Scena strokes meet the aura.
Step 12: At 21:24 – She retraces the outer aura from the first side of the tile.
Step 13: At 22:18 – Molly takes over and adds shading to the Scena lines Martha added, and blends it out with a tortillion.
Step 14: At 25:09 – She adds shading to the curved part of some of the sections and blends it out with a tortillion.
Step 15: At 25:50 – “Just to add a little punch,” Molly adds Orange Pastel Chalk pencil all around the outside edge, then softens it out to the edges of the tile with a tortillion.
Step 16: At 30:30 – Molly finishes the tile using the graphite tortillion to add “a little character” in a few of the corners.
Day 9
In Day 9’s video (13:41) – With Maria keeping him company, Rick tangles CZT Mimi Lempart’s Mi2 on today’s Translucen-Z tile.
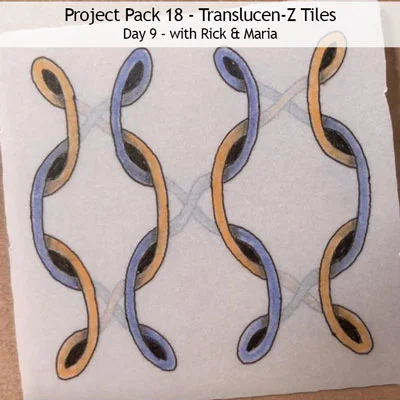
Step 1: At 00:16 – Rick explains we’re going to be working with CZT Mimi Lempart’s Mi2 today and begins with the Micron 01 to put the base dot grid of 4 dots by 4 dots on the tile.
Step 2: At 00:48 – He adds the parentheses curves wrapping around the dot pairs using the dots as reference points.
Step 3: At 02:04 – He makes the rice shapes at the end of the parentheses curves, giving a shout out to Mimi Lempart who deconstructed this tangle, then fills the rice shapes in with ink.
Step 4: At 03:11 – He adds an aura to the outside of each curve.
Step 5: At 04:48 – He turns the tile over and connects the rice shapes across the tile from one another all going in the same direction.
Step 6: At 05:22 – He turns the tile and adds more connecting strokes “in a Hollibaugh fashion“, going behind the ones he just did.
Step 7: At 06:17 – He turns the tile back to the front side and adds Orange Pastel Chalk pencil to the top left section, then says to imagine where that stroke is coming out and adds color to that section.
Step 8: At 07:12 – He switches to the Blue Chalk Pastel pencil and follows the same approach to fill in with blue.
Step 9: At 08:12 – When the blue is completed he goes back to the orange Chalk Pencil to finish that side of the tile.
Step 10: At 08:36 – He adds graphite to the “over-unders” and blends the chalk and the graphite together with a tortillion.
Step 11: At 10:20 – He turns the tile over and continues the orange color bands on the other side. AT 10:57, before he continues he uses the Micron 01 to reinforce the line where it goes under from the front side and adds graphite.
Step 12: At 11:58 – He repeats the process with the Blue Chalk Pastel and graphite to complete the crossed bands on the back of the tile.
Step 13: At 12:55 – He flips the tile back to the front and says, “a new twist on an old tangle“.
Step 14: At 13:00 – He adds his chop.
Day 10
In Day 10’s video (22:19) – With Rick keeping her company, Maria tangles Mooka, Knightsbridge and Gourdgeous on a Translucen-Z tile.

Step 1: At 00:14 – Maria shows us the Micron 10 we’ll be using later in today’s video and explains she put tape on the cap to easily distinguish it from the 01.
Step 2: At 00:27 – She starts by folding the Translucen-Z tile.
Step 3: At 01:30 – She lightly adds a border with the Zentangle graphite pencil around the larger of the two folded sections.
Step 4: At 02:08 – She draws “Kissing Mookas” with the Micron 01 around the edge of the penciled border, “tangling it large” so it creates open spaces that can be filled with other tangles.
Step 5: At 04:36 – After she’s completed each side of the shape, she adds more Mookas within the spaces.
Step 6: At 05:04 – Within each of the spaces created by the Mookas, she adds an aura to create another space within it so “all of the spaces are defined by an aura”. All of the auras have roughly the same size space as the Mooka stems.
Step 7: At 06:32 – “So I’m going to put some Crazy Knightsbridge in here, bending the lines to make it interesting.“
Step 8: At 07:48 – She fills in the Knightsbridge diamonds with ink, at 07:56, she shares our “little trick of the trade” about filling in Knightsbridge.
Step 9: At 08:51 – She uses the Silver Shadow Gelly Roll to add ink orbs to another of the sections. Rick explains how when the ink dries it turns to metallic but on the other side of the Translucen-Z tile the original Green color remains.
Step 10: At 09:57 – She repeats this, filling the section opposite the first dot section with dots to match. Rick reminds us how these pens take much longer to dry so be very careful of smudging. She also fills the middle section with dots.
Step 11: At 10:32 – She fills the remaining sections “with these Gourdgeous bands complementing the Knightsbridge”.
Step 12: At 13:16 – With the Orange Pastel Chalk pencil, she adds a little color to Knightsbridge and Gourdgeous sections and blends it with a tortillion.
Step 13: At 14:34 – With the Micron 10, she adds a bold outline by tracing over the outer edge stroke. The discuss how the Micron 10 nib creates a consistent bold stroke whereas the Graphic 10 pen changes stroke width with pressure.
Step 14: At 15:34 – Once the Gelly Roll ink has completely dried, still with the Micron 10, she turns the tile over and traces over that bold outline she just created on the first side of the tile.
Step 15: At 15:56 – She traces over the outlines of each of the sections.
Step 16: At 17:24 – She again adds Orange Pastel Chalk around each of sections and blends it with the tortillion.
Step 17: At 18:13 – Maria turns the tile back to the first side and again with the Micron 10 she traces over the outlines of each of the sections.
Step 18: At 19:37 – She flips the tile back and forth so we can see the light reflecting on both sides.
Step 19: At 19:57 – After adding her chop on the first side and signing the “flap” she folds along the original line and changes the tile to a three dimensional piece that will sit on a table etc.
Step 20: At 20:47 – Rick shows what the tile looks like when backlit with a battery-operated tealight. Marie cautions, “I wouldn’t put a candle near the paper.” He then shows more prototypes also backlit.
Wrap Up
In the final video in the Project Pack 18 Series (13:03) – Rick and Maria “take a look at a few things that didn’t make it through the final cut“.

Step 1: At 00:37 – Rick says, “Let’s just take a look at a few things that didn’t make it through the final cut,” as they show us a range of lovely prototypes and explorations of the tools in this Project Pack and the new Translucen-Z tiles.
Step 2: At 09:49 – Maria shows us the book “Mira Calligraphiae Monumenta” by Lee Hendrix and Thea Vignau-Wilberg. The lettering was done by Georg Bocskay and the book was illuminated by Joris Hoefnagel.
Step 3: At 10:18 – She explains that she’s been studying the book since 1992 when The Paul Getty Museum first came out with it, then shows some of the techniques used in the book that we’ve used in this series.
Step 4: At 11:45 – They wrap up by thanking everyone for participating in Project Pack #18 with this exciting new Zentangle product.
This recap of Zentangle’s Project Pack #18 will make it easy for you to find all the related videos and any parts of them you may wish to refer to again.
Remember the images above are linked to their YouTube video, simply click the image to go to the video. Or, you can view the complete video on the corresponding tangle’s page on TanglePatterns, they make a fascinating “historical” record of Zentangle videos on each tangle.
For a complete list of Zentangle’s Project Packs click the PROJECT PACKS link in the pink alphabetic tangle menu bar.
|
.oOo. |
|
Enhance your Zentangle experience while supporting TanglePatterns: |
|
BRAND NEW! TanglePatterns.com TANGLE GUIDE, 2026 Edition |
|
 |
The 15th Edition of the TanglePatterns.com TANGLE GUIDE is an instant-download 123-page interactive digital eBook/PDF containing over 2,300 tangles on the site from May 2010 through December 31, 2025. It's a great resource and a must-have digital tool for using the site. Visit the STORE > E-BOOKS page and help keep TanglePatterns.com going by getting your copy now! |
|
"Linda, Thank you! I was relying on too few and getting stuck after 3 years of daily working with Zentangle. This has inspired me to ‘begin again’ with renewed excitement." ~ Barbara R. |
|
| See the BOOK REVIEWS page for more details on its features and view a sample page. Note: this is a digital product downloaded immediately when ordering, nothing will be physically mailed to you. | |
| If you're new to Zentangle® and tangling, my TanglePatterns.com BEGINNER'S GUIDE TO ZENTANGLE is just what you need to get started. Also available en Français and en Español. | |
|
|
|
 |
This is the only Zentangle book you'll ever need: the fabulous Zentangle PRIMER Vol 1. It's your CZT-in-a-book by the founders of Zentangle®. For more about the content and to read the rave reviews, visit the BOOK REVIEWS tab. |
| Available in KINDLE format for $9.99. Spanish Edition here. Japanese Edition here. | |
| "Absolutely the best Zentangle Book yet! As an accomplished artist I used to think I did not need instruction on this art form. How wrong I was! My tangling improved by leaps and bounds after reading this book. If you think you have Zentangle down then you need this book more than ever!" ~ Kris H | |
|
|
|
|
.oOo. |
|


NOTE: as of this writing these exciting new vellum tiles are only available as part of Project Pack #18 however this Friday, September 2 they will be available for your local CZTs to order. They’ll be available to everyone on zentangle.com “early this fall”.
Thank you, Linda, for the detail that you provide for the project pack videos. It’s very helpful and greatly appreciated!
Linda, thank you for the excellent synopsis of this package. I appreciate the time and effort it takes for you to give us this great resource every time a new project pack is released. I find it so helpful to have the time stamps when I want to locate a particular element of the trainings. Your enthusiasm for Zentangle keeps me coming back!
It’s absolutely amazing to me how far you have come from the simple pen and pencil you can take anywhere with you. Relaxing, mediation.
The creativity that goes into each of these Project Packs, particularly this one, is astonishing. Thank you, Linda, for your continued diligence in making them more accessible to your readers.
Thanks, Linda, for this synopsis of #PP18, and for everything you do to support tanglers worldwide! Just wanted to say your tireless work is noticed, and greatly appreciated. You are really making a difference, on a daily basis! Thank you!???
Thank you so very much for this detailed project pack summary! Such a huge amount of time and energy on your end deserves to be recognized and celebrated 🙂 Having the project pack videos all on one page makes life so much easier when I am working on a series. Having the time stamps breaking down each video is incredibly valuable and helpful and why I love coming back each time ! So a mighty cheer and hearty thank you for this dedication and hard work!!
Thanks so much for your wonderful comments Barbara, Sonja, Nancy, Linda, Jessica and Jenn. It’s so helpful and encouraging to me to know these Project Pack “studies” are a valuable resource. Makes the effort well worthwhile. Much appreciated. HUGS !!
Thank you for your awesomeness. A true gift to the community.
Linda
Thank you so much for these summaries. I so appreciate being able to come here and find everything quickly. What a gift of time!