


 From the Zentangle newsletter introduction to Project Pack 07:
“Each year Zentangle celebrates the holiday season with a playful series we call ‘the 12 Days of Zentangle’. Enjoy 12 consecutive days of tangling tutorials all aligning with the same theme.
The 2019 series is Project Pack No. 07 where we explore the world of light and shadow in our tangled works.
In these 12 consecutive videos, you will learn fun ways to go beyond the ink and dive into creating dimension with graphite and chalk.
We will explore some perhaps familiar tools and perhaps some that are new to you.
In this project pack you will discover that like in life, Zentangle too is not just black and white … there are many shades of gray in between.“
SUPPLIES: This Project Pack is available here ($32.95) in the zentangle.com store and it is a convenient way to get all the supplies for the project. However for those of us whose budgets are tight, you might discover you have suitable alternatives in your own Zentangle supplies. Supplies in this Project Pack include:
- 8 each of the new gray Zentangle tiles: Bijou, Zendala, and the original 3.5-inch squares
- 4 black Zentangle Bijou tiles
- 1 Sakura Pigma Micron 01 – Blue
- 1 Sakura Pigma Micron PN – Blue Black
- 1 Sakura Gelly Roll – Gold
- 1 Sakura Gelly Roll 10 – White
- 1 graphite pencil
- 1 General’s White Charcoal Pencil
- 1 General’s Pastel Chalk Pencil – Light Blue
- 3 Tortillions
The following is a summary of the videos for this Project Pack with links to the individual videos. Either click the Day #’s title link or the image itself to view the full video on YouTube.
NOTE: In this article I include a LOT of step-by-step detail as well as the approximate time points so if you want to review a specific aspect of a tutorial you have the reference point to go to in the video.
These projects are all easy and fun and get gorgeous results — even for beginners — so don’t let {my obsession with} lots of detail put you off!
QUICKLINKS >> use these links to jump directly to a specific day:
- Day 1 – Maria tangles a 4 Bijou tile mosaic puzzle on the new gray tiles
- Day 2 – Rick tangles a 3.5-inch gray Zentangle tile with All Stars
- Day 3 – Molly Hollibaugh and Martha Huggins tangle a gray Zendala tile
- Day 4 – Julie Willand creates Tripoli, Crazy ‘Nzeppel, Flux and Huggins monotangles on 4 black Bijou tiles
- Day 5 – Martha Huggins tangles a dINGsplatz reticula on a 3.5-inch gray Zentangle tile and introduces the term peppering
- Day 6 – Rick tangles Hollis on a gray Zendala tile
- Day 7 – Molly Hollibaugh explores “new tangle trails” on a 3.5-inch gray tile
- Day 8 – Maria dives deep into the layering potential of Cadent on a 3.5-inch gray tile
- Day 9 – Martha tangles a wonky spiral on a 3.5-inch gray tile
- Day 10 – Molly tangles Bronx Cheer with Flux and Mooka on a 3.5-inch gray tile
- Day 11 – Rick tangles Paradox on four gray Bijou tiles creating a rearrange-able mosaic
- Day 12 – Maria tangles “a very organized Hollibaugh” with some Fescu and perfs on a gray Zendala tile
Day 1
In Day 1’s video (20:00) – “Tangle along with Maria as she and Rick guide you through the 1st video in this series.”

Today’s tile will use the following materials: 4 gray Bijou Tiles; Pigma Micron 01 – Blue; Pigma Micron PN – Blue Black; Gelly Roll – Gold; Gelly Roll 10 – White; Graphite Pencil; General’s White Charcoal Pencil; General’s Pastel Chalk Pencil – Light Blue; Tortillions; Piece of scrap paper.”
Step 1: Maria begins by preparing each of the 4 gray Bijou tiles with penciled corner marks that will help align the tiles at the end.
Step 2: At 2:30 – Maria takes the first tile and the Blue Black Micron PN pen and beginning at the corners marked, she creates squiggly lines connecting to the opposite corner to form a meandering river of sorts. “Start and finish on one of those little notches that we put on“. Repeat on remaining 3 tiles.
Step 3: At 3:50 – With the Blue Micron 01, make a “good size” single blue Printemps spiral in each of the 2 corners that don’t have the notches. Repeat on remaining 3 tiles.
Step 4: At 5:09 – “Now we’re going to start filling in the edges“, aura the edges of the squiggly lines.
Step 5: At 5:36 – Fill the edges on one side with “a real lively Diva Dance“, Repeat on remaining 3 tiles.
Step 6: At 9:42 -On the side of the tile opposite the Diva Dance, first do an aura along the squiggly line with a little weighting at the ends.
Step 7: At 10:15 – With the Blue-Black Micron PN, add “this big Tipple-like tangle” to fill the remaining space. Repeat on remaining 3 tiles.
Step 8: At 11:30 – With the graphite pencil, add “some pretty heavy graphite” to the space between the original meandering lines created in Step 2.
Step 9: At 12:56 – With a tortillion, pull the graphite towards the middle trying not to cover up all of the gray tile color.
Step 10: At 14:04 – With the Gold Gelly Roll pen, leaving “a blip in the middle” like a highlight, fill the Tipple with gold ink to make gold pearls or beads. NOTE: Be careful not to put your fingers where the gold ink is still wet. Repeat on remaining 3 tiles.
Step 11: At 15:31 – With the White Gelly Roll pen, add some white perfs on top of the graphite pencil from Step 8, making sure to vary the sizes. Repeat on remaining 3 tiles.
Step 12: At 16:05, – Add some white ink to the gold bead highlights. Repeat on remaining 3 tiles.
Step 13: At 16:22, – With the General’s Blue Pastel Chalk Pencil, add blue to the Diva Dance on all 4 tiles.
Step 14: At 17:41 – Use another clean tortillion on the blue chalk to “buff it up a little“.
Step 15: At 18:08 – “Here comes the fun part“, assemble the 4 tiles together in a mosaic like a puzzle. The 4 tiles can be arranged together in several different ways to create beautiful overall designs.
At 19:41 Maria shows two examples she created previously where in Step 11 in place of the perfs she used a solid stroke or hatching.
Day 2
In Day 2’s video (21:24) – “Tangle along with Rick as he and Maria guide you through the 2nd video in this series.“

Rick uses a standard size (3.5 inch) gray tile and all the tools used in Day 1 to tangle CZT Tomàs Padrós’s All Stars.
Step 1: Rick begins with the Blue-Black Micron PN pen and lays down the grid and rice shapes forming the basis for All Stars. TIP: at 1:04 he explains how he positions the dots to get the grid “reasonably organized”.
Step 2: At 4:42 – Using the take-off-and-land technique, he connects the rice shapes diagonally with S shapes; (6:15) turning the tile to easily make all the strokes in the same direction.
Step 3: At 6:42 – He adds rounding where all the strokes from Step 2 cross.
Step 4: At 8:15 – With the Blue 01 Micron, Rick add auras and cross strokes.
NOTE: At 8:52 and again at 10:13 in the video Rick references CZT Mimi Lempart’s Mi2 tangle, “I’m just wrapping that around sort of inspired from Mi2, which is a really cool tangle by Mimi Lempart“. [Mimi = Mi2.]
Step 5: At 12:39 – With the #10 White Gelly Roll, he carefully fills the aura spacing with a stroke of white to increase the contrast, again being careful of the white ink because it “stays wet for a while“.
Step 6: At 13:57 – With the General’s Blue Pastel Chalk pencil he adds pastel to the central areas where the strokes from Step 4 cross, then uses a tortillion to “spread the love” out a little so it “sort of fades away like a glow“.
Step 7: At 15:06 – With the Gold Gelly Roll he adds rounding to the crossing strokes in the center of the blue chalk patches, again being careful the ink doesn’t smudge.
Step 8: At 16:33 – After the gold ink is completely dry, he switches back to the Blue 01 Micron and goes over the very edge of the gold stars created in the previous step, connecting them to the blue strokes coming out of the gold star points.
Step 9: At 17:44 – With a graphite pencil he “really slathers the graphite on” up against the edges where the pattern appears to go under, then uses “a dedicated graphite tortillion” to blend out the graphite.
Step 10: At 19:15 – With the General’s White Charcoal pencil he adds a little highlight near the shadows and lightly smooths it out.
Day 3
In Day 3’s video (51:02) – “Tangle along with Martha and Molly as they guide you through the 3rd video in this series.“
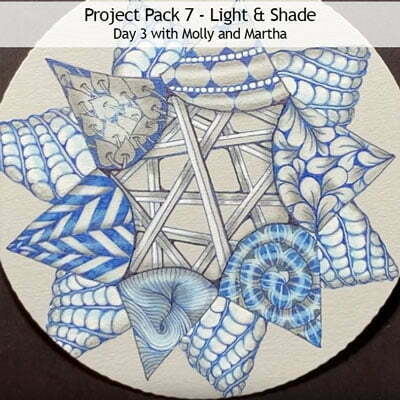
Step 1: Martha begins with the Micron Blue-Black PN and makes a 6-point “organic star” shape (5 to 7 points also work) in the center of the Zendala.
Step 2: At 0:50 – She works her way around the Zendala connecting each set of two points in a triangle, creating pointed cones around the edge.
Step 3: At 1:29 – She switches to the Blue 01 Micron and tangles Hollibaugh in the center space, and to change things up a bit she adds a third stroke to each band of Hollibaugh.
Step 4: At 1:54 – Martha switches back to the Blue-Black PN and adds weight to the third band by going over the previous stroke. Steps 2 and 3 are repeated until the center space is filled.
Step 5: At 3:50 – With the Blue 01 Micron Molly fills one of the cones with Jonqal.
Step 6: At 7:51 – With the Blue-Black PN Martha fills one of the cones with a single large Printemps spiral, then changes to the Blue 01 Micron and fills the spiral shape with bands and Crescent Moon shapes. She then switches to the PN to add an accent element.
Step 7: At 13:07 – Martha moves to the cone opposite from the spiral section just completed and with the Blue-Black PN she adds Pokeleaf growing organically from the ends of the center’s Hollibaugh bands. When the section is filled with Pokeleaf, she switches to the Blue 01 Micron and fills in the interstices to create a solid background.
Step 8: At 15:53 – Molly uses the Blue-Black PN to begin the initial structure for Scena to another cone section. She changes to the Blue 01 Micron to add the Scena auras to complete the section.
Step 9: At 19:41 – Martha uses the Blue 01 Micron and tangles a variation of Florz to fill another cone section, including adding some perfs in the bands.
Step 10: At 23:00 – Molly uses the Blue 01 Micron to add a version of Flux to fill the last section of the Zendala.
Step 11: At 26:11 – “But there’s more!” Molly uses a graphite pencil to add another layer of pointed sections around the perimeter and then uses the Blue 01 Micron to add Purk to all of the additional sections.
Step 12: At 30:02 – Martha uses the #10 White Gelly Roll to “add love” to the Hollibaugh center by filling the band opposite to the side where she added weighting in Step 4, reminding us to be mindful of the wet ink. She then adds white ink to the perfs within Florz.
Step 13: At 31:39 – Molly continues with the White Gelly Roll and adds ink to the orbs of Purk in all the sections around the outside edge of the tile. Takes time and patience and being mindful of the wet ink.
Step 14: At 32:40 – After all the Gelly Roll ink has thoroughly dried, Martha adds shading to her spiral tangle section. At 34:05 she adds General’s Blue Pastel Chalk pencil highlights, then finally a General’s White Charcoal pencil highlight “right down the middle of this spiral“.
Step 15: At 35:36 – In her Florz section Martha adds graphite pencil shading and then White Charcoal highlights.
Step 16: At 37:41 – On the Scena section Molly adds graphite, Blue Pastel Chalk, then White Charcoal highlights, blending as she goes with the tortillion.
Step 17: At 40:28 – On the Jonqal section, Molly adds graphite, Blue Pastel Chalk, then White Charcoal shading.
Step 18: At 42:40 – On her Flux section, Molly adds graphite and White Charcoal .
Step 19: At 43:53 – Martha edges her Pokeleaf section with graphite.
Step 20: At 45:20 – Martha adds shading to the Hollibaugh center section as well as around the edges of that section.
Step 21: At 46:38 – Molly adds shading and blue highlights to the Purk sections around the edge.
Step 22: At 47:40 – Martha restates the ink stroke around the edge of the center Hollibaugh section using the Blue-Black PN and adds rounding to add “a little bit of character” to that section.
At 50:29 Martha and Molly show another Zendala tile done previously with a different selection of tangles.
Day 4
In Day 4’s video (33:55) – “Tangle along with CZT Julie Willand as she guides you through the 4th video in this series.“

Step 1: Julie describes the tools for this tutorial: the 4 black Bijou tiles, the Gold Sakura Gelly Roll, the General’s Blue Pastel Chalk Pencil, the White General’s Charcoal Pencil, and a tortillion for each of the pencils.
Step 2: At 00:38 – starting with a single tile and the Gold Gelly Roll, Julie begins by noting that the Gold ink is thicker than the White Gelly Roll so the ink takes longer to dry, “be mindful of your hand to make sure you’re not smudging the ink.“
Step 3: At 1:41 – Julie begins tangling Tripoli until the tile is full of triangles, going right off the edges.
Step 4: At 3:17 – Once all the ink is completely dry, starting in one corner Julie adds a fragment to Tripoli.
Step 5: At 5:05 – Once all the Tripoli is filled with the fragment and the ink is dry, using the General’s Blue Pastel Chalk Pencil Julie adds blue chalk to each corner of the “half Bales” shapes.
Step 6: At 7:00 – With the General’s White Charcoal Pencil she fills in the area between the Blue chalk pencil.
Step 7: At 7:58 – With the tortillions, she softens the chalk and charcoal pencil to finish the first tile.
Step 8: At 9:42 – On the second tile she tangles Crazy ‘Nzeppel using the Gold Gelly Roll pen.
Step 9: At 13:00 – With the General’s Blue Pastel Chalk pencil Julie adds blue chalk around the inside of each shape, “not filling in the entire shape“.
Step 10: At 14:26 – Julie uses a tortillion to soften the blue chalk, “bringing it right to the edge of each shape, but leaving the middle untouched“.
Step 11: At 15:15 – With the General’s White Charcoal pencil she fills in the area in the center of the Blue chalk pencil.
Step 12: At 16:00 – Julie uses tortillions to soften the white charcoal and slightly blend it into the blue chalk to complete the second tile.
Step 13: At 16:37 – On the third tile using the Gold Gelly Roll pen Julie tangles Flux flowing off a center orb.
Step 14: At 19:18 – With the General’s Blue Pastel Chalk pencil Julie adds blue chalk around the inner edge of each Flux shape. she then softens the chalk with a tortillion.
Step 15: At 20:22 – With the General’s White Charcoal pencil she fills in the area in the middle of the blue chalk pencil, then softens the white charcoal with a tortillion.
Step 16: At 21:45 – With the Gold Gelly Roll pen she makes a Printemps spiral in the center of each orb.
Step 17: At 22:12 – On the fourth and last Bijou tile, using the Gold Gelly Roll pen Julie tangles a radiating Huggins variation.
Step 18: At 26:29 – When all the Huggins shapes are in place, Julie adds auras to each line.
Step 19: At 27:20 – When those auras are completed Julie adds a curving stroke from one corner to the opposite corner of each shape, and adds auras to those strokes, repeating for each of the Huggins shapes.
Step 20: At 30:00 – With the General’s Blue Pastel Chalk Pencil, she adds blue chalk just to the tips of the bands created by the auras in each shape, being careful to avoid to outer bands defining the Huggins shapes.
Step 21: At 31:38 – With the General’s White Charcoal Pencil, add white charcoal to the middle spaces between the blue chalk.
Step 22: At 31:52 – Soften the blue and white pencils using their matching tortillions.
Wrapping up, Julie assembles all four tiles in a lovely mosaic.
Day 5
In Day 5’s video (25:44) – Tangle along with Martha as she guides you to tangle an ING-shaped dINGsplatz reticula on a square gray Zentangle tile, and introduces the term peppering.

Step 1: Martha begins with a traditional 3.5-inch square Zentangle tile in the new gray color from the Project Pack, along with the Blue-Black Micron PN pen.
Step 2: At 1:10 – She starts by adding an Ing-shaped loopy string using her pen.
Step 3: At 1:51 – She connects the loopy lines, creating “sort of an unpredictable grid” using the take-off-and-land technique.
Step 4: At 2:59 – She repeats the same connecting technique on the opposite side of the initial string.
Step 5: At 3:29 – She turns the tile and connects the outside shapes with a subtle curved stroke.
Step 6: At 4:35 – She begins the process of filling all of the grid spaces in the framework created by the previous steps.
Step 7: At 5:14 – She adds the first line in the center space and adds weight (like rounding) on both sides at the center end of the stroke.
Step 8: At 5:26 – From the same point, on the right side of the previous line she adds another stroke and then adds weight to the right side of it. Repeat until the right side is full.
Step 9: At 5:53 – She repeats this on the left side of the center stroke, adding weight to the left side of each line and repeating until this section is full.
Step 10: At 6:42 – Marta explains, “we’ve noticed this fragment filler kind of popping up in a lot of our work here lately and we’ve decided to call it peppering because it really resembles the tangle Pepper“.
Step 11: At 7:12 – Martha turns the file to fill the next section and reminds us that we’re always working towards the center. Fill all the remaining center sections in the same way.
Step 12: At 8:13 – Once the center sections are finished, Martha uses the same method to fill the triangular spaces that are left, remembering that we’re always working towards the center so first line that divides in each shape in half is always weighted towards the center end (not the outside).
Step 13: At 10:07 – Now for the final shapes, using the same method as before, Martha fills the teardrop shapes.
Step 14: At 11:50 – With a very light touch Martha uses the Blue 01 Micron to add some “vein” detail around the tile.
Step 15: At 13:00 – With the blue chalk and white charcoal pencils as well as the graphite pencil, Martha adds highlights beginning with the lightest (white) at the tips in each fragment, followed by the blue (15:55) in the middle of the “petals”, and at 17:20 adding graphite to the base of each fan shape. A tortillion is used to blend and soften the graphite.
Step 16: At 20:39 – With the Blue Micron 01 Martha adds an aura around the entire shape.
Step 17: At 21:30 – With the Gold Gelly Roll Martha adds a small orb at the center of each one of the “peppered” shapes.
Step 18: At 22:40 – With the Blue Micron 01 Martha adds a ring at one end of the entire shape, together with a “hanger”, then fills the hanger for the ornament with the Gold Gelly Roll.
Step 19: At 22:15 – With the Blue Micron 01 Martha adds a Eke-like aura around the perimeter, giving the effect of a tatted edge.
Day 6
In Day 6’s video (13:40) – Tangle along with Rick as he tangles the new Hollis tangle, with Maria keeping him company.

Step 1: With the Blue-Black Micron PN, Rick tangles Hollis on a gray Zendala tile while explaining the background of how he and Maria came up with this tangle.
Step 2: At 5:15 – With the Blue Micron 01, Rick adds the orbs to the forks where the Hollis branches come together.
Step 3: At 6:13 – He adds auras to each of the orbs, “aura-ing the orbs“.
Step 4: At 6:34 – He adds perfs to the auras.
Step 5: At 7:13 – He adds two rows of auras beside the perfs.
Step 6: At 7:40 – Rick repeats Steps 2-5 around the entire tile.
Step 7: At 8:05 – With the General’s Blue Pastel Chalk pencil, Rick fills in the Hollis vines and around the orbs.
Step 8: At 8:40 – With the Gold Gelly Roll pen, Rick fills the orbs with gold ink, “in a Midas-y sort of way“.
Step 9: At 9:26 – With the #10 White Sakura Gelly Roll pen, Rick uses the white ink “to enhance those little perfs.”
Step 10: At 10:04 – With a graphite pencil Rick adds shading to the “over-unders“and blends it out with a tortillion. He also explains that his tangle honors his mentor and friend, Hollis Little Creek of the Marten clan of the Anishinaabe in Minnesota.
Step 11: At 11:58 – With the General’s White Charcoal pencil, Rick adds white charcoal “character” highlights to the Hollis vining.
Step 12: At 12:22 – With the White Sakura Gelly Roll pen, Rick adds highlights on the embellishments he has added to the forks in the Hollis branches.
Step 13: At 13:00 – With the Blue-Black Micron PN then the Blue Micron 01, Rick adds his chop to complete this Zendala tile.
Day 7
In Day 7’s video (27:40) – Molly explores “new tangle trails” on a gray square Zentangle tile.
She introduces the video by noting, “in many of these videos you will notice a theme of working with tangles that blossom, radiate or in many cases create their own space rather than fill a predefined space. These tangles or tangling techniques are exciting and often become the star of the show.“
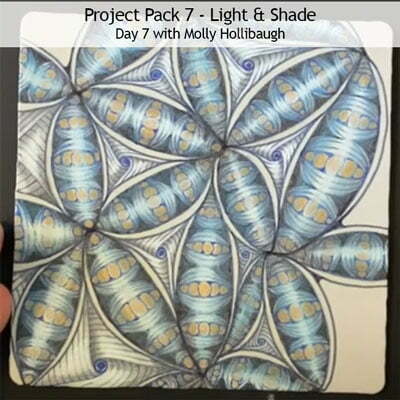
Step 1: At 1:27 – Working on a gray 3.5-inch tile with the Blue-Black Micron PN, first Molly explains her reticula for this tile is based on the pod (or rice) shape of Fife, or Bales. She randomly places two dots on the tile, about an inch apart, and connects the two with a generous pod shape and adds a thin aura on both sides.
Step 2: At 2:43 – This is the basic way we will make this reticula, so she adds another dot and connects it to one of the first two dots, making another pod shape. Make sure to give some girth to them because we are going to fill them with fragments later.
Step 3: At 3:20 – Continuing to add connecting pod shapes, Molly advises us to give them different proportions so they aren’t all the same size. And always connecting with an arc-shaped line.
Step 4: At 6:42 – Having filled the tile, she has a basic form completed.
Step 5: At 7:14 – Molly adds dividers inside each shape around the tile, breaking each pod into square shapes where fragments can be added. She starts by adding the middle one first, and then working her way to the outer edges until all the pods have been subdivided into squares.
Step 6: At 7:45 – Molly begins to fill the spaces with a fragment. Using the Blue Micron 01, she adds a thinner pod shape in the middle of one of the “squares”.
Step 7: At 8:36 – She turns the tile and fills that new pod shape with orbs, “really smush them in“. Then she inks in the interstices.
Step 8: At 9:07 – Aura the orb-filled pod shape until they fill the space.
Step 9: At 9:35 – Repeat Steps 6-8 in the remaining squares inside the larger pod.
Step 10: At 11:12 – Molly notes that when you reach the outside spaces, “you’re going to have to use your imagination a bit” to fill in the smaller shapes with the same fragment.
Step 11: At 12:14 – Changing to the Blue-Black PN, Molly fills in the triangular spaces left, “so that our pod shapes kind of pop out“.
Step 12: At 13:25 – Molly fills all the remaining “pods” using the steps that completed the first one.
Step 13: At 14:04 – Using the Gold Sakura Gelly Roll pen, Molly carefully inks in all of the “peas” making sure she doesn’t go over the Micron blue strokes. She also shares that she keeps a scrap piece of paper handy to occasionally wipe the nib of the Gold Gelly Roll as the ink can build up on it. Make sure the Gold ink is completely dry before moving on.
Step 14: At 15:45 – The pods all completed, Molly notes that the basic structure also offers triangular spaces to fill.
Step 15: At 16:25 – Using the Blue Micron 01, she does “a variation of a fragment that’s very similar to the tangle Well.” She starts with a small orb in the center of the triangle space,
Step 16: At 17:19 – Using the take-off-and-land technique she adds a stroke from the center orb into the corner of the triangle space. “A lot of the times I say to myself ‘the number 9’ so that I know what direction I”m going because the shape I’m making is kind of creating a number 9.” Turning the tile she adds strokes into the remaining 2 corners of the triangle.
Step 17: At 17:49 – She adds detail to the fragment by adding auras or stripes that fill each of the spaces.
Step 18: At 18:50 – Molly fills the remaining triangular spaces with the same fragment.
Step 19: At 19:33 – She is ready to add shades of grays and blues to the ink, starting with the large pod shapes.
Step 20: At 19:50 – Using the graphite pencil, Molly adds shading to the inside edge of the pod shape and softens it with a tortillion.
Step 21: At 20:52 – Using the General’s Pastel Blue Chalk pencil, she adds blue to the edge of the previous steps’ graphite and blends it out with a tortillion where needed.
Step 22: At 21:37 – Using the General’s White Charcoal pencil, she adds white highlights to the pods, being careful to avoid the gold ink.
Step 23: At 22:45 – Molly repeats the graphite-blue-white steps on all the remaining pods.
Step 24: At 23:28 – Molly moves on to the remaining triangular shapes, adding graphite to the “over-unders” of the Well-like fragment then softening it out with a tortillion.
Step 25: At 24:47 – “Depending on how much room you have“, you might add a little bit of white charcoal.
Step 26: At 25:09 – Molly completes the remaining triangular shapes using the graphite and white charcoal.
Step 27: at 25:43 – Molly goes back with her pen to create some finishing touches, a little bit of rounding around the outer edges and restating some inner ink lines as desired.
Day 8
In Day 8’s video (27:07) – Maria dives deep into the layered potential of a familiar tangle, Cadent, on a gray square Zentangle tile.

Step 1: Using the Blue-Black Micron PN, “we’re only going to do this one fragment of Cadent” so Maria begins by laying out four various-sized orbs around the tile and connecting them using the take-off-and-land technique with the familiar S strokes,
Step 2: At 1:20 – She adds an outside aura to the previous strokes, “but the auras meet at top and bottom“.
Step 3: At 1:59 – She continues by adding an inside aura to the original strokes.
Step 4: At 2:35 – She adds another aura to the inside one just made and continues adding them until the inside space is almost completely full.
Step 5: At 3:56 – She wraps another aura around each orb and connects the aura to the next orb.
Step 6: At 4:41 – She repeats, adding similar auras around the outside but always connecting to the adjacent orb until the auras extend to the edges of the tile.
Step 7: At 5:35 – With the Blue Micron 01, Maria adds an inner aura in each of the ribbons formed by the first connecting strokes in Step 1.
Step 8: At 6:40 – Maria adds simple orbs or beads inside the shapes just created in Step 7.
Step 9: At 7:21 – Maria adds a curved stroke inside each orb/bead to give it some detail.
Step 10: At 7:47 – Moving inside to the next ribbon, Maria again adds interior auras to all 4.
Step 11: At 8:15 – In those newly created shapes Maria adds “some drama here” with strokes and fills to create a Knightsbridge-like effect.
Step 12: At 9:06 – Maria moves to the next inside ribbon and repeats the aura.
Step 13: At 9:36 – She adds parallel strokes, “pinstripes“, inside the new shapes and at 10:03 goes back and adds parallel sets of strokes behind the first ones (in a Hollibaugh fashion).
Step 14: At 11:11 – Repeating the previous technique with the last inside ribbon Maria auras them and fills them with tiny perfs.
Step 15: At 12:12 – Maria moves to the outer ribbons, and leaving one ribbon blank she goes to the next one and auras the inside of it..
Step 16: At 12:31 – She adds “smushed in squares, like dental work!” to the inside of that shape and repeats around the tile.
Step 17: At 13:00 – She adds a dot inside each smushed square.
Step 18: At 13:18 – Using the Gold Gelly Roll, Maria fills the unaura-ed ribbon with gold ink being careful not to smudge the wet ink.
Step 19: At 14:50 – She adds gold ink between the blue of the Knightsbridge bands.
Step 20: At 15:35 – She fills the center space with gold ink.
Step 21: At 16:03 – She adds a band of gold around the outside perimeter of the tangle with a touch of rounding in the corners. Like Molly, Maria keeps a piece of scrap paper handy to twirl the tip of the pen to clean it off a bit.
Step 22: At 17:47 – After the gold ink has completely dried, with the General’s Blue Pastel Chalk pencil, Maria fills the outside ribbon with blue, “just enough to give it this lovely softness“.
Step 23: At 18:10 – With the Blue Micron 01, in the “extra” ribbon, Maria auras it and adds orbs/beads to the inside, then finishes each bead with a curved stroke for detail.
Step 24: At 19:22 – With the graphite pencil Maria adds shading detail to the ends of the blue bands of Step 22, as well as “spinning some graphite” off of each of the original Cadent orbs from Step 1. Then she uses the tortillion to blend and soften the graphite.
Step 25: At 21:02 – Using the Blue-Black PN, Maria restates the original orbs and “adding some love” to some of the other original strokes. especially the ones framing the gold ink.
Step 26: At 22:51 – With the General’s White Charcoal pencil, Maria adds some highlights around the tile and then “glides” the tortillion over the charcoal to soften it out.
Step 27: At 24:22 – “But wait, there’s more!” With the graphite pencil, Maria adds shading to the inside of the original orbs and blends it out with the tortillion.
Step 28: At 25:07 – Using the Blue-Black PN, Maria adds 2 parallel strokes to the inside of the orbs giving them the effect of being the heads of screws.
Step 29: Lastly Maria adds her chop, signs and dates her tile, and shows another example tile done previously using the same concept.
Day 9
In Day 9’s video (29:36) – Martha selects a standard 3.5-inch square gray tile for today’s tutorial working with a wonky spiral.

Step 1: At 00:53 – With the Blue 01 Micron Martha lays down a single large open Printemps-like spiral shape.
Step 2: At 01:15 – She “retraces” the shape using only straight lines, creating a series of arcs or semi-circles around the spiral, “a newly drawn spiral with angles and curves“.
Step 3: At 02:25 – Using the Blue-Black Micron PN, Martha adds a rice (or petal) shape at the first intersection in the center of the spiral.
Step 4: At 03:02 – She continues to add rice shapes on either side of the first one, all converging at the same intersection, “varying their lengths and layering them between each other … Purposely make some skinnier, some fatter, some longer.“
Step 5: At 03:35 – At each place along the spiral going around the outside, repeat adding the petal shapes at the intersections.
Step 6: At 04:06 – “I’m purposely drawing nice open shapes so we have room to play with some of our other tools when we’re done.“
Step 7: At 04:36 – “Sometimes my petals will overlap.”
Step 8: At 06:39 – The petals have all been added.
Step 9: At 07:00 – Using the Blue 01 Micron, Martha adds a simple stroke detail to the edge of each petal, “right down the point“.
Step 10: At 08:03 – Martha adds orbs (“bubbles”) between the petals, “nestling them in here and there“.
Step 11: At 09:20 – Martha suggests it helps to look at the overall composition “to see where your bubbles should land“.
Step 12: At 10:54 – “It’s quite possible that some of these bubbles will escape, there’s a few here and there.“
Step 13: At 11:30 – With the #10 White Gelly Roll pen, Martha adds white “to the bubbles to bring them to life“, filling them all in.
Step 14: At 12:40 – Martha reminds us to be careful where we put our hands, be sure to allow for drying time as you move your hand around the tile.
Step 15: At 13:00 – Once the bubbles have completely dried, Martha adds graphite to the tips of the petals and blends it out with a tortillion, being very careful to leave the space in the center of the petal open. (Note Step 19 for her update.)
Step 16: At 14:24 – With the General’s White Charcoal pencil Martha adds highlights by filling most of the space left in the center of each petal but leaving a little bit of room for some General’s Blue Chalk Pastel pencil.
Step 17: At 14:53 – With a clean tortillion, gently work the white charcoal and blue chalk into the paper.
Step 18: At 14:58 – Martha continues around the spiral completing each flower in the same sequence, “playing around with amounts of graphite and chalk“
Step 19: At 15:51 – Martha notes “in the end I decided that I like putting the white down first then working my way around the space the white left behind“.
Step 20: At 19:10 – If the ink on the petals has “disappeared a bit“, you might like to go back with the Blue-Black PN and restate some of those lines with a very light touch.
Step 21: At 20:23 – In the space left around the perimeter of the tile, Martha adds graphite, white and blue pencil creating some very light cloud-like elements.
Step 22: At 21:49 – With the tortillions, Martha smooths out the graphite, chalk and charcoal.
Step 23: At 23:09 – Once the tile is filled with the cloud-like areas, Martha goes back with the white charcoal to reinforce the white highlights and emphasize the layering of the colors.
Step 24: At 24:06 – With the Blue 01 Micron, Martha adds a simple Knightsbridge fill to the original “wonky spiral”, starting in the middle of each arc.
Step 25: At 26:20 – With the Gold Sakura Gelly Roll, Martha adds some “sparkly, glowing” orbs to create a background texture all around the tile.
At 28:58 – Martha shares another she did using the new gray tiles.
Day 10
In Day 10’s video (19:16) Molly tangles Bronx Cheer with Flux and Mooka on a 3.5-inch gray tile.

Step 1: At 00:48 – With the Blue-Black Micron PN, Molly draws two thin stems “for the Bronx Cheers to live in” from one corner of the tile.
Step 2: At 01:20 – A little above one of the stems, Molly adds “some really smushed orbs” to the tile. She adds a large orb where the middle of the Bronx Cheer will be and working towards the top of the stem she adds more orbs and partial orbs surrounding it to form an overall round shape.
Step 3: At 03:15 – She adds another Bronx Cheer to the other stem, using the same process.
Step 4: At 04:00 – She adds “some greenery” around the berries combining the tangles Flux and Mooka.
Step 5: At 05:18 – She adds some vein detail to the Flux.
Step 6: At 06:23 – She inks in some of the spaces behind.
Step 7: At 06:56 – She adds more ink to some of the Bronx Cheer orbs.
Step 8: At 07:46 – “Now I’m going to focus on my Bronx Cheer“, using the #10 White Sakura Gelly Roll to fill in each berry. “You don’t need to go all the way to the edge of each berry.“
Step 9: At 09:21 – Be sure to let the white ink dry completely. Then with the graphite pencil Molly adds shading at the base of the Flux leaves.
Step 10: At 09:55 – She adds a touch of graphite on the tips of the larger Flux leaves and around the edge of the Mooka shapes.
Step 11: At 10:28 – After all the graphite has been added, she uses a tortillion to blend it out.
Step 12: At 11:30 – With the General’s White Charcoal pencil, she adds white to the center spaces where there isn’t any graphite.
Step 13: At 12:34 – “There are a couple places I want to add a little more graphite“, strengthening the shading.
Step 14: At 12:44 – With the General’s Blue Pastel Chalk pencil, Molly adds a very light touch of blue, going over the graphite in some areas to make the white berries stand out.
Step 15: At 14:08 – With the White Charcoal pencil, Molly adds a little more white to the Mooka and Flux.
Step 16: At 14:46 – Molly lightly adds graphite shading to the left side of the Bronx Cheer berries, going over the white Gelly Roll but making sure it is completely dry first.
Step 17: At 15:32 – With a tortillion, Molly gently works the graphite softly over the White Gelly Roll on the berries.
Step 18: At 16:08 – Molly adds a light touch of graphite to a few of the berries on the lower right side of the Bronx Cheer and uses a tortillion to blend it out.
Step 19: At 17:08 – Taking an overall look at the tile, Molly adds “a little blue here and there, maybe adding a little white here and there, some graphite too, playing around with the layers a little bit more“.
Step 20: At 17:44 – With the PN, Molly adds more ink to some of the berries, “redefining some of these lines“. An optional step if you prefer the more muted look.
Day 11
In Day 11’s video (13:00) – Rick tangles Paradox on four gray Bijou tiles creating a rearrange-able mosaic.

Step 1: At 00:44 – Rick starts by outlining the outside edge of the fist Bijou tile with the Blue Micron 01 pen.
Step 2: At 01:17 – “This is how we start Paradox“, he begins in the upper right corner “point” and draws a straight stroke towards the lower right corner to the line, with the stroke ending just a little bit in from that corner point.
Step 3: At 01:40 – Repeat that “point to line” around the tile until it is completely full.
Step 4: At 02:16 – Rick notes that he turns his tile for every stroke.
Step 5: At 04:00 – “We end up with this tiny little square in the middle.“
Step 6: At 04:06 – Rick begins the second Bijou tile in exactly the same way as the first tile, “but this time we’re going to make a mirror image of the first one.”
Step 7: At 04:52 – He begins in the upper right corner, but starts the line just inside the corner and makes a stroke to the lower right corner/point. (Going line-to-point, instead of point-to-line as the first tile.)
Step 8: At 05:06 – Again he rotates his tile to repeat the same stroke, line to corner/point.
Step 9: At 05:56 – Continue line to point until this tile is completely filled to the center.
Step 10: At 06:50 – Rick shows the two tiles side by side,
Step 11: At 07:15 – “I”m going to do something a little bit different“, he adds “gradual weighting” to the lower part of each stroke creating a fan-like appearance.
Step 12: At 08:43 – Rick shows the first completed tile next to the one that hasn’t had weighting added yet so we can see the overall effect it has added, “and now we’ll do the other one“.
Step 13: At 09:04 – Maria notes “enjoy this meditation because it will take you a while to do all four of them. Enjoy and not rush through it.“
Step 14: At 09:10 – Using a graphite pencil, Rick “loads up some graphite” on the weighted curves “on the outside of those fans”, then goes back in with a tortillion to smooth out the graphite.
Step 15: At 09:41 – Using the General’s White Charcoal pencil, Rick adds white highlights near the graphite.
Step 16: At 10:18 – Using the General’s Blue Pastel Chalk pencil, Rick adds a slight touch of the blue on the narrow ends of the fan shapes.
Step 17: At 10:46 – Using the Blue Micron 01, Rick rounds the corners of the innermost square shape in the center of the tile.
Step 18: At 11:00 – Using the Gold Sakura Gelly Roll, Rick adds a touch of gold to the center orb.
Step 19: At 11:11 – Rick arranges all four completed tiles together, “one of the neat aspects of this tangle is that when you put them together in different ways you get different meta shapes“. He demonstrates by aligning the tile mosaic in different ways.
Step 20: At 12:08 – Maria points out that they also work in a row to create different patterns.
“So it just gives you an idea of some amazing things that you can do with this tangle.“
Day 12 – Conclusion
In this final video in the Project Pack 7 Series (24:49) – Maria tangles “a very organized Hollibaugh” with some Fescu and perfs on a gray Zendala tile

Step 1: At 00:42 – With the Blue Micron 01, Maria begins by laying down a pair of curved strokes creating a band about the width of a tortillion apart.
Step 2: At 00:59 – She adds another band creating a vesica piscis (“marquise shape”) – the same shape as Step 1 but in the opposite direction and going behind the first set.
Step 3: At 01:22 – She turns the tile and adds similar curved Hollibaugh bands behind the first two sets and at 90° to them, forming the same marquise shape but in the other direction.
Step 4: At 02:14 – “All through this my hand has been in the same position.”
Step 5: At 02:31 – Going back to the first band, Maria adds an aura on the both sides about 1/3 of the size of the original band, going behind as dictated by the other bands.
Step 6: At 03:12 – “So we’re going to go through and do the same thing on each one of the lines” in the sequence the original bands were created.
Step 7: At 04:20 – Once completed, “we have our first layer“. Next Maria adds another round of auras with the Blue Micron 01, using the same sequence but using more pressure and making the auras narrower than the previous one.
Step 8: At 05:09 – Maria adds an aura inside each of the blank sections, using the heavier pressure and approximately the same spacing as the original Hollibaugh bands.
Step 9: At 05:38 – From the auras she just added, Maria connects the corners “and this is going to create that coffered ceiling look“.
Step 10: At 07:10 – Inside those shapes “like stained glass windows”, Maria adds curving Fescu tendrils, interweaving and overlapping to fill the space.
Step 11: At 08:49 – Repeat adding the Fescu tendrils in all the “window” shapes.
Step 12: At 09:49 – Once all the windows are filled, Maria assesses the overall look and adds more tendrils “here and there for balance“.
Step 13: At 10:14 – Maria adds auras to the spaces around the Fescu shapes, “to make more of an all-over pattern”. Rick points out that Maria is using a very light touch to add these fine aura lines.
Step 14: At 11:41 – Maria has been turning the tile each time and points out that her hand “pretty much hasn’t moved from the position and it’s not struggling with the curve, that it’s doing mostly the same curves . … If you are a right-hander always have your hand to the right so you can see what the point’s doing.”
Step 15: At 12:09 – Rick reminds us to “relax our hand, our arm, our shoulders, pay attention to your breathing now and then. .. I like to have my forearm supported when I’m tangling, not just my wrist but my whole arm, so I can just relax into it.“
Step 16: At 12:29 – Maria analyzes the overall look and decides to add “some pearls or perfs” to fill the larger spaces.
Step 17: At 13:36 – Maria notes, “this is a very complicated looking tile and yet it was so simple, it was the same thing over and over“.
Step 18: At 15:00 – Notice that the orbs “are taking over the line“, going over the line a bit.
Step 19: At 15:50 – Now that all of the “stained glass” is finished, with a graphite pencil Maria adds some shades of gray. Using the first aura of Step 5, Maria fills the bands on both sides with a touch of graphite, and repeats it around the tile.
Step 20: At 17:11 – With a tortillion, Maria smooths out all the graphite she just added.
Step 21: At 18:04 – With the General’s Blue Pastel Chalk pencil, Maria adds blue to the “window” areas.
Step 22: At 18:38 – With the graphite pencil, Maria fills “the edge of this glass” to make it pop out – with “a little heavier application of the graphite“, and repeats that around all the windows.
Step 23: At 19:29 – With the tortillion, Maria smooths out the graphite she has just added, pulling it a little into the windows.
Step 24: At 20:24 – With the General’s White Charcoal pencil, Maria adds some highlights over the window areas.
Step 25: At 21:16 – With the Blue-Black Micron PN, Maria accents some of the original arcs.
Step 26: At 22:16 – Maria also accents the shape of the “windows” by restating their outlines with the PN, creating contrast.
Step 27: At 23:12 – With the White Sakura Gelly Roll, Maria adds “a few little beads of light” on a few of the orbs and perfs in the “windows”.
At 24:05 – After adding her chop, Maria shows two more Zendalas she had done previously in the same fashion including a beautiful one done with Browns.
Sadly, THE END … until the next one …
And there you have it. This recap of Zentangle’s Project Pack #07 will make it easy for you to find all the related videos.
Remember the images above are linked to their YouTube video, simply click the image to go to the video.
For future reference you can locate this post on the TUTORIALS and the VIDEO tabs in the pink alphabetic tangle menu bar. You can also locate it in the TANGLES BY TYPE section in the left sidebar with the tag projectpack.
For a complete list of Zentangle’s Project Packs click the PROJECT PACKS link in the pink alphabetic tangle menu bar.
|
.oOo. |
|
Enhance your Zentangle experience while supporting TanglePatterns: |
|
BRAND NEW! TanglePatterns.com TANGLE GUIDE, 2026 Edition |
|
 |
The 15th Edition of the TanglePatterns.com TANGLE GUIDE is an instant-download 123-page interactive digital eBook/PDF containing over 2,300 tangles on the site from May 2010 through December 31, 2025. It's a great resource and a must-have digital tool for using the site. Visit the STORE > E-BOOKS page and help keep TanglePatterns.com going by getting your copy now! |
|
"Linda, Thank you! I was relying on too few and getting stuck after 3 years of daily working with Zentangle. This has inspired me to ‘begin again’ with renewed excitement." ~ Barbara R. |
|
| See the BOOK REVIEWS page for more details on its features and view a sample page. Note: this is a digital product downloaded immediately when ordering, nothing will be physically mailed to you. | |
| If you're new to Zentangle® and tangling, my TanglePatterns.com BEGINNER'S GUIDE TO ZENTANGLE is just what you need to get started. Also available en Français and en Español. | |
|
|
|
 |
This is the only Zentangle book you'll ever need: the fabulous Zentangle PRIMER Vol 1. It's your CZT-in-a-book by the founders of Zentangle®. For more about the content and to read the rave reviews, visit the BOOK REVIEWS tab. |
| Available in KINDLE format for $9.99. Spanish Edition here. Japanese Edition here. | |
| "Absolutely the best Zentangle Book yet! As an accomplished artist I used to think I did not need instruction on this art form. How wrong I was! My tangling improved by leaps and bounds after reading this book. If you think you have Zentangle down then you need this book more than ever!" ~ Kris H | |
|
|
|
|
.oOo. |
|


I love that you took the time to write out instructions! Thank you!
Dear Linda,
I am always excited to see what new tangle you focus on on Mondays, Wednesdays, and sometimes Fridays. When I saw that today you were going to talk about Project Pack 7, I was a little disappointed, until I saw what you did! I have been watching the videos, and scribbling down the steps to jog my memory, so that I can do the project. I’d only gotten through Day 2. When I saw your detailed instructions, along with the links, and pictures provided by Zentangle, I was DELIGHTED! I’m now printing out this lovely hard-copy reference, which I’ll use (after watching the videos, unencumbered by the need to take notes, thanks to your hard work). So, many thanks for today’s post! I am sure that I’m not the only one who will find it very helpful!
Linda,
What an effort to go through and include all the links, steps for completing the Project pack tiles, photos, etc. Thank you so much for all this wonderful, detailed information.
Have a fabulous Christmas and a happy New Year.
What a wonderful gift you have given us. I already have all the days complete except for the last one, which is started anyway. I’ve been so busy with other things that I didn’t have much time and I had to keep going back to the videos to check how they did the tile of the day. I ended up doing a couple of them twice, but I learned a lot by doing that. I may want to do these again, and now I can do it with written explanation. 🙂 So thank you Linda.
Thank you for the summary. I am behind on so many things this year, including this project pack. I will use at-hand materials and look forward to starting the New Year with project in front of me.
Thank you for the pp summary. Nice to know we can go to tanglepatterns and find the write ups and links to all these project packs. Linda, you do such awesome stuff for all of us. Much appreciated.
Thanks so much for your lovely comments Terri, Dessie, Lianne, Melena, Ginger and Sue. MOST appreciated 🙂 XOXO