


 Zentangle’s Project Pack #14 was created in observance of May’s Mental Health Awareness month.
As explained in the Zentangle newsletter introducing Project Pack 14:
The United States has been observing Mental Health Awareness during the month of May since 1949. Each year, businesses, organizations, schools, and individuals dedicate this month to raise awareness of mental health and present innovative ideas, events, and programs that support mental health and the prevention and treatment of mental illness.
Many individuals that suffer from mental health symptoms have found that creating art has a very positive impact on their condition. Even those not suffering from mental illness have found that a regular practice of creating art relieves stress, increases confidence, and supports general mental well-being.
After brainstorming with our friends at Sakura of America, we designed a Project Pack series to highlight the importance of art and creativity in mental health and wellness. In this series, we share the Zentangle Method as an option for accessing the artist within.
SUPPLIES: This Project Pack is available here ($33.95) in the zentangle.com store and it’s a convenient way to get all the supplies for the project. However, the first video reviews the items in the Project Pack and you might discover you have suitable alternatives in your own Zentangle supplies.
This Project Pack also contains a lovely custom-made booklet, Tangled Musings, which forms the basis for the video lessons of the project. (The booklet is similar to the Legend booklet of Project Pack #10.) The printed booklet is 5.5 inches (14 cm) wide by 5.5 inches (14 cm) tall. The spreads contain Maria’s hand lettered “beautiful quotes about art and how art affects our lives every day …”. It is made of a sewn-bound signature composed of 5 sheets of a smooth card stock (for a total of 20 pages). The booklet’s cover is a linen-textured heavyweight card in Zentangle’s turquoise with their red embossed logo.
The additional supplies included are:
- The new Sakura Micron 10 pen, Black
- Sakura Micron PN pen, Black
- The 06 size from the new Sakura Gelly Roll Moonlight pens, Gray
- Sakura Gelly Roll Metallic pen, Green (#529)
- Zentangle graphite pencil
- tortillion
- square white Zentangle tiles
- a custom-made Tangled Musings booklet
The following chronology is a summary of the videos for this Project Pack with links to the individual videos. Either click the Day #’s title link or the image itself to view the full video on YouTube.
It isn’t necessary to watch the videos in sequence, but it will be very helpful for you to watch the Introduction video first.
CZT Molly Hollibaugh recommends we watch the videos completely through once before beginning our tiles:
“You’re going to have a little more confidence, you’re going to be a little more aware of what’s happening next. Then you might try something different, you might explore it in a different way”.
Day 1 – Introduction
In the introductory video (07:37) – Rick, Maria and Molly introduce this Project Pack and explain the impetus behind it.
They then introduce the contents and supplies contained in this Project Pack. It includes an “awesome” custom-made booklet titled Tangled Musings, in which Maria has lettered “beautiful quotes about art and how art affects our lives every day … We’re going to spend some time on these spreads in our Project Pack.”
They follow by introducing the tools of the Project Pack including Sakura’s new #10 Micron, a Micron PN pen, one of the new Gray Gelly Roll Moonlight pens, and a Green Metallic Gelly Roll pen.

Day 1
In Day 1’s video (20:16) – With Rick keeping her company, Maria tangles Noom on the “Allow your pen to soothe your soul” spread in the Tangled Musings booklet.

Step 1: At 00:42 – Maria explains we are going to be starting this project with the tangle Noom (aka Noom Repus = Super Moon spelled backwards).
Step 2: At 01:17 – Using the Gray Sakura Moonlight Gelly Roll pen, Maria says “we’re going to strip a ribbon of Noom” down the page.
Step 3: At 05:39 – With the Micron PN, Maria fills in the small triangles created in Noom.
Step 4: At 06:07 – She adds an aura around the outer perimeter of Noom.
Step 5: At 07:10 – Changing to the “Turquoise-y” (Green) Metallic Gelly Roll pen, Maria adds tiny strokes from the aura she just added to connect to the printed line in the area containing Noom, changing the pressure of the pen and adding sparkle every now and again to create a textured element.
Step 6: At 08″45 – Rick notes that when we turn our books around to do the other side, “the Gelly pens take a little longer to dry so keep that in mind” to avoid smudges.
Step 7: At 09:40 – Changing to the new Micron 10, “we’re going to go over that edge with this bold crazy #10 (not to be confused with the 01!!)”
Step 8: At 10:44 – Maria restates the printed outline of the tile, still with the #10 Micron.
Step 9: At 11:46 – “Now we’re going back to the PN,” Maria adds an aura around the tile, leaving a larger space and going behind the ribbon of Noom.
Step 10: At 12:52 – She adds orbs to the aura space just created.
Step 11: At 13:38 – “Another little tiny aura just for some character.”
Step 12: At 14:15 – Along the edges of Noom, she adds a tiny Eke-like aura, inspired by her work in the fabric industry where ribbons often have intricate edging.
Step 13: At 15:01 – With her graphite pencil, “we’re going to shade in very specific ways.” She also adds shading with the tortillion to make the ribbon appear to be under the tile and adds further shading around the ribbon then finishes by adding her chop.
Day 2
In Day 2’s video (39:50) – Molly and Martha take us through tangling Striping, Sampson, Bales, and Tipple on the “Fill your paper with the breathings of your heart” spread.

Step 1: At 03:00 – After Martha and Molly give an introduction to the series, Molly selects the spread with the William Wordsworth quote “Fill your paper with the breathings of your heart” to work on. The spread has a pre-strung Zendala on it.
Step 2: At 05:08 – Molly begins with both of the black pens, the Micron 10 and the PN and explains that she’s going to add the tangle Striping.
Step 3: At 05:37 – She uses the Micron PN and after a pause for gratitude and appreciation, she adds Striping to the section at 12 o’clock, turning her booklet for comfort.
Step 4: At 08:26 – With the stripes outlined, Molly switches to the Micron 10 to fill them.
Step 5: At 10:00 – She explains we’re going to add now add the same Striping to every other section thus the 3, 6, and 9 positions of a clock.
Step 6: At 12:02 – Molly hands the booklet off to Martha for the next stage. Using the Gelly Roll Moonlight 06 Gray pen, Martha explains she’ll be filling the 4 sections left between the Striping with the tangle Sampson.
Step 7: At 19:30 – Martha moves on to the remaining “diamond” sections and adds a Bales fragment to each one and adds auras to each rice shape.
Step 8: At 22:15 – She adds orbs inside of the rice shapes.
Step 9: At 25:10 – Martha changes to the Green Metallic (“very fun sparkly”) Gelly Roll pen and adds a little bit of green sparkle in each of the orbs, making sure to leave space around each of the green gel ink dots. At each stage it’s important to be mindful that the ink is slow drying and take care not to smudge it with our hand.
Step 10: At 26:54 – Molly comes in with the Gray Gelly Roll and adds Tipple to the empty center section.
Step 11: At 28:58 – Molly encourage us to treat the center section the way we want, as she takes the Green Metallic Gelly Roll and treats the orbs the same way Martha did hers by adding a touch of green ink to the center of each orb.
Step 12: At 30:34 – “Make sure to leave that center to dry for a little bit,” then Molly adds shading to the Striping with the graphite pencil and blends it out with the tortillion.
Step 13: At 33:27 – Martha adds shading to the Bales sections and blends it out with the tortillion.
Step 14: At 36:28 – She adds shading to the Sampson section and blends it out.
Step 15: At 37:46 – Molly adds graphite to the edges of the Tipple center section.
Day 3 (Mirrored for Left Hand Tanglers)
Today’s video was also posted in a mirrored version especially for left handed tanglers. If you want to watch the regular version of the video, use this link.
In Day 3’s video (27:56) – With Maria keeping him company, Rick tangles Paradox, Hollis and Moon Pie on the spread with Ralph Waldo Emerson’s quote, “Every artist was first an amateur“.

Step 1: At 01:00 – After indicating the spread he will be working on, using the Green Metallic Gelly Roll pen, Rick goes over the printed lines of the box on the page.
Step 2: At 02:09 – After dividing the spread’s rectangle into 4 vertical rectangles, Rick adds a diagonal line across the two boxes on each side of the spread.
Step 3: At 02:42 – He chooses a section and begins to add Paradox to it, turning his booklet for each deliberate stroke. Corner to line, corner to line. “This is an unusual shape for Paradox“.
Step 4: At 06:18 – He continues with a second triangular section of the framework, making sure to keep the spaces relatively equal between the strokes.
Step 5: At 07:29 – He fills a third triangular section.
Step 6: At 08:22 – He fills another 4-sided section.
Step 7: At 09:54 – He begins work tangling the opposite half of the spread.
Step 8: At 13:55 – Changing to the Gray Moonlight Gelly Roll, Rick adds an aura around the square and then evolves it into a band of Hollis around the perimeter.
Step 9: At 17:58 – He goes back and adds branching Hollis curves emanating from the original band.
Step 10: At 20:53 – Changing to the black Micron PN, Rick adds Moon Pie in a few places to embellish Hollis.
Step 11: At 22:49 – With the Gray Moonlight Gelly roll, Rick adds an aura around the edges of the Moon Pie.
Step 12: At 23:21 – With the Green Metallic Gelly Roll he adds a dot of ink to the orbs of Moon Pie.
Step 13: At 23:45 – He adds graphite shading and blends it out with a tortillion.
Step 14: At 25:27 – He adds graphite around the edges of the large rectangle between the Hollis tendrils and blends that out.
Step 15: At 27:31 – He adds his chop.
Day 4
In Day 4’s video (40:28) – Julie Willand selects the spread with Albert Einstein’s quote, “Creativity is contagious, pass it on.” to tangle Pokeroot, Purk, Diva Dance, Cubine, and Marasu while discussing the reasons she selected these tangles and talking about our individual creativity.

Step 1: At 01:38 – After a brief introduction, Julie starts with a simple string of a looped line filling the center of the wide semicircle.
Step 2: At 02:08 – With the Micron PN, she adds Pokeroot along the outer edge of the string while talking about her initial intimidation about sharing her Zentangle art caused by comparing her work to that of Maria, Molly and Martha. “So that’s the theme I’m working with today, to stop comparing our ourselves to other people, comparing our artwork to other people and just appreciate it for what it is.” Julie explains her inspiration behind choosing Pokeroot.
Step 3: At 07:30 – “The next tangle we’re going to do is Purk .. we’re going to fill all of these loops with the tangle Purk.” Julie explains her inspiration behind choosing Purk and she adds the initial bands to all of the loops created by her string.
Step 4: At 09:21 – She goes back to the first loops and adds the orbs to fill each of the bands.
Step 5: At 10:50 – Changing to the Micron 10, she adds Diva Dance and explains the reason she selected this tangle.
Step 6: At 15:52 – She fills the next section with Cubine.
Step 7: At 18:48 – Skipping the section at the top for now, Julie adds the same three tangles to the other side of the arc section.
Step 8: At 21:55 – Julie explains that the center space is for us to add a tangle, perhaps one of our “mac and cheese” tangles.
Step 9: At 22:30 – Julie’s mac and cheese tangle is Marasu so she adds that to the center space in her booklet.
Step 10: At 28:06 – With all the tangles complete, Julie adds shading to each one then smooths it with a tortillion.
Step 11: At 36:13 – Although the white charcoal pencil wasn’t included in this Project Pack, you may already have one in your supplies. Julie adds white charcoal highlights to her tangles.
Step 12: At 38:40 – With the Micron PN Julie goes back to restate the lines of Pokeroot where they meet the other tangles.
Day 5
In Day 5’s video (41:14) – Molly and Martha tangle variations of Verdigogh including one with Springkle for the stem on the “inkstained” spread with the quote “Life is the art of drawing without an eraser” while talking about “how you can used the Zentangle philosophies in your everyday life.“
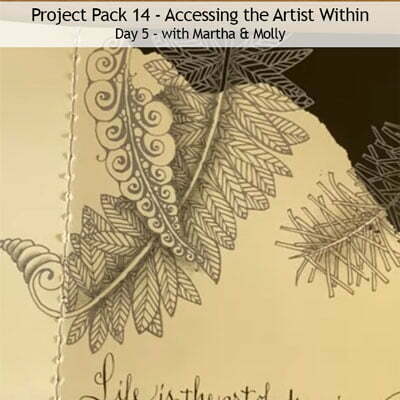
Step 1: At 3:20 – After an introduction, Martha has selected the Gray Gelly Roll pen and adds the tangle Verdigogh after turning the booklet around to work on the upper right-hand corner.
Step 2: At 10:33 – Molly takes over to do another version of Verdigogh on the other inked corner of the spread.
Step 3: At 18:43 – Martha resumes to add another Verdigogh sprig on her side of the spread, using a “vertical approach” using weighted spirals in place of the “needles”. She adds dewdrops and rounding to the edges.
Step 4: At 28:07 – Molly adds three more Verdigogh sprigs using Springkle for the stem.
Step 5: At 34:55 – Molly adds shading and blends it out with a tortillion.
Step 6: At 39:18 – Martha adds shading to her sprigs and blends it out.
Day 6
In Day 6’s video (28:24) – With Maria keeping him company, Rick tangles Well and variations on the spread with the Nietzsche quote “The essence of all beautiful art, all great art, is gratitude.”

Step 1: At 01:09 – After a brief introduction, Rick uses the Gray Moonlight Gelly Roll pen and adds a large grid on the spread.
Step 2: At 04:20 – With the grid finished, Rick switches to the Micron PN and adds an orb to each square.
Step 3: At 05:30 – He adds the “take off and land” C-shaped strokes of the tangle Well in the first grid square.
Step 4: At 06:06 – in the adjacent square he creates a reflected or mirrored version of the first square’s Well.
Step 5: At 06:30 – “We’re going to do this sequence of mirroring through this entire set of reticula.“
Step 6: At 09:08 – He adds a solid dot in the center of each orb.
Step 7: At 09:46 – He explains that he’s going to treat this as four sections of four reticula and do something different in each set. In the first set he adds arcs creating a petal look and fills the whole right side of the spread with the same stroke.
Step 8: At 12:05 – In the last set of four he adds a curving inside aura to each of the petals.
Step 9: At 13:30 – Changing to the Gray Gelly Roll, he works in the second quadrant on the left side of the spread and adds straight-ish lines from the curved edge to the center point. He points out that he’s turning the book every time to keep his hand in the same comfortable position.
Step 10: At 16:44 – Moving to the third quadrant (the first on the right side of the spread), he adds strokes parallel to the original grid line to make it disappear.
Step 11: At 18:27 – He repeats the same strokes in the fourth quadrant (the last one on the right side of the spread).
Step 12: At 19:08 – With a graphite pencil he adds different shading to each of the variations and smooths it out with a tortillion.
Step 13: At 26:58 – He adds a dot of Green Metallic Gelly Roll ink to the orbs.
Step 14: At 27:17 – He adds his chop.
Day 7
In Day 7’s video (34:57) – Rick keeps Maria company as she tangles the Dingsplatz string technique with Purk and Printemps on the spread with the Thomas Merton quote, “Art enables us to find ourselves and lose ourselves at the same time.”

Step 1: At 01:02 – After her introduction Maria explains she’s going to be tangling using the Dingsplatz technique on this spread and she demonstrates how it starts on a tile before going to the booklet.
Step 2: At 01:50 – Using the Gray Moonlight Gelly Roll pen, Maria adds the “loop-de-doops” line on the left page of the spread.
Step 3: At 02:10 – She explains she’s going to put “a bunch of these in the background” and she adds more of the loop shapes to fill the entire spread.
Step 4: At 04:55 – After adding “quite an explosion of Dingsplatz“, Maria auras the inside section of each.
Step 5: At 06:07 – Once all the initial aura have been added, she adds another but allowing a bigger space in order to “do some coffering“.
Step 6: At 06:30 – She adds the connecting strokes that form the coffering appearance.
Step 7: At 07:20 – Switching to the Micron PN, she adds a “nice tight aura just to add some beautiful detail.“.
Step 8: At 08:33 – With the Gray Moonlight Gelly roll she adds an another wide aura, this time between each loop.
Step 9: At 10:06 – Next she adds a tight aura around the end of the loops.
Step 10: At 11:50 – She adds another aura to the previous one between each loop.
Step 11: At 13:04 – Switching again to the Micron PN, she adds triangles around the outer edges and fills them in.
Step 12: At 14:33 – She auras the triangles then adds another aura to those.
Step 13: At 16:20 – Next she auras inside the loops and adds a stroke to connect the new loop to the old one (a coffering stroke).
Step 14: At 17:53 – Back to the Gray Gelly Roll, Maria adds Purk inside the loops.
Step 15: At 19:15 – She adds detail to the triangle shapes by adding strokes with sparkle to the right side of each triangle.
Step 16: At 20:37 – With the Green Metallic Gelly Roll, she adds Printemps spirals to the center of each Dingsplatz.
Step 17: At 22:54 – She adds more Printemps in the background areas.
Step 18: At 26:39 – Maria adds shading to the spread and blends it with a tortillion.
Step 19: At 31:18 – She uses the Micron PN to restate some of the lines.
Step 20: At 33:36 – She adds Green Metallic dots to the triangles for some additional subtle detail.
At the end of the video Maria shows another version of this spread that she did for planning.
Day 8
In Day 8’s video (25:34) – Molly and Martha tangle using two Fragments from the PRIMER to create a lovely frame around the quote on the last page in the booklet with Maria’s quote, “Tangle your own conclusions”.

Step 1: At 01:34 – After their introduction they select the last page in the booklet with Maria’s quote, “Tangle your own conclusions“.
Step 2: At 02:29 – Using the graphite pencil, Martha notes we are going to be working with some borders around the quote. With the pencil she adds a roughly equidistant aura around the quote box by placing dots at the corners and connecting them.
Step 3: At 04:19 – Selecting the Gray Moonlight Gelly Roll pen, she breaks up the aura band into segments with double parallel strokes.
Step 4: At 06:29 – In each segment she adds an X composed of double lines with one set going behind the other.
Step 5: At 08:50 – She adds a solid filled orb behind the crossing point of each of the X’s, then adds an aura around each. (This is Fragment S5 in the PRIMER .)
Step 6: At 11:45 – Molly continues with the Gray Moonlight Gelly Roll, to add layers to Martha’s border. First she adds one wide aura, then restates the line adjacent to Martha’s border. Then she adds a second wide aura around the center.
Step 7: At 14:07 – She extends the corner lines of her first band and then divides both bands into equal fragment spaces creating a grid (reticulum).
Step 8: At 15:49 – Next she divides the first set of four squares into triangles and works in those first.
Step 9: At 16:15 – She places a dot in the center of each of the triangles, then connects the dot to the corners of the triangles.
Step 10: At 17:05 – She continues around the grid working in sets of 4 boxes and repeats the dots and corner lines in each, creating a starburst-like border with Fragment D1 from the PRIMER.
Step 11: At 19:39 – Using the graphite pencil, Martha adds shading around the original quote box and blends it with the tortillion.
Step 12: At 20:52 – She adds graphite to shading the border that Molly has done.
Step 13: At 21:26 – She adds graphite shading to the inside edge of the outer border.
Step 14: At 22:39 – Molly uses the Micron PN to restate the original printed border surrounding the quote.
Step 15: At 23:52 – She repeats this around the outside border.
Step 16: At 24:24 – With the Green Metallic Gelly Roll Molly adds a dot of green ink at the center of each starburst shape around the border.
Day 9
In Day 9’s video (17:48) – With Rick keeping her company, Maria has decided to take us back to basics and she tangles Tripoli filled with Well, and “Feathered Fescu” on a square white Zentangle tile instead of in the Tangle Musings booklet.
This video was also mirrored for left handed tanglers here.

Step 1: At 01:00 – With the graphite pencil Maria makes a light dot on the tile, “that is our string!” With the Micron PN She begins the first strokes of Tripoli.
Step 2: At 02:00 – She guides us through creating an equilateral triangle forming the basis of this tangle.
Step 3: At 03:38 – With one “circle” of triangles completed, she chooses one triangle and joins another to it.
Step 4: At 03:51 – “You can go any where on that grouping and add another triangle and keep going around and around until you have as many as you decide you want.“
Step 5: At 05:04 – “We’re now going to go into each of these beautiful triangles and draw a small orb.“
Step 6: At 05:36 – Maria takes another tile to demonstrate what we’re going to be doing in each triangle. We’re going the tangle Well, “we’re going to circle around the orb and then go to the corner – every stroke is a number 9“.
Step 7: At 06:06 – Back to the tile, Maria begins to fill the triangles with Well using the strokes just demonstrated.
Step 8: At 07:12 – “Now we’re going to add something a little bit new“, she adds a stroke taking off from one of the triangle auras and reaching the corner of the tile, “like a feather shape“, adding another beside it to create a stem shape. She explains we’re going to be doing “Feathered Fescu“.
Step 9: At 08:19 – She adds Fescu along both sides of the stem. “This is an unusual tangle in that we cross lines.“
Step 10: At 09:51 – She turns the tile to add Fescu on the other side of the stem.
Step 11: At 10:52 – Maria demonstrates how she plans to shade Well then proceeds to add graphite to all of the triangles and blends it with a tortillion.
Step 12: At 12:48 – She adds shading to the Feathered Fescu.
Step 13: At 14:19 – With the Micron 10 she adds an aura around the Tripoli cluster.
Step 14: At 15:16 – She adds a graphite aura along one side of the cluster then softens it away from the line.
Step 15: At 16:25 – She adds her chop.
Step 16: At 16:51 – She shows some of her explorations with this concept.
Day 9 Wrap Up
In the final video in the Project Pack 14 Series (07:40) Rick, Maria and Molly reflect on the lessons of this series as they review each of the pages we’ve done.

This recap of Zentangle’s Project Pack #14 will make it easy for you to find all the related videos and any parts of them you may wish to refer to again.
Remember the images above are linked to their YouTube video, simply click the image to go to the video. Also: each of the complete videos are included on the corresponding tangle’s page on TanglePatterns.
For a complete list of Zentangle’s Project Packs click the PROJECT PACKS link in the pink alphabetic tangle menu bar.
|
.oOo. |
|
Enhance your Zentangle experience while supporting TanglePatterns: |
|
BRAND NEW! TanglePatterns.com TANGLE GUIDE, 2026 Edition |
|
 |
The 15th Edition of the TanglePatterns.com TANGLE GUIDE is an instant-download 123-page interactive digital eBook/PDF containing over 2,300 tangles on the site from May 2010 through December 31, 2025. It's a great resource and a must-have digital tool for using the site. Visit the STORE > E-BOOKS page and help keep TanglePatterns.com going by getting your copy now! |
|
"Linda, Thank you! I was relying on too few and getting stuck after 3 years of daily working with Zentangle. This has inspired me to ‘begin again’ with renewed excitement." ~ Barbara R. |
|
| See the BOOK REVIEWS page for more details on its features and view a sample page. Note: this is a digital product downloaded immediately when ordering, nothing will be physically mailed to you. | |
| If you're new to Zentangle® and tangling, my TanglePatterns.com BEGINNER'S GUIDE TO ZENTANGLE is just what you need to get started. Also available en Français and en Español. | |
|
|
|
 |
This is the only Zentangle book you'll ever need: the fabulous Zentangle PRIMER Vol 1. It's your CZT-in-a-book by the founders of Zentangle®. For more about the content and to read the rave reviews, visit the BOOK REVIEWS tab. |
| Available in KINDLE format for $9.99. Spanish Edition here. Japanese Edition here. | |
| "Absolutely the best Zentangle Book yet! As an accomplished artist I used to think I did not need instruction on this art form. How wrong I was! My tangling improved by leaps and bounds after reading this book. If you think you have Zentangle down then you need this book more than ever!" ~ Kris H | |
|
|
|
|
.oOo. |
|


Thank you so much. I really appreciate all the effort and detail you put into these. Now I’m trying to decide whether I want the Micron 10 and/or the metallic gelly roll. Decisions, decisions….
Linda, if you’ve tried the Micron 10, I’d appreciate a compare/contrast with the “Graphic 1.” Is it smaller, as in a finer line? I don’t really like the Graphic 1 pen from them. I do like the 08, though. I LOVE the Moonlight Gelly Roll pens, and I’m not sure I need a metallic pen in such a similar color to the “blue green,” but maybe I do?
Hi Donna, thanks for the compliments, much appreciated 🙂
I find the Graphic 1 tip a little mushy for my taste and when I compare the Micron 10 to the Graphic 1 line on a tile, the 10 actually appears just slightly bolder.
The feel on the paper is nicer for my taste too, it has more of a PN feel. The Graphic 1 almost has a felt-tip feel, but I’ve no idea what it’s made of.
As far as the Moonlight and Metallic pens go, you will enjoy having them both – they are all fun and not very expensive compared to other media. I prefer to get them in sets so I have a range of colors. The inks appear quite different so even with the same colors you get a different effect.
Hope that helps!
Thanks, Linda! I do love using the Moonlight pens and was thrilled to see that grey pen featured in THEIR art. [I use the grey ones a lot.] I believe I will get both a set of Metallics and the 10.
Thank you for the detailed summary for PP14!! Your summaries for each project pack are my go-to pages when I am in the mood to work with a video. I frequently have to stop and close down and return at later times while following a video, and your time notations are such a blessing <3
And I totally agree that picking up Sakuras and in sets is the way to go! I love having the option to explore new inks and new colours 🙂 I just picked up the Soufflé 10 pen pack this week and am keen to get playing 🙂