


 Zentangle’s newsletter introducing us to The Twelve Days of Zentangle, 2021 Edition Project Pack #16 explains:
Isn’t it ironic we playfully titled this Project Pack Series, “Keeping Score”, when in fact, in true Zentangle philosophy, it is quite the contrary? It is a beautiful thing that as we practice the Zentangle Method, we let go of the need to compete or keep score. We become stronger, and our hearts grow larger with our efforts to collaborate, share, empower, inspire, encourage, contribute, enhance, learn, support, beautify, comfort . . . enjoy.
It has become an annual Zentangle tradition for us to celebrate the holiday season with a series we call The Twelve Days of Zentangle. For twelve consecutive days, we deliver daily tangling lessons, guiding you through the steps to create tangled works of art that are all part of a festive theme.
The newsletter goes on to playfully pun on the “Keeping Score” theme …
This Zentangle series offers us a moment to pause and reflect on the past year. As the year unfolded, we hope you were able to lean on your Zentangle practice and focus on the beautiful things that came through. Together we will in-crease our skills while navigating this part of our journey one stroke at a time. In this year-end series, we will be looking closely between the layers and folds of our Zentangle practice. As we score some new tools for our tangling toolbox, we will dig into some creative, tangled ways to celebrate and illuminate your Zentangle art. We will work with dimensionality and play with illusions.
SUPPLIES: This Project Pack is available here ($36.95) in the zentangle.com store and it’s a convenient way to get all the supplies for the project. However, the first video reviews the items in the Project Pack and you might discover you have suitable alternatives in your own Zentangle supplies:
- Sakura Micron PN pen, Black
- Sakura Gelly Roll pen, White 08
- Sakura Gelly Roll Metallic pen, Silver
- Zentangle graphite pencil, white charcoal pencil
- small bottle of Mod Podge glue and sealer, gloss finish
- sponge brush
- stylus tool – for scoring tiles [thus the “Keeping Score” theme] – (an old ballpoint pen that’s out of ink, or a knitting needle will also work)
- tortillions
- white and black square Zentangle tiles; white, black, tan and gray Zendala tiles; white Bijou tiles
SUPPLIES NOT INCLUDED:
- two nickel-size coins
- scissors
- spoon
- paper clips
- needle and thread
- rubber bands
- Blu Tac
- cotton buds (Q-Tips)
- ribbon or string for hangers
- sheet of scrap copy paper for gluing and tracing
- sunflower seeds or rice, dried beans etc. (for “things that rattle“)
The following chronology is a summary of the videos for this Project Pack with links to the individual videos. Either click the Day #’s title link or the image itself to view the full video on YouTube.
It isn’t necessary to watch the videos in sequence, but it will be very helpful for you to watch the Introduction video first.
CZT Molly Hollibaugh recommends we watch Project Pack videos completely through once before beginning our tiles:
“You’re going to have a little more confidence, you’re going to be a little more aware of what’s happening next. Then you might try something different, you might explore it in a different way”.
Jump to: Day 1 – Day 2 – Day 3 – Day 4 – Day 5 – Day 6 – Day 7 – Day 8 – Day 9 – Day 10 – Day 11 – Day 12 – Wrap Up
Introduction
In the introductory video (07:59) – Rick, Maria and Molly explain the theme of this Project Pack and review the materials contained in the kit as well as showing the common household items we will need to gather together for the projects (these are listed above).
“We always suggest watching this video first. The rest of the videos in this series can be watched in any order.“

Day 1
In Day 1’s video (26:10) – With Rick keeping Maria company, she tangles Pangea on a Renaissance tan Zendala tile then fills the reticulum with the new tangle Mrth. She then turns the finished Zendala into a Zentangle flipper toy using Blu Tac and two nickel coins.

Step 1: At 00:34 – Maria introduces a new reticula named Pangea and a new tangle (fragment) called Mrth (“pronounced mirth”). She begins by drawing Pangea. “These are repeating blobs or maybe shapes that are never the same. … then what we’re going to do is to aura a little ways around and then make another blob.” Keep the distance between the blobs pretty even.
Step 2: At 03:18 – “We’re going to fill this with a fragment called Mrth.“
Step 3: At 08:26 – “On the edges of Pangea“, Maria creates some “pistils” coming out of the smiley face.
Step 4: At 10:21 – “There are all kinds of surprises … oh my God here’s a Zinger coming.“
Step 5: At 11:44 – Maria uses the Silver Gelly Roll to add a border around the tile’s edge.
Step 6: At 12:06 – She adds some perfs/orbs/Tipple.
Step 7: At 13:03 – She adds “a tiny bead” between the first row of orbs
Step 8: At 13:20 – With the graphite pencil she adds “shades of gray“.
Step 9: At 14:10 – With the tortillion she blends the shading.
Step 10: At 15:18 – She uses the graphite on the tortillion to add gray detail to the pearls.
Step 11: At 16:17 – With the white charcoal pencil she adds highlights.
Step 12: At 17:13 – To sharpen the white charcoal pencil she advises to use the larger pencil sharpener because it has a lower angle for the charcoal. She then adds white charcoal around the background.
Step 13: At 17:46 – With her tortillion marked for use with the white charcoal, she lightly blends the white charcoal background.
Step 14: At 19:20 – Using the sponge brush Maria adds Mod Podge to the back of a black Zendala tile. You can put it inside a folded piece of paper and inside a book to press them together and allow to thoroughly dry.
Step 15: At 20:36 – Once dried, “it’s going to be pretty stiff“. She uses a needle and a 24″ piece of matching thread which she knots, then puts a hole about 1/4” (.63 cm) in from two edges on opposite sides.
Step 16: At 21:26 – She then sews the two sides leaving about 2″ gap between them forming a curved shape, then tying knots on both sides.
Step 17: At 23:55 – “Here comes the magic,” she presses a piece of Blu Tac on a nickel coin then embeds the coin onto the thread and then presses the second coin into the Blu Tac.
Step 18: At 25:36 – They take it to their dining room table and show how it flips and rights itself. We’ve just made a Zentangle flipper toy!
Day 2
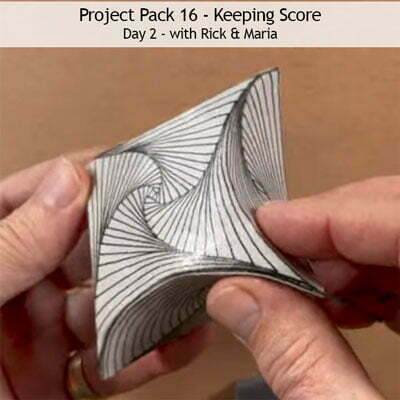
In Day 2’s video (28:34) – With Maria keeping him company, Rick creates another 3D Zentangle object using Gray Zendala tiles, in this case a pillow box ornament tangles with Paradox.
Step 1: At 00:30 – Rick uses a square white tile behind a Gray Zendala tile to help him mark four corners on the back of the Gray Zendala with a pencil.
Step 2: At 00:46 – He uses the edge of another Gray Zendala tile to connect two dots with a curved line around all four sides.
Step 3: At 01:40 – He repeats the same procedure on the second Gray Zendala tile.
Step 4: At 02:40 – He uses the large end of the stylus to score the tiles along the lines he just drew on both tiles. You can also use an empty ballpoint pen or similar object to score the lines.
Step 5: At 03:40 – He gently bends the tiles along the score lines on both tiles and shows how they will fit together to form a pillow box.
Step 6: At 05:49 – He flattens the Zendala tile back out so he can tangle on it with Paradox.
Step 7: At 06:09 – Using the Micron PN he defines the area of Paradox by drawing over the fold lines. He then adds Paradox in the four perimeter sections of the tile.
Step 8: At 11:38 – He repeats the same process with the second tile.
Step 9: At 11:57 – “Now we’re going to do each of these in a slightly different way.”
Step 10: At 15:07 – He does the second tile in the reverse direction to create a different meta pattern.
Step 11: At 17:26 – He places the tiles side by side to show the different meta patterns:

Step 12: At 17:39 – With the graphite pencil he adds shading and blends it with a tortillion.
Step 13: At 19:17 – Finished with the tangling, he folds the tiles again and puts the pillow box together.
Step 14: At 20:37 – “In this case we’re going to make an ornament out of it.“
BE SURE TO WATCH THE COMPLETE GLUING PROCESS THROUGH BEFORE YOU BEGIN GLUING YOUR TILES.
Step 15: At 20:49 – Rick cuts the Project Pack envelope, removing the closure to use as the ornament hanger. With a blue pen he marks the sides of the tiles that are going to be glued. He then applies Mod Podge to the marked sides using the sponge brush. NOTE: Be sure to wash the Mod Podge out of the brush as soon as you finish so you can use it again.
Step 16: At 23:20 – He puts the two tiles together, drops the closure inside the box with its string for a hanger outside, then uses rubber bands to hold them together until the glue dries.
Step 17: At 27:25 – He seals the outside of the ornament with two coats of Mod Podge.
Day 3
In Day 3’s video (24:10) – Julie Willand tangles Crazy Huggins filled with dry embossed Flux on a white square Zentangle tile.

Step 1: At 02:06 – Julie begins this lesson by tangling Crazy Huggins a little larger than we might be used to because she’s going to fill it later with another tangle.
Step 2: At 08:00 – Once she has a band of Crazy Huggins from one corner of the tile to another, she adds an aura on each stroke.
Step 3: At 09:24 – Using the stylus (“our scoring tool“) as a pen, with the small end Julie adds a variation of Flux to the tile. This is CZT Maria Tovar’s Inkless Tangling (Dry Embossing) Technique (see her free tutorial here on TanglePatterns).
Step 4: At 12:17 – In the spaces left between the Flux petals Julie adds auras to fill the spaces.
Step 5: At 13:09 – She fills the rest of the Crazy Huggins with Flux and notes she likes to go over some of the strokes with the stylus to reinforce them.
Step 6: At 15:09 – With the graphite pencil, she adds graphite to the ends of the Huggins shapes then softens it with a tortillion, pulling the graphite into the middle to reveal the dry embossed Flux shapes.
Step 7: At 16:51 – She repeats this graphite/tortillion process on each of the Huggins shapes.
Step 8: At 18:00 – She goes back to the edges of the Huggins shapes and adds more “over-under” emphasis with graphite then softens the line with the tortillion.
Step 9: At 20:49 – With the PN she adds rounding to the corners of the shapes.
Step 10: At 22:03 – With the Silver Metallic Gelly Roll pen she fills the inside of each orb and notes the need to be careful while the ink dries.
Step 11: At 23:01 – Julie finishes her tile by adding her chop and signing the back.
Day 4
In Day 4’s video (54:55) – Molly and Martha take turns tangling a white Zendala tile and then form it into a hanging ornament.

Step 1: At 02:00 – After a brief introduction and explaining we’ll be tangling on a white Zendala tile and using a square tile to mark it, Molly and Martha “honor the first step in the Zentangle Method by just getting my space ready and taking a moment for myself for gratitude and appreciation.”
Step 2: At 03:46 – Molly makes four marks on the back of the Zendala tile using the corners of a black square tile as a guide.
Step 3: At 04:41 – She uses the edge of the Project Pack envelope as a guide to join the top and bottom (12 and 6 o’clock) points with a pencil line.
Step 4: At 04:48 – Using the bottom point (6 o’clock) as the center, she adds pencil lines joining it to the two remaining marks at the 3 and 9 o’clock positions.
Step 5: At 05:26 – Judging the space between 12 and 3 o’clock by eye, she visually divides it in half and then half again. She repeats the process on the other side of the center guideline.
Step 6: At 06:31 – She connects each of those marks to the 6 o’clock position, “kind of like a fan shape“.
Step 7: At 07:20 – With the small end of the stylus she scores each of the pencil lines, first placing a notebook or pad underneath for better score marks.
Step 8: At 09:10 – She flips over the tile and gently folds at the score lines so they’re more visible for tangling.
Step 9: At 10:39 – Martha takes over and explains they’re going to tangle something different in each section and with the black Micron PN she very lightly adds a stroke over the fold lines of a section, then adds another stroke between them to divide the section in half.
Step 10: At 12:36 – Martha explains she’s going to tangle a Knightsbridge variation.
Step 11: At 17:04 – Martha chooses a second section and fills it with a Printemps variation using square spirals instead of the traditional curved ones, as in Ambler/Emingle. After she fills the section she adds rounding/weighting to the shapes.
Step 12: At 23:03 – Molly takes over and adds her tangles, beginning with Purk.
Step 13: At 27:20 – In another section Molly adds Jetties.
Step 14: At 30:14 – In a third section Molly adds Shattuck.
Step 15: At 34:00 – Martha resumes and adds a zigzag line forming triangles to another section. She then places a dot in the center of each triangle and connects the dot to the three corners.
Step 16: At 37:44 – Martha adds Hollibaugh using three lines instead of the usual two, to one of the two remaining sections.
Step 17: At 40:02 – Molly fills in the final cone shape with a variation of Tipple.
Step 18: At 41:21 – Molly adds shading to the tangles and blends it out with a tortillion.
Step 19: At 47:03 – Now we’re ready to assemble our ornament. With a piece of twine, a paper clip and Mod Podge, Molly gently reforms the tile into a cone, inserts the knotted twine hanger into the cone and glues the two sides together using Mod Podge. She then secures it with a paper clip until the Mod Podge dries.
Step 20: At 51:47 – After the Mod Podge has dried (about an hour) Martha seals the ornament with Mod Podge to finish today’s project.
Day 5
In Day 5’s video (30:42) – With Rick keeping her company Maria tangles on a gray Zendala tile and also uses a spoon, a Q-Tip and a towel to create a three-dimensional tile.

Step 1: At 00:01 – Maria explains she’s tangling on a gray Zendala tile and will also be using a Q-Tip, a towel, a paint brush and a little bit of water. The towel provides a spongy cushion for our procedure today.
Step 2: At 01:38 – With a graphite pencil Maria puts down some dots to use as guides for creating a multi-sided shape, then turning her tile she connects the dots with curves that bounce from dot to dot.
Step 3: At 02:19 – Maria uses the large end of the stylus to score the penciled lines.
Step 4: At 03:18 – With a little bit of water and the Q-Tip, Maria paints/wets the inside of the shape.
Step 5: At 04:00 – She places a towel down and flips the tile over to work on the underside. Using the back of a spoon she gently pushes from the center of the star shape to stretch the tile and push it into the tile. At 05:07 she turns over the tile briefly so we can see how the shape is “puffing out“. At 05:11 she uses her fingernail to get more precision along the edges and at 05:28 she carefully uses the large end of the stylus along the edges to further stretch/define the edge. She continues to work on raising and defining the shape to her satisfaction.
Step 6: At 06:58 – Maria turns over the tile and gently restates the pencil border around the shape, noting we don’t necessarily have to do that ourselves, this is more for the camera so we can see the shape.
Step 7: At 07:34 – With the Micron PN, Maria adds an aura around the edge of the shape. At 08:05 she adds another outside the first. At 08:55, she adds a third aura, a lighter stroke and a wider margin than the first two, after using the spoon to work the back of the shape again.
Step 8: At 09:16 – She embellishes the space between the second and third auras with Knightsbridge.
Step 9: At 10:19 – She adds a fourth aura.
Step 10: At 10:49 – She adds a single Pokeleaf growing from each point in the outer aura. At 11:54 she adds another Pokeleaf at the right side of each previous one “and coloring in the interstices as we go along”. At 12:39 she adds another on the left side of each cluster. At 13:16 she adds another round of Pokeleaf to fill the edges and inks in the interstices to fill the border.
Step 11: At 14:51 – “We’re going to aura around these beautiful leaf shapes.“
Step 12: At 16:00 – With the Silver Gelly Roll “we’re going to add a background behind these leaves“, and she adds “consistently inconsistent” strokes radiating from the imagined center point of the tile, like the tangle Msst, on the right side of each section.
Step 13: At 18:00 – Because we only worked on one side, the Gelly Roll ink has had a little time to dry and Maria now works on the left side, adding a Printemps spiral and more Msst.
Step 14: At 19:21 – After the silver border is finished and dry, “we’re going to work on the inside” and with the Micron 01, Maria adds an off-center orb then radiates some lines from the orb to the points around the edge of the puffy center.
Step 15: At 20:05 – Maria adds rounding where the spokes attach to the center orb.
Step 16: At 20:15 – “What that did was give us six triangles and we’re going to doing Bales inside these six triangles.“
Step 17: At 22:29 – Maria adds “black beads” in the center of the Bales triangles.
Step 18: At 23:31 – Maria adds shading with a graphite pencil and softens it with the tortillion.
Step 19: At 24:39 – She adds detail strokes, “enthatching“, at the center of the “flower” petals.
Step 20: At 25:05 – She adds graphite over the silver where the leaves come together then softens it outward with the tortillion.
Step 21: At 25:57 – She adds shading to the “leaf turnings” and softens it with the tortillion.
Step 22: At 26:31 – She adds shading to the Knightsbridge area.
Step 23: At 27:31 – Maria adds “magic white” charcoal highlights.
Step 24: At 30:02 – She wraps up by showing us two prototypes she did in preparation for this lesson.
Day 6
In Day 6’s video (29:46) – With Maria keeping him company, Rick scores and tangles two white square Zentangle tiles then assembles them into a Zentangle “dice”.

Step 1: At 00:46 – After explaining that in addition to two regular white tiles and other supplies from the Project Pack, we’ll be using paper clips, scissors and some sunflower seeds (or whatever will make a rattling sound, such as dried beans or pasta shapes). He begins by finding the middle of one side of a tile and adding a small crease there and marks it with a pencil.
Step 2: At 01:12 – He uses the marked tile “to add a little mark on all four sides of those two tiles” on the back of both.
Step 3: At 02:06 – He uses the large end of the stylus along the edge of the Project Pack envelope to connect the marks across and on the diagonal on both tiles.
Step 4: At 04:03 – With a pair of scissors he cuts along the score one one side into the center of the tile.
Step 5: At 04:38 – “And now you get to see what we’re going to do with this!” He folds along the score lines, then folds the tile to overlap so that a triangle shape is formed, “a little pyramid”, and that one side will be glued.
Step 6: At 05:41 – “In the Zentangle tradition of gratitude, I am writing gratitude.” on one of the cut pieces. On the other he writes “Family”. These will be hidden messages once the flap is glued.
Step 7: At 06:33 – He lightly pencils the score line so we can see it easily, then using the Micron PN he adds a pen stroke along the diagonal score lines.
Step 8: At 07:34 – He auras the center fold in 3 of the triangles, the flap with the hidden message will not be tangled, turning the tile to keep his pen in a comfortable position for his hand.
Step 9: At 08:41 – On both tiles he adds bands inside the triangles “it’s sort of a version of Hurry“, and keeps the bands the same width as the aura.
Step 10: At 10:31 – With the Silver Gelly Roll pen he fills in the space between the first aura and the folds on both tiles.
Step 11: At 12:27 – “I want to put something in the outside corners … and each corner is going to be a little different”. In the first corner using the Micron PN he adds a large orb and fills it in, in the next one he puts two orbs and fills them in, in the third corner he adds three orbs and fills them in..
Step 12: At 13:42 – He adds a stroke around the edge of the tile, then puts two auras around each orb before he begins to add Diva Dance.
Step 13: At 18:27 – On the second tile he adds four orbs in one corner, five in the next, and six in the last. He then adds the stroke around the edge of the tile and completes them again with Diva Dance.
Step 14: At 20:32 – He adds graphite for emphasis on the layers and blends it out with a tortillion.
Step 15: At 22:17 – He adds graphite around the outer edge of the tile.
Step 16: At 23:22 – He adds Mod Podge to the “message” flap and glues the overlap together, then adds paper clips to clamp the flaps together until the Mod Podge dries, “align it, squeeze it, clamp it”. Then we allow the tiles to dry completely.
Step 17: At 24:55 – Rick removes the clips and places a few sunflower seeds inside one of the pyramids before gluing the two tiles together with Mod Podge, making sure not to put two double layers together. Then he clamps them together with paper clips and allows it to dry.
Step 18: At 27:46 – After attempting it with ink, he adds graphite around the edge to reduce the lightness.
Step 19: At 28:16 – He coats the entire “dice” ornament with two layers of Mod Podge to seal it.
Day 7
In Day 7’s video (30:07) – With Rick keeping her company, Maria tangles a “Crazy” variation of Cubine on a Renaissance Tan Zendala tile.

Step 1: At 00:29 – Maria notes that the Renaissance Tan Zendala tiles are “probably my favorite canvas”.
Step 2: At 00:59 – She explains she’s going to tangle variations of Cubine, taking it out of the grid. She displays examples of this Crazy Cubine, plus Wild Cubine, and Blossoming Cubine as well as several beautiful tiles featuring these variations.
Step 3: At 04:40 – She “gets down to business” and begins today’s Zendala tile: using the large end of the stylus she adds an arc from top to bottom on the tile. Then she gently folds the tile along the score.
Step 4: At 06:05 – With a pair of scissors she carefully cuts three “little diamond shapes … across the fold“.
Step 5: At 07:14 – She flattens out the tile then accentuates the score line with graphite then with the Micron 01 she adds an aura to the right of the score line and around the cutouts.
Step 6: At 08:15 – She turns the tile and does the same thing on the opposite side.
Step 7: At 09:12 – Maria adds a dot, “you don’t really have to but it’ll be your starting point … now we want to go from that dot to the middle and then beyond” of the diamond shapes. She then adds the rest of the Cubine shape to all three diamonds.
Step 8: At 10:59 – “This next step is we’re going to insert a few borders before we put in some more Cubine fronds.”
Step 9: At 11:42 – After she adds the border, she adds more fronds which can now go behind the border.
Step 10: At 14:36 – She adds another border behind the fronds.
Step 11: At 15:28 – She adds more fronds to balance the composition.
Step 12: At 16:23 – She adds detail to the “kites” so they match the cut ones.
Step 13: At 16:48 – She adds some perfs between the fronds and where there is a wider space just adds more orbs/Tipple.
Step 14: At 19:03 – Inside the border she adds Shattuck using the Micron 01.
Step 15: At 20:29 – With the Micron PN, inside the second border she adds a “series of really fat stripes” for drama.
Step 16: At 21:10 – Still using the PN, she restates the edge of the border to make it bolder.
Step 17: At 21:42 – With the Silver Metallic Gelly Roll she fills in the top left shape and the bottom right shape of each Cubine “kite”.
Step 18: At 23:26 – With the graphite pencil she adds a heavy band under the base of the motif then softens it to create a drop shadow.
Step 19: At 24:40 – With the white charcoal pencil she adds color to the whole top background and softens it with the tortillion.
Step 20: At 25:18 – She also adds a white highlight through the middle of the Shattuck border.
Step 21: At 25:38 – With the graphite pencil she adds emphasis to the heavy line at the top of the stripe border, blends it out, then adds a little white at the bottom of the stripe border.
Step 22: At 26:26 – She adds white highlights to the orbs and a bit more graphite under the second border. She finishes the tile by adding her chop and reemphasizing the fold.
Day 8
In Day 8’s video (22:25) – With Maria keeping him company, Rick tangles four Bijou tiles and creates another 3D ornament with them.

Step 1: At 00:36 – After explaining we’re going to be using four Bijou tiles, scissors, and a needle and thread, Rick says “we’re going to go back to basics here” and he begins with the dots, border, string steps of the Zentangle Method.
Step 2: At 01:10 – Using the border as a string, he adds Crescent Moon.
Step 3: At 05:58 – With the graphite pencil he adds shading and softens it with the tortillion.
Step 4: At 06:39 – On the second Bijou tile he does the dot, border, string sequence and then adds Hollibaugh.
Step 5: At 09:08 – With the graphite pencil he adds shading and softens it with the tortillion.
Step 6: At 10:28 – On the third Bijou tile he does the dot, border, string sequence and then adds Printemps.
Step 7: At 12:05 – With the graphite pencil he adds shading and softens it with the tortillion.
Step 8: At 13:08 – On the fourth Bijou tile he does the dot, border, string sequence and then adds Florz.
Step 9: At 14:15 – With the graphite pencil he adds shading and softens it with the tortillion.
Step 10: At 14:46 – Now that all four Bijou tiles have been tangled, with the Silver Metallic Gelly Roll Rick fills in the outer edge of each tile making a band of silver around each.
Step 11: At 15:55 – After giving the Silver ink time to dry thoroughly, “now we’re going to do a little assembly” and he cuts a length of heavy thread to prepare.
Step 12: At 16:16 – He lays the thread on one of the tiles so the ends are in the center and the loop comes out a corner then glues another tile back-to-back with Mod Podge. He glues the second set of two tiles together but without a thread loop.
Step 13: At 17:51 – After letting the tiles dry thoroughly, he takes the tile with the thread coming out and cuts from the opposite corner to the center of the tile. He repeats that with the other pair of tiles.
Step 14: At 18:35 – He fits the two pieces together to make a three dimensional “lovely little ornament with our four basic tangles.”
Step 15: At 19:26 – With the Silver Metallic Gelly Roll he touches up the edges of the tiles.
Step 16: At 20:00 – He adds a coat of Mod Podge to seal the ornament, “at this point you can always add glitter.” When that has dried he adds a second coat of Mod Podge.
Day 9
In Day 9’s video (38:19) – Molly and Martha introduce us to their Z-Through technique on a black Zendala tile using Pangea, Mooka and Tipple.

Step 1: At – Molly and Martha explain that though this Project Pack explores making three dimensional pieces of Zentangle art, in today’s lesson we’re going to be working two-dimensionally with the tangle Pangea. “We’re going to be focusing on a fun technique that you can do with Pangea that’s playful and a little tricky and takes a little bit of concentration.“
Step 2: At 01:51 – Martha shows the material we’ll be using for this lesson including a black Zendala tile, the Micron PN, the White 08 Gelly Roll, graphite and white charcoal pencils, and tortillions.
Step 3: At 02:22 – Martha suggests “waking up” the White Gelly Roll on the back of the tile before beginning. Molly suggests using it at more of an upright angle, “and a light touch” says Martha.
Step 4: At 03:11 – After Molly acknowledges the first step of gratitude, and encourages us to taking a moment for recognizing the little things, Martha begins to tangle Pangea.
Step 5: At 04:31 – Martha explains, “The whole concept here, a lot like Tripoli and Molygon, is that this tangle is focusing on the aura or the space between each shape.
Step 6: At 10:25 – When the tile is filled with Pangea, Martha gives it a moment to dry before proceeding.
Step 7: At 10:41 – Molly takes over to guide us through the next steps of what she calls “reverse Tranzending” (in the newsletter they’re now calling it Z-Through), with the tangle Mooka.
WE ARE ENCOURAGED TO WATCH THE NEXT STEPS THROUGH BEFORE PROCEEDING OURSELVES.
Step 8: At 11:37 – Molly draws a large Mooka over the top of the Pangea.
Step 9: At 12:40 – She draws another Mooka to the left of the first one, using the same stem and branching off.
Step 10: At 13:10 – She turns the tile and adds a second “Mooka pair” to the right of the first set.
Step 11: At 13:44 – She turns the tile and adds a single small Mooka further to the right.
Step 12: At 13:43 – She turns the tile and adds a third “Mooka pair” on the right.
Step 13: At 14:29 – She turns the tile and adds Mookas to the left of the first, ultimately filling the lower half of the tile.
Step 14: At 15:30 – Finished with her Mookas, Molly invites Martha (“good friend, big sister“) to “try to attack this and see what can happen“.
Step 15: At 15:44 – Using the black Micron PN, “as a magic wand“, everywhere there is an aura space with Mooka lines going through it, Martha covers them up with black ink. “You have got to focus, maybe doing the Mooka stems first.” She notes that if we miss a stroke we can go back and fix it with the white pen.
Step 16: At 17:59 – “Focus on the aura space,” as Martha follows each aura “like a river” to find the Mooka strokes to cover with black ink.
Step 17: At 20:45 – Using the white charcoal pencil and keeping a sharpener handy, Molly colors in the Mooka shapes, beginning with the first one she laid down.
Step 18: At 22:14 – Using her white-dedicated tortillion she softens the white charcoal inside the shapes.
Step 19: At 23:24 – She adds graphite on the bottom edge and blends it in with a tortillion.
Step 20: At 24:20 – She repeats the process on the second Mooka.
Step 21: At 24:53 – She continues to repeat the process on the remaining Mookas. If the white charcoal accidentally blends into the Pangea a bit, she cleans it up with the black ink.
Step 22: At 28:49 – “Now we’re going to add a little texture,” as Martha uses the White Gelly Roll to fill the Pangea with varying sizes of Tipple, “but only the ones the Mookas are touching”.
Step 23: At 32:15 – After giving the tile a few minutes to dry, Molly adds graphite shading for to emphasize the layering and she “buffs it out as I go“.
Step 24: At 34:35 – Molly reviews the tile and tightens things up with the black pen and adds emphasis under the Mooka to darken the shadow.
Step 25: At 36:20 – Molly says they’re going to put a layer of Mod Podge on this tile and explains that in the next lesson they’re going to do another tile “and show you a fun way to sort of combine them“.
Day 10
In Day 10’s video (43:29) – Molly and Martha tangle Auraknot and then they use it as a reticulum and fill it with Spoken, Crescent Moon, Knightsbridge, Munchin and Striping for a festive, finished, composition. They combine it with yesterday’s tile to make a hanging ornament.

Step 1: At 01:32 – After their introduction, Molly shows the materials we’re using for this lesson: a white Zendala, the Micron PN and the graphite and white charcoal pencils with their corresponding tortillions.
Step 2: At 02:04 – Molly explains we’re going to be tangling Auraknot, and as usual she takes a moment for gratitude and appreciation.
Step 3: At 04:08 – She turns the tile right side up and uses a square tile behind it to help mark four equal spaces around the edge of the Zendala.
Step 4: At 05:10 – She turns the Zendala so the marks are halfway between the points of the tile and she marks those four spots.
Step 5: At 06:00 – Switching to the Micron PN, Molly uses the graphite ticks as a way to create different size V shapes around the edge of the tile, starting and stopping on the tick marks.
Step 6: At 08:00 – She notes that Auraknot is kind of like a Celtic knot, and she creates a connecting line from one triangle to the next. She then auras that stroke.
Step 7: At 09:27 – Moving to the next peak she repeats the sames process, this time the aura goes behind.
Step 8: At 10:18 – Turning the tile, she moves to the next peak and repeats the process. She continues around the tile until all the peaks are done.
Step 9: At 14:10 – “We’re actually going to use this Auraknot as a reticula.“
Step 10: At 14:34 – Martha takes over to add Spoken to the center of the tile, beginning with an orb and then using the take-off-and-land technique to connect the orb to each of the points around the center.
Step 11: At 17:23 – Martha adds an aura on two sides of each of the segments just created.
Step 12: At 18:35 – “To embellish this further, I’m going to add some orbs in these spaces” and she inks in the spaces between the orbs.
Step 13: At 21:23 – Martha moves to the outer edges and adds an aura inside each triangular space.
Step 14: At 22:10 – “I’m going to do a sort of variation on Crescent Moon.“
Step 15: At 25:51 – Martha adds “just another little playfulness to each one of these,” with quick strokes resembling eyelashes.
Step 16: At 27:06 – Switching to the Silver Metallic Gelly Roll, Martha adds squares of Silver creating Knightsbridge around the dark bands.
Step 17: At 28:04 – She adds fills in the center orb with Silver ink.
Step 18: At 28:25 – Molly takes over to tangle Munchin in every other triangular space.
Step 19: At 29:38 – She decides to do something different in the alternating triangles and she adds Striping for some contrast.
Step 20: At 31:00 – Molly adds graphite to create dimension, beginning with the layers in Auraknot and then working around the rest of the tangles on the tile.
Step 21: At 37:28 – “I’m going to assemble this tile with the tile we did yesterday … the idea is we’re going to put them back-to-back with some string in between, using the Mod Podge.” They finish the ornament with a small bell on the ends of the strings.
Day 11
In Day 11’s video (44:37) – With Rick keeping her company, Maria tangles a version of Fengle on a Renaissance Tan Zendala tile then glues it to a black Zendala tile to make a 3D scented, auditory Zentangle object d’art.

Step 1: At 00:45 – Using the same now-familiar marking method, with a square Zentangle tile, Maria marks the Renaissance Tan Zendala into four sections with graphite tick marks.
Step 2: At 01:16 – Using the white tile edge as a guide, Maria connects the four ticks with a string line.
Step 3: At 02:00 – Using the edge of another Zendala, she adds arcs over the four straight string lines.
Step 4: At 02:30 – With the large end of the stylus she scores along the pencil lines. They recommend doing this with the Zendala on a surface with a little give rather than a hard table.
Step 5: At 03:25 – She delineates the arcs with a pencil aura beside it.
Step 6: At 04:15 – She adds another pencil aura on the other side of the arc.
Step 7: At 04:39 – With the black Micron 01 she puts an orb in the center space, then adds an aura around it. Then she adds a wider aura around it and fills the space with small orbs.
Step 8: At 05:36 – Using the take off and land technique Maria “spins around the center motif” and connects it to each corner with an S stroke. She notes she’s doing a version of Fengle.
Step 9: At 06:15 – Maria adds a dot in the middle of the lower curved section then says, “We’re going to add four more of these S lines, but we’re going to go behind the pencil lines in Hollibaugh-fashion drawing underneath.“
Step 10: At 07:18 – “Now we’re going to backtrack to about halfway to the existing lines,” that stretch to the corners.
Step 11: At 08:06 – She joins the ends of the corner strokes, going along the pencil lines until they meet the adjacent stroke.
Step 12: At 08:45 – “We’re going to throw a little orb in the center of each section.“
Step 13: At 09:07 – “We’re going to spin these lines in the other direction … the other lines were S shapes and this one is more like a number 9.” She again uses the take off and land technique.
Step 14: At 09:43 – She continues adding this spinning stroke so each shape is connected on all three corners, “still doing number 9’s going to the center“.
Step 15: At 10:55 – Focusing on the center orbs, “that central hub”, she spins more strokes coming off the center in the top right section, weighting the stroke towards the end. “Start from the hub and go for the bead … skip one space” around the hub and fill every other one.
Step 16: At 13:36 – She fills in the background sections with black ink, adding “drama”.
Step 17: At 14:35 – She adds a stroke inside the scored aura to make a continuous shape.
Step 18: At 15:20 – Maria inks over the outside pencil aura line and around the base of the arcs to enclose the space.
Step 19: At 16:16 – “We’re doing the same thing on the complementary side“, she auras the outer shapes around the edges of the Zendala.
Step 20: At 16:52 – She fills the inner seed shapes with Tipple for background texture explaining her technique for adding large orbs then smaller ones around them and filling in with tiny ones to finish.
Step 21: At 21:13 – “We’re going to drop some double lines in each one of the outer semicircles,” the double lines divide them into four sections.
Step 22: At 21:55 – She adds an aura inside each of the sections.
Step 23: At 22:55 – She adds coffering: connecting the corners of the auras to the outside.
Step 24: At 23:42 – She adds a thin aura inside each of the central “facets”.
Step 25: At 24:39 – Maria marks a new white tortillion to distinguish it from one to use with graphite. She then adds graphite to the tangles and blends it with a tortillion.
Step 26: At 29:03 – With the white charcoal pencil she adds highlights and blends them out with the tortillion.
Step 27: At 32:12 – She adds more graphite over the white.
Step 28: At 32:53 – She adds white charcoal “in these window panes” around the edge, then adds graphite shading on the left and bottom sides of the coffering frames.
Step 29: At 35:06 – With the Micron 01, Maria “adds a little love” to make edges crisper where the white charcoal and graphite may have changed the original strokes, and she adds more graphite where the while chalk has lightened the original.
Step 30: At 36:56 – Maria folds up the edges along the straight score lines, then at 37:22 she gently folds the curved lines towards the back, gently molding the piece a little at a time.
Step 25: At 38:20 – Maria demonstrates her technique for gluing the Tan Zendala to a black one and putting some coffee beans (or macaroni or rice, etc.), and/or scented things such as lavender, inside.
Step 25: At 42:52 – Using a large needle Maria pierces the top through the “beads” to let the scent out. She gently enlarges the needle holes using the stylus, “making them just a tiny bit bigger“. She finishes by adding some White Gelly Roll dots to the black ink and then her chop.
Day 12
In Day 12’s video (31:09) – In the last day’s video Maria makes a spinning top from two tangled Zendalas glued together and a graphite pencil used as the spinner.

Step 1: At 00:14 – Maria begins by gluing two Zendalas together, a Renaissance Tan and a black, creating a double-faced Zendala.
Step 2: At 01:32 – Using a piece of scrap paper, Maria lays the Zendala combo on the paper and traces around it with the graphite pencil, then she cuts out the penciled circle.
Step 3: At 02:09 – She folds the circle in half and in half again to find the center. “I want you all to realize this is going to be a great tool to have in your toolbox and not to throw away this piece of paper.”
Step 4: At 02:45 – Using a large needle, Maria pierces the center, “as close to the center as you can get, and then just save this“. She then folds the circle again lining up the previous folds and creating 8 sections.
Step 5: At 04:07 – Using this new tool we’ve just created, Maria centers it on top of her Zendalas and marks the middle using a large needle and then pierces the Zendalas through that mark.
Step 6: At 04:56 – With the graphite pencil, Maria Makes “this bizarre amoeba-like thing” for a string, “like a giant Pangea.”
Step 7: At 05:15 – Using the Micron PN, Maria draws an aura around the string, turning the tile as needed.
Step 8: At 05:40 – Using an edge of the Project Pack envelope aligned through the center piercing, with pencil she divides the outer edge of the tile into four sections, then divides those in half creating eight sections around the edge of the tile.
Step 9: At 06:24 – She restates the pencil lines with the Micron PN and then auras both sides of them.
Step 10: At 06:57 – She adds an aura around the outside of the Pangea ink line.
Step 11: At 07:27 – She places a dot in the center of each outside section the same distance from the outside edge of the tile, then she auras the dot in every other one.
Step 12: At 08:30 – She adds a spiral around each of the aura-ed dots, then adds Printemps around it to fill the section; she repeats this around the tile in the other three sections with aura-ed dots.
Step 13: At 10:38 – She adds a large aura, about the size of the pencil diameter, around the dot/hole in the center, then adds an aura around that. She adds a third aura a little further spaced out,
Step 14: At 11:25 – Using the “spokes” around the outside of the tile as a reference, she adds a small triangle from the aura pointing at the “spokes” around the outside edge of the aura.
Step 15: At 12:01 – We’re doing CZT Daniel Lamothe’s Dreamcatcher tangle and will use it as a reticulum. She adds a V shape joining the tips of each triangle.
Step 16: At 12:10 – “You just keep doing that and if you keep the curve of the line that you’re extending, it gets bigger.” As Maria reaches the Pangea pencil string, she treats the strokes as going behind.
Step 17: At 13:32 – She adds Crescent Moon starting in the first triangles near the center of Dreamcatcher.
Step 18: At 14:16 – In the next layer she adds a “curvier version of it“.
Step 19: At 15:21 – In the third layer she adds Bales, then in the space left she adds another Crescent Moon.
Step 20: At 16:42 – In the fourth layer she repeats the previous layer, adding Bales shapes and then Crescent Moon in the remaining space.
Step 21: At 17:26 – In the Pangea aura band she adds Knightsbridge.
Step 22: At 18:24 – In the remaining sections around the edge of the tile, she adds a diamond shape around the dot, then adds an aura around them.
Step 23: At 19:16 – She adds Bales shapes inside the diamonds, and auras it until the dot disappears.
Step 24: At 19:51 – With the graphite pencil she adds shading for dimension and blends it with the tortillion.
Step 25: At 23:51 – She adds highlights with the white charcoal pencil.
Step 26: At 24:08 – She adds White Gelly Roll ink to highlight the Crescent Moons, “just adding a little bit of sparkle there“, as well as in some of the Printemps.
Step 27: At 24:50 – She adds white charcoal to the same Printemps “to bring those first spirals up … lifts them off the page“.
Step 28: At 25:13 – She turns the Zendala over to the black side and with the White Gelly Roll she puts an aura “up very close to the edge”. Rick notes that a light pressure on the Gelly Roll is all that it takes and the pens also work better more vertically than the Microns.
Step 29: At 25:35 – Still with the White Gelly Roll Maria adds an aura inside the one just drawn, and then adds Doodah inside the band.
Step 30: At 26:30 – “If you make an oops, make something of it,” she adds a Zinger.
Step 31: At 27:14 – She adds “like a Dingsplatz” around the center and adds dots between the loops.
Step 32: At 27:51 – Maria turns the tile over and adds her chop, then uses the stylus to enlarge the center hole a little bit. She enlarges it further using the pencil.
Step 33: At 29:45 – Using her tortillion, Maria adds Mod Podge to the hole then pushes the graphite pencil about 1/3 of the way through. Then they “take it for a spin“.
Wrap Up
In the final video in the Project Pack 16 Series (10:40), Rick, Maria and Martha review the dimensional pieces of art we created “and tell some stories“.

Step 1: At 01:15 – After playing with Day 1‘s flipper toy, Rick demonstrates a device he found on Amazon with a remote control and he rotates his pillow box toy from Day 2.
Step 2: At 02:25 – They enjoy Julie’s beautiful tile from Day 3 using CZT Maria Tovar’s Inkless Tangling (Dry Embossing) Technique.
Step 3: At 02:25 – Next up is Martha and Molly’s faceted cornucopia hanging ornaments from Day 4 and suggest some ways to use them including gluing two together.
Step 4: At 03:55 – Next up is Maria’s burnished 3D Zendala tiles from Day 5.
Step 5: At 04:30 – On Day 6, Rick created a Zentangle die.
Step 6: At 05:16 – The next one is Maria’s Zendala with Crazy Cubine on a Tan Renaissance Tile from Day 7.
Step 7: At 05:38 – On Day 8 Rick created another 3D hanging ornament using Bijou tiles.
Step 8: At 06:18 – On Day 9 Molly and Maria taught us their Z-Through technique using Pangea and Mooka, and Martha shows their prototype using Icanthis and Pangea and a green watercolor pencil. Day 10 created the reverse side of this Zendala pair.
Step 9: At 08:00 – Day 11 was the “scented tambourine” and Maria also shows us her prototypes.
Step 10: At 09:08 – The final one was Day 12‘s Spinner and Maria shows us more prototypes including one she made with two square tiles instead of the Zendalas.
This recap of Zentangle’s Project Pack #16 will make it easy for you to find all the related videos and any parts of them you may wish to refer to again.
Remember the images above are linked to their YouTube video, simply click the image to go to the video. Or, you can view the complete video on the corresponding tangle’s page on TanglePatterns, they make a fascinating “historical” record of Zentangle videos on each tangle.
For a complete list of Zentangle’s Project Packs click the PROJECT PACKS link in the pink alphabetic tangle menu bar.
|
.oOo. |
|
Enhance your Zentangle experience while supporting TanglePatterns: |
|
BRAND NEW! TanglePatterns.com TANGLE GUIDE, 2026 Edition |
|
 |
The 15th Edition of the TanglePatterns.com TANGLE GUIDE is an instant-download 123-page interactive digital eBook/PDF containing over 2,300 tangles on the site from May 2010 through December 31, 2025. It's a great resource and a must-have digital tool for using the site. Visit the STORE > E-BOOKS page and help keep TanglePatterns.com going by getting your copy now! |
|
"Linda, Thank you! I was relying on too few and getting stuck after 3 years of daily working with Zentangle. This has inspired me to ‘begin again’ with renewed excitement." ~ Barbara R. |
|
| See the BOOK REVIEWS page for more details on its features and view a sample page. Note: this is a digital product to download immediately when ordering, nothing will be physically mailed to you. | |
| If you're new to Zentangle® and tangling, my TanglePatterns.com BEGINNER'S GUIDE TO ZENTANGLE is just what you need to get started. Also available en Français and en Español. | |
|
|
|
 |
This is the only Zentangle book you'll ever need: the fabulous Zentangle PRIMER Vol 1. It's your CZT-in-a-book by the founders of Zentangle®. For more about the content and to read the rave reviews, visit the BOOK REVIEWS tab. |
| Available in KINDLE format for $9.99. Spanish Edition here. Japanese Edition here. | |
| "Absolutely the best Zentangle Book yet! As an accomplished artist I used to think I did not need instruction on this art form. How wrong I was! My tangling improved by leaps and bounds after reading this book. If you think you have Zentangle down then you need this book more than ever!" ~ Kris H | |
|
|
|
|
.oOo. |
|


Thanks, Linda! As ever, I greatly appreciate the summaries and time hacks. These are super helpful! Merry Christmas.
Day 1. How is Pangea different from Vache? Thanks!
Vache 2 – it isn’t.
When I added Pangea to the site I wrote: “And truth be told Pangea was actually first published way back in 2010 by Canadian CZT Genevieve Crabe as Vache 2. It also shares DNA with Linda Dawson’s Amoeba!”