


 As is now their tradition, each year Zentangle HQ celebrates the Christmas season with their Twelve Days of Zentangle series.
This 2025 Edition was inspired by Leonardo da Vinci and his contemporaries. For twelve consecutive days we tangle together with guidance from video lessons and the selected contents of our Project Pack.
Here’s this year’s introduction from the Zentangle newsletter:
As we venture forward in the world, we, as a species, become more. More educated, more efficient, more talented, more complex, more innovative, and more aware. Yet, in order to propel us in this forward motion, we still look back at those who came before us. We still take inspiration and guidance from discoveries and ideas from centuries ago.
In this Project Pack, we will travel back in time and visit a golden era of art that was deeply influenced by the rapidly changing philosophy, literature, music, science, and technology of the time. Join us as we explore new materials and techniques that pay homage to a timeless beauty that continues to enamor and impress us so many years later.
SUPPLIES: This Project Pack is available here ($39.95) in the zentangle.com store and it’s a convenient way to get all the supplies for the project. However, the introductory video reviews the items in the Project Pack and you might discover you have suitable alternatives in your own Zentangle supplies. “If you do not have the project pack materials, we encourage you to follow along with whatever you have available.”
- One Zentangle canvas tool pouch containing:
- One Sakura Micron 01 pen, Brown (#12 = Light Brown)
- One Sakura Micron 03 pen, Sepia (#117 = Dark Brown)
- One Sakura Micron 08 pen, Sepia (#117 = Dark Brown)
- One General’s Pastel Chalk pencil – #4429 Sanguine
- One Zentangle graphite half pencil
- One Zentangle General’s white charcoal half pencil
- Three tortillions
- New Dark Renaissance Tan Zentangle tiles:
- Six 3.5-inch square tiles
- Two Phi tiles
- Two prestrung Zendala tiles
- Two 5xPhive 5-inch square tiles
The following chronology is a summary of the videos for this Project Pack with links to the individual videos. Either click the Day #’s title link or the image itself to view the full video on YouTube.
It isn’t necessary to watch the videos in sequence, but it will be very helpful for you to watch the Introduction video first.
CZT Molly Hollibaugh recommends we watch Project Pack videos completely through once before beginning our tiles:
“You’re going to have a little more confidence, you’re going to be a little more aware of what’s happening next. Then you might try something different, you might explore it in a different way”.
QUICK LINKS TO DAILY SUMMARIES
Jump to:
Day 1 – Rick tangles Phicops and Flux
Day 2 – Maria tangles Molygon and Variations
Day 3 – Julie tangles Crazy Huggins and Diva Dance
Day 4 – Molly and Martha tangle tangle Hollibaugh, Marasu, Tripoli, Crescent Moon and Striping
Day 5 – Maria tangles Mysealiam
Day 6 – Molly and Martha tangle Pokeleaf and eleven more tangles
Day 7 – Rick tangles Doodah and Well
Day 8 – Julie tangles Fife
Day 9 – Molly and Martha tangle versions of Verdigogh and Scena
Day 10 – Rick tangles Narwal, Flux and Shattuck
Day 11 – Maria tangles Rixty
Day 12 – Maria tangles Icanthis and Sampson
Wrap Up
Introduction
In the introductory video (07:26) – Rick and Maria introduce us to this year’s Leonardo da Vinci-inspired Twelve Days of Zentangle series.

Step 1: At – Rick and Maria introduce themselves then as they open the supplies pack for this Project Pack they explain that we’ll be taking inspiration primarily from Leonardo da Vinci but also from fellow Renaissance artists. Maria points out that they aren’t historians, just enthusiasts, “so if we misspeak, please forgive us”.
Step 2: At 01:42 – Rick displays the new mid-tone Tan tiles “that mimic this wonderful period of time”. These are darker tiles than the regular Renaissance Tan tiles. He points out that the pre-strung Zendala mimics da Vinci’s “Vitruvian Man“.
Step 3: At 03:33 – As Rick shows an image of da Vinci drawings of machinery, Maria notes “he was big on machines and always trying to improve on things that existed”.
Step 4: At 03:53 – As he shows more da Vinci drawings, “We would look at these and take inspiration from different inventions.”
Step 5: At 04:05 – “He would also do beautiful, beautiful drawings of nature.”
Step 6: At 04:30 – Rick empties the canvas pouch of project tools and goes through them, pointing out the Sanguine chalk pencil “you can see how the color just really matches.” Maria notes that da Vinci used chalk in that color “and he referenced it as Sanguine as well.”
Step 7: At 05:10 – He reviews the pens, including “two new pens an 03 and an 08 in a very, very dark brown”.
Step 8: At 05:24 – Maria suggests marking them with “some sort of tape because you don’t want to confuse them with your black pens”, as Rick wraps the ends of the two pens with a small piece of blue artist tape. He continues with the pencils and tortillions.
Step 9: At 06:40 – Rick says, “Molly pulled out a couple of really cool quotes to set the tone for this.”
Step 10: At 06:48 – “Art is the queen of all sciences, communicating knowledge to all the generations of the world.” Leonardo da Vinci.
Step 11: At 07:04 – “When the spirit does not work with the hand, there is no art.” Leonardo da Vinci.
Day 1
In Day 1’s video (19:02) – With Maria keeping him company, Rick tangles Phicops and Flux on the prestrung star Zendala.

Step 1: At 00:18 – Rick and Maria introduce themselves and Rick says, “We’re going to start this da Vinci-inspired adventure with these beautiful materials.” He selects one of the two prestrung Zendalas with the star shape for today.
Step 2: At 01:00 – Rick explains that today’s lesson was inspired by da Vinci’s drawing of a waterwheel shown in the book Leonardo: The Complete Drawings, by Johannes Nathan, Frank Zöllner. “We’re taking inspiration, we’re not trying to copy it but it’s a beautiful opportunity to incorporate some tangles.”
Step 3: At 01:20 – We’re going to be using Phicops by CZT Laura Harms’s husband, Brad Harms. Rick starts with the light Brown Micron 01 and makes a dot in the middle of the Zendala, then adds a stroke going from the dot along the string to the point where the two string lines meet at the point.
Step 4: At 02:04 – He repeats this around the tile, starting at the center dot and going over the string line to the point.
Step 5: At 02:45 – He notes this is a nice warmup exercise for your hand, and says Maria: “yes, but you HAVE to focus”.
Step 6: At 02:57 – After he’s finished all five “spokes”, “Let’s put one in between each … and if they’re not exact it will all work out in the wash.”
Step 7: At 03:38 – With another curved stroke, he connects the points of each line to the spot on the adjacent line where the string crosses it, first getting the rhythm of the stroke by starting with the first five curved strokes he added, then going tack to the curves added in between. “This is all curves.”
Step 8: At 05:19 – Once those have been completed, “We’re going to do the last set of lines”, and going in the opposite direction, “We’re going to take advantage of that string line and just restate it up to the point where it stops.”
Step 9: At 06:03 – Using the Sanguine Chalk Pencil Rick adds shading along the base and left side of each cone shape.
Step 10: At 06:32 – He adds White Charcoal Pencil along the edge of each, then blending the colors with a tortillion. This is unlike our usual sequence of adding shading everywhere, and blending it then adding color everywhere, and so on. Here he completes all the steps of coloring, shading and blending on each shape before proceeding to the next. He fills all the main shapes this way, going back and adding more Sanguine and/or White as he feels.
Step 11: At 09:02 – Having finished the main shapes he now uses a graphite pencil to add shading to the “part inside, so to speak”, as well as along the overlapping leading edge of the main shape.
Step 12: At 09:54 – Maria reminds us, “Shading in Zentangle is a totally different art form than shading in reality.”
Step 13: At 10:32 – After he finishes the first shape to his liking, Rick moves around the tile repeating the shading on each Phicops section.
Step 14: At 10:53 – Maria reminds us that we can pause the video and go at our own pace, “it really works out better than trying to keep up with Rick or keep up with me. Take your time and if you need to, reinforce what you’re doing” after assessing it from different perspectives.
Step 15: At 11:35 – Rick adds a tiny bit of White Charcoal at the tip of each Phicops shape to add contrast.
Step 16: At 11:46 – Maria gives us tips about sharping our pencils.
Step 17: At 12:06 – Rick changes to the Brown 03 Micron to add a thin aura all around the shape.
Step 18: At 12:59 – He adds Flux around the outer edge along the aura, each touching the one next to it and all facing in the same direction, like water on the waterwheel.
Step 19: At 14:32 – He adds orbs in the spaces between the Flux, starting with the largest one he can fit in each space then adding smaller ones around it.
Step 20: At 15:57 – With the graphite pencil Rick adds shading at the base of the Flux shapes and softens it with the tortillion. “I’m also using the graphite that’s on the tortillion to touch the bubbles and push them into the background a little bit.”
Step 21: At 17:10 – After he finishes the shading, he goes back with the White Charcoal pencil to add a little bit of highlight.
Step 22: At 18:17 – He adds his chop and signs the back of the tile.
On the blog, ZHQ responded to questions about the books inspiring this series. This is the list they provided:
Leonardo: The Complete Drawings, by Johannes Nathan, Frank Zöllner.
Isabella & Leonardo, by Francis Ames-Lewis
Leonardo da Vinci, by Walter Isaacson [Note: Now a docuseries from Ken Burns on PBS]
Leonardo da Vinci Master Draftsman, by The Metropolitan Museum of Art
Leonardo da Vinci and the Secrets of the Codex Atlanticus, text by Marco Navoni
Day 2
In Day 2’s video (28:46) – With Rick keeping her company, Maria tangles Molygon and variations on a square Tan tile.

Step 1: At 00:52 – After introducing herself and showing us the tools for this Project Pack, Maria says she’s “going to work with a Molygon-esque shape”, Molygon and variations, as inspired by the da Vinci image she shows us.
Step 2: At 01:20 – She begins with the Light Brown 01 pen and makes a dot, then adds a long S curve coming from it., “this is going to tell us exactly what to do the entire time.”
Step 3: At 01:40 – Back to the dot, she adds another S curve, connecting it at the tip with the first one to create a closed shape.
Step 4: At 01:50 – She adds a third S curve, that auras the second one, “When we’re going Molygon, we usually go about 3/4 of the way down with your aura and then do a tethered aura for the other side, turn your tile.”
Step 5: At 02:13 – Turning her tile she adds another aura following the previous one and ending about 3/4 of the way down, then another tethered aura. They note how the shape is changing from the S curve we began with.
Step 6: At 02:41 – As she adds a fourth set she says, “it’s almost having a wing feeling.”
Step 7: At 03:23 – “I tend to carve my way through adding little touches here and there,” this gives her more time to think about what she’s going to do next. Rick adds, “If you’re not really sure what you’re going to do next on a big scale, you just go in and add a little love here and there .. .always keeping your pen moving and it keeps the momentum going.” Maria continues around until the overall shape is complete.
Step 8: At 05:04 – “We’re going to add a few more vits of Molygon as if they were going behind,” as she adds a shape coming from one corner towards the main shape, then going behind it, keeping the same aura consistent throughout. Then grows that shape outwards in the same way as before.
Step 9: At 06:11 – She begins to add orbs inside the Molygon, starting at the middle of the shape and tucking them in as if growing behind each other. Rick notes, “They really push up and right over even the bounding line.” Maria inks in the spaces (interstices) between the orbs as she goes along.
Step 10: At 07:40 – “She turned the other way to do the same thing,” and Maria adds “the biggest orb is in the middle and then it goes away from it on each side.”
Step 11: At 08:10 – “We’re going to pretty much do this in all of the Molygon shapes.” She fills all of the center shape’s spaces in this way.
Step 12: At 08:42 – Moving to the shape that’s going behind, she adds the largest orbs where the shape goes under then decreases them outwards from there.
Step 13: At 09:58 – Moving on, she connects the ends of two of the shapes opposite one of the tile’s corners with a small C-curve then extends a stroke out from it towards the corner. She adds more strokes radiating out to the edge of the tile, and “feathers” the ends of the last couple, filling the outer band of half the tile. “It looks like tendrils coming out of the shell.”
Step 14: At 11:35 – She “closes” pairs of the lines with a V-shape, “imagining where they would be connected”.
Step 15: At 12:00 – “We’re putting in a spine right down the middle of each one.”
Step 16: At 12:36 – With the graphite pencil she adds “detail on the tips of those Molygons“, she adds graphite at each end and then softens it with a tortillion.
Step 17: At 13:46 – With the Sangine Chalk Pencil she adds color beginning where the graphite is the lightest in each shape and lightening it towards the middle, “leaving that center part untouched”.
Step 18: At 14:42 – She marks one of the tortillions with the Sangine, then uses that to soften the color she’s just added.
Step 19: At 15:54 – She adds “heavy” White highlights in the middle of each Molygon shape with the White Charcoal pencil.
Step 20: At 16:51 – Maria reminds us to take time every now and again to hold the tile out at arms’ length to assess the tile and see it from a different perspective.
Step 21: At 17:39 – She goes over the White Charcoal with a tortillion, blending it in.
Step 22: At 18:02 – Maria adds more graphite at the center tips of the Molygon shapes and softens them in a circular fashion.
Step 23: At 18:53 – She begins adding light graphite fill in one half of each of the tendril shapes, softens it with a tortillion and then adds a little more graphite at the center of each.
Step 24: At 21:17 – With the White Charcoal pencil, Maria adds a curved aura where the darker graphite ends, then continues adding them spaced outwards “almost a rainbow radiating highlights”. She softens them with a tortillion.
Step 25: At 22:47 – She adds details with the Dark Brown Micron 08 and an aura around the overall shape.
Step 26: At 25:03 – She changes to the Dark Brown Micron 03 and adds “a narrower aura”.
Step 27: At 25:48 – Thinking her tile was done, Maria adds her chop then after looking at the tile she decides to add more detail with the White Charcoal pencil. She adds light swirly strokes around the outer edges then smooths it with her fingers, adding texture and bringing forward the focal shapes.
Step 28: At 28:22 – They show “More samples, more iterations”.
Day 3
In Day 3’s video (16:13) – In this video Julie Willand tangles the wonky version of Huggins called Crazy Huggins together with Diva Dance on a square Tan tile.

Step 1: At – After a brief introduction, Julie explains we’ll be working with the three Microns today, the 01 Light Brown and the 03 and 08 Dark Browns and a square tile on the new darker Renaissance paper tile.
Step 2: At 01:56 – We are taking inspiration from da Vinci and other Renaissance artists. Julie shows a picture of Girl With A Pearl Earring by Johannes Vermeer and points out the dark background, and describes the technique of chiaroscuro contrasting dark and light with deep shadows and bright highlights. “We’re going to play around with that and also drawing some inspiration from some of da Vinci’s sketches” and a twisting effect that caught her eye in the sketches she shows us.
Step 3: At 02:54 – She begins with the Brown 01 Micron and draws four orbs roughly in a rectangle and connects pairs using the take-off-and-land technique to begin the tangle Crazy Huggins.
Step 4: At 03:33 – She continues building Crazy Huggins outwards on the tile noting, “I’m not going to fill my entire tile with Huggins but it’s going to take up a good portion”.
Step 5: At 04:41 – She adds auras on the inside of Huggins and around the outer perimeter of the overall shape.
Step 6: At 05:17 – She adds a curve stroke inside the Huggins, dividing the shape in half from corner to corner, then adds tethered auras on each side of the curve to create the twisting effect she noted in the da Vinci sketch. She repeats this inside each Huggins shape.
Step 7: At 07:26 – She adds hatched shading (enthatching) inside the corners of each of the curves.
Step 8: At 08:00 – Switching to the Dark Brown 08 Micron to add the Rock ‘n’ Roll version of Diva Dance around the outside of the Huggins. She fills the entire space around the Huggins with Diva Dance.
Step 9: At 10:31 – She adds White Charcoal pencil highlights, “working on each Huggins one-by-one and adding White charcoal to the middle of each of those bands.” She smooths out the White charcoal with a tortillion.
Step 10: At 11:26 – With the Sanguine Chalk Pencil she adds color at the ends of each shape where she had added the enthatching, then blends it in with a tortillion.
Step 11: At 12:15 – She adds graphite shading along the edges where the “Huggins weave into each other”.
Step 12: At 12:52 – She continues this process with the remaining Huggins shapes on the tile.
Step 13: At 14:37 – Moving to the Diva Dance area, she adds a heavy layer of graphite along the edges of the Huggins, then softens it with a tortillion.
Day 4
In Day 4’s video (38:24) – With Jen’s help on the video voiceover, Molly and Martha tangle Hollibaugh, Marasu, Tripoli, Crescent Moon and Striping on the prestrung back of a 5xPhive Tan tile.

Step 1: At 00: – After introductions and a quick review of the tools, Molly explains Martha wasn’t available to do the voiceover for this video so Jen is stepping in on her behalf.
Step 2: At 01:12 – Molly notes the inspirations for today’s video lesson are from architectural influences of da Vinci’s time.
Step 3: At 02:35 – She shows a 5xPhive tile they’re chosen for today’s explorations and beginning with the 03 Sepia Micron pen. We’ll be working on the prestrung back of the tile. Molly begins by restating the center string with the 03.
Step 4: At 03:10 – She adds an aura inside the shape.
Step 5: At 03:22 – She continues restating the string lines with the 03, “outlining the structure”.
Step 6: At 04:28 – She sets the sections up to add coffering by adding dots inside the corners and then connecting the dots and then connecting the corners. She reminds us to pause the video and go at our own pace for each step.
Step 7: At 06:29 – She adds dots on the center square and adds coffering to it using the same method.
Step 8: At 07:18 – Martha uses the Brown Micron 01 to fill the center section with short thin Hollibaugh “planks” that grow from the coffered edge towards the center of the tile.
Step 9: At 09:58 – She adds Marasu in a pair of the open squares, switching to the Sepia 03 to add the thin Marasu lines on the edges of the wider Brown 01 bands.
Step 10: At 12:27 – In the pair of open squares on the opposite side of the Marasu, she divides each into four triangles using strokes with the Brown 01 from corner to corner, then adds rice shapes on each segment creating Tripoli (or Fragment C12).
Step 11: At 14:00 – With the 03 Sepia Martha adds orbs in the center of each Tripoli fragment.
Step 12: At 15:20 – Switching back to the Brown 01 and moving to another pair of coffered sections she fills them with Crescent Moon.
Step 13: At 17:57 – In the last remaining pair, she again divides them into triangles with corner to corner strokes, then adds simple auras inside each triangle then adds rounding at the points.
Step 14: At 19:46 – With the 03 Sepia Martha adds rounding in the corners of the center Hollibaugh section.
Step 15: At 20:22 – Martha adds S-strokes along the center section’s aura line creating the effect of a ribbon wound around it. Molly says “we call them streamers“.
Step 16: At 21:32 – Molly comes back and with the 03 Sepia and adds orbs in the four curved outer sections, inking in the spaces between them to bring the orbs forward.
Step 17: At 22:48 – Molly adds Striping in the four corner areas.
Step 18: At 24:13 – Martha and Molly add graphite, White Charcoal and Sanguine Chalk pencil to all the tangles they’ve added to the tile.
Step 19: At 34:15 – Molly goes back in with the pens to “bring that emphasis back”.
Step 20: At 36:07 – Molly adds graphite shading around the outer edges of the tile, then goes back with the pen again to go over some of the lines around the edges.
Day 5
In Day 5’s video (23:29) – Rick keeps Maria company as she tangles a variation of Mysealiam on a tan Phi tile.

Step 1: At 00:37 – After a brief introduction, Maria shows the da Vinci sketch that served as her inspiration for today’s lesson as well as the Phi tile we’ll be using.
Step 2: At 01:10 – Starting with the graphite pencil she ads a light diagonal line, aiming from corner to corner. Then she adds an oval shape, “this is going to be our string. If you’re wondering, it’s sort of a variation of a Mysealiam“.
Step 3: At 01:37 – Beginning with the Brown Micron 01, she adds a slightly diagonal stroke from the tip of the diagonal string line to the left side of the bottom of the oval. “Shoot some lines down to this beautiful oval.” She repeats this on the right side of the string line.
Step 4: At 02:00 – She extends those two strokes down to the tip of the bottom of the string line, creating a large diamond shape overall.
Step 5: At 02:15 – Starting about half way down the first stroke she drew, Maria adds another line on the left side, tethered to the bottom oval shape, then extends that line towards the bottom of the overall shape, connecting to the tip. She repeats this going outwards on the left side until she reaches the edge of the oval shape.
Step 6: At 03:43 – She repeats this on the right side.
Step 7: At 03:49 – On the inside of the center diamond shape she created first, Maria adds curved auras, then repeats this on the bottom of the diamond shape.
Step 8: At 04:04 – “We’re going to put some orbs inside here,” as she adds a large orb about the size of the pencil diameter at the middle of the bottom oval line, “we’re going to go down that center string, that first line that we put down.” She adds more orbs the same size along that line, “doing them left and right and a little jogging them back and forth”.
Step 9: At 05:09 – Once the initial line of large orbs is added from top to bottom, Maria adds more orbs explaining, “your orbs are going to get a little bit smaller as they get to the opening.” She fills that space with orbs and inks in the spaces between them. They discuss the advantage of pausing and restarting the video as necessary to study the steps as we go along.
Step 10: At 06:53 – Taking the Sepia Micron 08 (dark brown), “we’re going to start adding to the composition. I’m going to go over some lines and some lines I won’t go over”.
Step 11: At 08:05 – Switching to the Brown 01, and working in the “ribs” on each side of the center, she adds some solid brown in the rib. Then she switches to the 08 Sepia again to add another narrower rib inside each of the rest then fills each one with the Brown 01.
Step 12: At 09:40 – She repeats this on the right side, then uses the 08 Sepia to add some dark accent strokes here and there, especially along the ribs at the bottom edge of the oval.
Step 13: At 11:00 – She brings in the White Charcoal pencil and adds it all across the top rib section, then in the un-inked sections in the bottom, creating a brown and White striped effect. She repeats this on the right side but with a little lighter layer so the left side remains brighter.
Step 14: At 12:10 – She adds graphite shading along the edges of the White ribs and blends them it. The effect makes the brown one look raised above the White.
Step 15: At 13:30 – She adds a thin White line along the edge of the bottom of the oval. Then she adds White in other spots around the shape where she wants highlights.
Step 16: At 14:17 – Working with the Sanguine Chalk Pencil, she adds color in the orbs section leaving highlights in the orbs and then softening it with a tortillion.
Step 17: At 15:33 – With the Brown 01 she adds strokes around the highlights she left in the orbs, “little seeds of some sort”.
Step 18: At 16:40 – She adds tiny White highlights in each “seed” with a sharpened White Charcoal pencil and follows that with more graphite shading in that area.
Step 19: At 17:29 – Using the graphite pencil, Maria creates a light “margin” along the right side of the tile
Step 20: At 17:40 – With the Sanguine Chalk Pencil, Maria adds a Bijou character at the left side of the graphite line.
Step 21: At 18:10 – She adds a second “margin” line in graphite above the first creating a large-ish band. She then adds a graphite aura along the bottom line.
Step 22: At 18:30 – Still using the graphite pencil she adds Crescent Moon along the band, filling it with Crescent Moon and its auras. She then uses the tortillion lightly to “nudge” the area into the paper.
Step 23: At 19:50 – “Somebody had to do this, and it had to be me,” Maria says as, like da Vinci, she adds backwards printing, adding the word Passion with the graphite pencil.
Step 24: At 20:30 – She adds the word Gratitude, also printed backwards.
Step 25: At 21:14 – Changing to the Sepia 08, Maria adds a few more embellishments.
Step 26: At 22:00 – She adds her chop.
Step 27: At 22:26 – She advises, “Hold your finished work out and see if it needs more distinction. I’m going back in and giving them little shades.” Rick adds, “Just a little delineation.”
Day 6
In Day 6’s video (45:57) – Molly and Martha (with Jen’s voiceover) tangle Pokeleaf, Purk, Tripoli (B12), Flux, Ambler/Emingle, Hibred, Jetties, Florz, Diva Dance, Jonqal, Striping, and Festune on the back of a 5xPhive Tan tile.

Step 1: At – After introducing themselves and the theme of this Project Pack, Molly shows some da Vinci sketches inspired by his inventions related to flight, the structure of bird wings and feathers. She then goes over some of the materials used in the lesson, including the 5xPhive Tan tile we’ll be using today.
Step 2: At 02:11 – With the graphite pencil Molly finds approximately the middle of the tile and places a dot there. She adds a curved pencil line reaching from one of the string’s corners in an arc to that middle dot, and extends another arc to the opposite corner of the string with a similar curved line.
Step 3: At 02:44 – With the Brown Micron 01 and varying the pressure as she goes to add character to the strokes, Molly draws a straight line from the pencil dot down to the string’s corner, then adds a similar line on the other side of the first one, leaving a narrow space between them.
Step 4: At 03:10 – She adds a similar pair of curved lines on the left side, spaced a little outwards from the first set, and then a similar pair on the right side. She continues creating these spaced channels on the left and right until the lower half is filled.
Step 5: At 04:58 – Molly “closes off these columns” with arcs.
Step 6: At 06:03 – At the top of each of the columns/channels she adds a “sort of Pokeleaf-esque” shape with a spine in the middle of each, “mimicking the spine we put into these wing shapes”.
Step 7: At 06:44 – For the next layer she adds the same shape between each of the previous ones, offsetting the layer from the one above. She repeats this until the channels are about one third full and then adds rounding on the bottom row.
Step 8: At 09:25 – She “seals off the top part” with a subtle slightly curved stroke.
Step 9: At 10:12 – Martha takes over to add some different tangles in the remaining space in the channels. First she divides the center two into squares with double lines mimicking the “spines” already in place and then fills those squares with orbs, somewhat like Purk.
Step 10: At 13:00 – She adds a Tripoli fragment (B12) in the next channel on the right side.
Step 11: At 15:05 – She fills the next channel on the left with Flux and orbs.
Step 12: At 17:10 – She fills the channel next to Flux with the squared version of Printemps named Ambler/Emingle.
Step 13: At 18:51 – She moves to the right side and fills the channel beside the Tripoli fragment with Hibred.
Step 14: At 20:51 – In the channel next to Hibred she adds Jetties.
Step 15: At 23:28 – On the left side next to the Emingle/Ambler she adds Florz.
Step 16: At 24:58 – Next to the Jetties she adds Diva Dance.
Step 17: At 26:18 – Next to the Florz she adds Jonqal.
Step 18: At 27:50 – Net to the Diva Dance she adds Striping with the tangle enhancer sparkle. Next to that she fills the space with small Bronx Cheer orbs and leaving a highlight in each.
Step 19: At 29:59 – On the left side beside the Jonqal she adds Festune and fills the final section with more Bronx Cheer orbs.
Step 20: At 31:26 – She “adds love” restating some of the strokes.
Step 21: At 32:00 – Molly has added Sanguine Chalk Pencil along the edge of the Pokeleaf section and softened it with a tortillion.
Step 22: At 32:53 – She adds graphite shading along the lower edge of the Pokeleaf area and on each side of the spines.
Step 23: At 34:35 – She adds White Charcoal highlights.
Step 24: At 35:58 – She adds more graphite under the Pokeleaf edges emphasizing the over-unders, then adds White Charcoal highlights too.
Step 25: At 38:34 – On the top half of the tile, using the side of her graphite pencil Molly adds graphite lines curving down from the top corner to the top of the Pokeleaf section. Then she uses the tortillion to blend it in along that edge.
Step 26: At 40:53 – Using the White Charcoal pencil she adds sketchy lines between the graphite lines then softens them with a tortillion.
Step 27: At 42:05 – With the Sepia 03 Micron she restates the top and bottom edges of the Pokeleaf section and some small hatching strokes
Step 28: At 45:24 – They add their chops.
Day 7
In Day 7’s video (23:07) – With Maria keeping him company, Rick tangles Well and Doodah on a 3.5″ Tan tile.

Step 1: At 00:46 – After introductions Rick shows a da Vinci sketch of what he imagines is a helicopter that he’ll be using for his inspiration today and we’ll be tangling on a 3.5″ square Tan tile.
Step 2: At 00:58 – “Alfie was so excited he ordered a little model of it, and tangled it and wound it up and just thought everybody would rally enjoy it.”
Step 3: At 01:22 – Beginning with the Brown Micron 01, Rick places a dot roughly in the center of the tile then draws a stroke out from there about half way towards the edge, then adds a curved stroke from the end as the start of a spiral. He turns the tile and continues the spiral outwards to the edge of the tile, stopping when the end is parallel with his first center stroke. He adds a short line connecting to the spiral. “And that’s my interpretation of looking down at the top of what Alfie put together.”
Step 4: At 02:56 – With the Sepia Micron 08 and starting at the center dot, Rick adds strokes extending from the dot to just past the spiral line he first drew and continues adding strokes all the way around the spiral.
Step 5: At 03:47 – Going back to the Brown 01, he adds an aura border around the inside of the spiral line.
Step 6: At 04:36 – Switching to the Sepia 03 Micron, Rick adds a black orb with a highlight (“black olives“) for the tangle Well in the center of the first inner wedge shape then continues adding them in each wedge shaped space.
Step 7: At 05:53 – Switching to the Brown Micron 01, he adds an aura around each orb.
Step 8: At 06:21 – He fills the border band with Doodah.
Step 9: At 07:20 – He goes back to the wedge shapes and finishes adding the tangle Well in each, mirroring each segment with the one adjacent.
Step 10: At 10:50 – Back to the Sepia 03, for contrast he adds auras inside each Well fragment “around the petal shapes”.
Step 11: At 11:48 – He fills the spaces just created by the auras with the lighter Brown 01.
Step 12: At 12:47 – He adds Sanguine Chalk Pencil inside the Well “petals”. Maria points out we should be aware that the chalk pencils can smear before the tortillion pushes them into the paper.
Step 13: At 14:43 – He adds another layer with graphite shading in the corners over the Sanguine.
Step 14: At 16:04 – He adds shading on the inner edge and along the outside of the opposite side of the Doodah band, then White Charcoal highlights on the other inside edge. “Then go back in and blend everything together with the magical tortillion.”
Step 15: At 18:22 – He adds White Charcoal highlights on Well.
Step 16: At 19:32 – He adds graphite shading around the edges of the tile “to give texture to the background”.
Step 17: At 20:20 – He adds a little bit of Sanguine Chalk Pencil over the graphite border in the corners of the tile.
Step 18: At 21:00 – He adds his chop and signs and dates the tile.
Day 8
In Day 8’s video (13:15) – Julie tangles a Fife monotangle on a Tan 3.5″ tile.

Step 1: At 01:52 – After her introduction Julie shares that our inspiration for today’s lesson comes from Leonardo da Vinci’s Flower of Life sketches, which she shows briefly, and it reminded her of the tangle Fife.
Step 2: At 02:21 – With the graphite pencil she adds a dot in each corner and close to the edge of the tile then connects them with a border.
Step 3: At 02:54 – With the Sepia 03 Julie adds a grid of dots for the foundation for Fife. She lays four rows of dots in the Sepia, then uses the Brown 01 to add another row in the lighter color, “we’re going to keep those two sections separate.”
Step 4: At 03:46 – Switching back to the Sepia 03, Julie adds rice shapes connecting the dots into square-ish spaces in the “Sepia dot” section.
Step 5: At 04:56 – She adds Fife‘s diagonal rice shapes inside each square.
Step 6: At 05:36 – Julie changes to the 01 and adds the rice shapes to that set of dots.
Step 7: At 06:21 – She switches back to the Sepia 03 to add the layer of diagonal rice shapes that go behind the diagonal ones already there. Then she switches to the Brown 01 to repeat this in that section.
Step 8: At 07:06 – Changes back to the Sepia 03 she adds enthatching on that section’s rice shapes.
Step 9: At 07:47 – She fills in the spaces around the Sepia rice shapes with the Sepia ink.
Step 10: At 08:26 – With the Brown 01, “Inside the rice shape that sits on top, I’m going to add orbs nestled in there like a little pea pod, and I’m going to do this in each one that sits on top.”
Step 11: At 09:22 – With the White Charcoal Pencil, Julie adds highlights on the center of the rice shapes in the Sepia section and blends them with a tortillion.
Step 12: At 09:58 – She adds Sanguine Chalk Pencil over the enthatching on the rice shapes.
Step 13: At 10:13 – She adds graphite shading where the rice shapes go over other ones.
Step 14: At 10:37 – In the Brown section Julie adds Sanguine Chalk Pencil on the orbs and softens with a tortillion before adding a White Charcoal highlight in the middle of each orb. Then she adds graphite shading where the rice shapes cross each other.
Step 15: At 11:59 – She adds heavy graphite shading along the edge of the Sepia section where it transitions to the Brown “unfinished” side, typical of some of da Vinci’s sketches.
Step 16: At 12:19 – She adds her chop.
Day 9
In Day 9’s video (25:04) – Molly and Martha tangle a “flat version of Verdigogh” together with Scena on a prestrung Tan Zendala tile. Rick sits in for Martha on the voiceover.
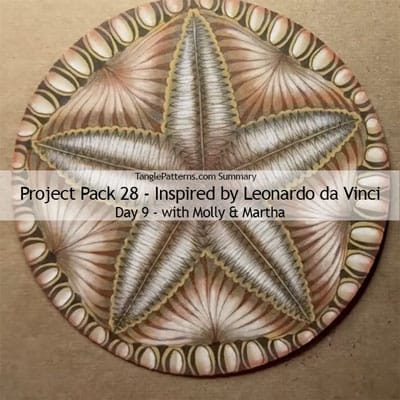
Step 1: At 01:19 – After their introductions, Molly shows an image of da Vinci’s “Vitruvian Man“, explaining she and Martha chose this as their inspiration for today’s lesson.
Step 2: At 02:02 – Selecting the prestrung Zendala, Molly begins with the Sepia 03 and estimating the center point of the tile she places a a dot there then draws a stroke from it down to one of the inner star points on the string. She repeats this on the remaining four points of the inner star.
Step 3: At 02:42 – Again from the center point, she now adds a stroke from it out to the point of the larger star then adds a thin aura along it. She repeats this around the tile.
Step 4: At 03:23 – Molly adds a stroke and curves on each side creating a rice shape and connecting the short stroke of Step 2 at a right angle to the longer pair of strokes. She repeats this outwards in the string, making a stroke and rice shapes to fill it, commenting “we’re sort of playing with a flat version of Verdigogh here”.
Step 5: At 05:23 – Martha takes over and with the Brown 01 she adds a playful aura mimicking the ends of the Verdigogh “needles” on one edge and continues it along the next one, then connects the two with a stroke creating a triangular space. She repeats this around the tile.
Step 6: At 06:40 – Martha moves to one of the sections and drops a vertical line from the base of the triangular shaped space to the top of the triangle then adds peppering to the end of that stroke. Molly says, “this is a variation on the tangle Scena“. She continues adding these strokes with peppering to fill the space. And repeats this in the remaining four sections.
Step 7: At 09:30 – With the Sepia 08 Molly then adds back to back curved strokes from the middle of the outside edge of the Scena to the edge of the tile, creating a “tree trunk” effect on each one. Molly comments how she and Martha noted that da Vinci “probably invented the ball bearing … and this particular layer or border was inspired by the ball bearing”. She also “attaches” the five points of the star to the edge of the tile in the same way.
Step 8: At 11:00 – She divides each section around the border in half in the same way with back to back curved strokes that she fills in.
Step 9: At 11:39 – Molly decides to do another layer of these, again dividing each space in half.
Step 10: At 12:21 – Molly changes to the Sepia 03 and adds a large orb inside each of the border spaces.
Step 11: At 13:20 – She adds some weighting on one side of each orb.
Step 12: At 14:05 – Molly adds graphite shading on one of the Scena sections, then she adds Sanguine Chalk pencil, followed by White Charcoal highlights and always softening with the tortillion. She repeats this in each of the Scena sections.
Step 13: At 18:02 – She begins work on the center Verdigogh star section, adding graphite shading first, then White Charcoal pencil, and finally the Sanguine Chalk pencil, again following each with the tortillion.
Step 14: At 23:13 – Molly adds White Charcoal highlights along the border of the tile.
Step 15: At 23:50 – She adds Sanguine Chalk Pencil along the edge of the tile.
Day 10
In Day 10’s video (18:04) – With Maria keeping him company, Rick tangles Narwal, Flux and Shattuck on a square 3.5″ Tan tile.

Step 1: At 00:48 – After brief introductions, Rick shows a da Vinci sketch of a coiled object which is the inspiration for today’s lesson.
Step 2: At 01:11 – With the graphite pencil Rick makes a string with a pair of lines across the tile from side to side.
Step 3: At 01:23 – Using the Brown 01 Micron, Rick fills the string with S-strokes that begin and end touching each other creating a coil-like appearance.
Step 4: At 03:06 – He adds a thin aura on each side of one of the center sections and he adds the tangle Flux inside it and fills the spaces between with orbs. He starts with the largest orb he can fit in, then adds smaller ones around it.
Step 5: At 04:52 – He skips two spaces up the string and repeats this same sequence of auras, Flux and orbs inside that space.
Step 6: At 05:26 – He repeats this on the lower part of the string.
Step 7: At 0:50 – “Let’s take a little bit of Hollibaugh inspiration” as he adds a second string crossing under the first one.
Step 8: At 06:09 – Again with the Brown 01, Rick fills the second string with connected S-strokes creating a second coil.
Step 9: At 07:22 – He chooses one of the sections and adds auras on each side, then adds the tangle Shattuck inside it.
Step 10: At 08:36 – He repeats this in another section of the same string.
Step 11: At 08:55 – He adds Sanguine Chalk Pencil coloring to the “pointy ends” and along the edges of the sections on the Flux ribbon, softening it with a tortillion. He completes the Flux ribbon in the same way.
Step 12: At 11:27 – With the graphite pencil, Rick adds shading on the Flux ribbon.
Step 13: At 12:03 – With the Sepia 03, Rick restates some of the original pen strokes that have become faint under the pencil shading.
Step 14: At 13:52 – He adds White charcoal highlights on the Flux ribbon.
Step 15: At 15:15 – He begins adding color and shading on the Shattuck ribbon, “basically doing the same thing that we did on the top one”.
Step 16: At 16:11 – He adds graphite shading where the top ribbon crosses over the bottom one.
Step 17: At 16:34 – With the Sepia 03 Micron he restates the lines on the Flux ribbon where it crosses the Shattuck ribbon.
Step 18: At 17:02 – He adds his chop.
Day 11
In Day 11’s video (20:28) – With Rick keeping her company, Maria tangles Rixty on a 3.5″ square Tan tile.

Step 1: At 00:54 – After their introductions, Maria has selected one of the 3.5″ square Tan tiles for today’s lesson and we will be doing Rixty. She begins by using the graphite pencil to make an S-shaped string corner to corner.
Step 2: At 01:05 – With the Brown Micron 01, she adds “a little V shape about two thirds of the way down” then restates the string line in ink from the bottom of the v to the bottom of the string.
Step 3: At 01:25 – She adds a wide aura on each side of that line, “creating the stem on this organic looking piece”.
Step 4: At 01:46 – “We’re going to begin our Rixty by going behind there,” as she connects the tip of the V with a line down to the “stem” on each side creating a triangular shape, then auras that shape. She inks in the triangular space created.
Step 5: At 02:21 – Working up from the top of the first V shape she placed on the string in Step 2, Maria extends the auras upwards slightly, then adds a V shape between them, creating “branches” (“two little Rixtys, splitting off”) going slightly outwards. Diverging Rixtys.
Step 6: At 02:47 – She adds a curved stroke on top of each branch, then connects the ends of each to their branch with a downward stroke and fills in the space created. On the left side she adds an aura around the end shape and as Rick comments “it looks like someone drinking through a straw”. She repeats this on the right side.
Step 7: At 03:42 – “We’re going to go back,” as she extends the inner line of each branch up from the Rixtys with the curve so they meet at the string line, than adds the outer aura on each. Rick says, “We’ve gone from Diverging Rixtys to Converging Rixtys.”
Step 8: At 04:24 – She adds “that little lip design” on top where they converge and repeats the Rixty shape by connecting it “going behind” and filling in the shape “so you can see what you’re doing”.
Step 9: At 04:57 – “So we’re going to do the same thing over again” as she creates another pair of diverging Rixty. “Split off, put in that V shape and make two more Rixtys.”
Step 10: At 05:52 – She adds the strokes to make a converging Rixty from the ends of those two.
Step 11: At 06:20 – “And now, here’s the finale,” she adds a tendril going from the top of the final Rixty up to the end of the string.
Step 12: At 06:40 – “So now we’re going to go in and add some beautiful berries … lovely orbs.” She fills the spaces and along the edges with orbs of all sizes, inking between them where needed.
Step 13: At 09:20 – She inks over the string line in the “tendril”, then where each of the Rixty cross over and under she adds a her signature hatch strokes (we usually see her add to Pokeleaf etc.) on the under side to emphasize that dimension.
Step 14: At 10:11 – She restates the outer strokes at the bottom of the stem and adds several small hatching strokes coming up from the end.
Step 15: At 10:34 – With the Sepia 03 she darkens the inked in triangular shapes in the Rixtys to make them stand out. She also restates bits of the “lip” line at the top of those spaces.
Step 16: At 11:40 – With the White Charcoal pencil, she adds highlights on the berries down the left side. She also adds it on the left side of the Rixtys and the stem, she uses a well sharpened pencil and a very light touch. She has not used a tortillion yet.
Step 17: At 13:05 – She adds Sanguine Chalk pencil on all of the berries. Still no tortillion yet.
Step 18: At 13:51 – She adds graphite shading on the “Vinci berries” and mainly on the right side.
Step 19: At 15:04 – Now for the tortillion to soften and blend just the graphite.
Step 20: At 15:30 – Softly with the Sanguine Chalk she adds a drop shadow aura spaced just a bit off along the right side of the Rixty branch and then softens it outwards with the tortillion.
Step 21: At 16:38 – She goes back in with the graphite pencil adding touches here and there as they discuss da Vinci’s sketches. Maria points out that da Vinci used Fabriano paper, “the same paper as our tiles. Same mill.” She adds a small touch of graphite in the shadow area.
Step 22: At 17:36 – Maria adds her chop.
Step 23: At 18:49 – “I have a few other examples of this … so you can see different iterations.” We see several gorgeous tiles including one done on a Tan Zendala where the background is completely blackened in (with a brush and black ink), with a lovely White Charcoal Eke border. She also shows us several of her drawings with notes “to get in the mood” with themes and quotes from Leonardo.
Day 12
In Day 12’s video (20:08) – With Rick keeping her company, Maria tangles a combination of Icanthis and Sampson on a Tan Phi tile.

Step 1: At 00:48 – After introductions and explaining we’ll only be working with the Brown 01 Micron, the graphite pencil and the White Charcoal pencil, Maria displays some da Vinci drawings that were her inspiration for today, especially the oak leaves.
Step 2: At 01:10 – She begins with the graphite pencil and makes “a very subtle backwards S string” from corner to corner, “like the center spine of a leaf”. Then she adds a second pencil aura line slightly away from the first one, “holding the tile so it doesn’t move and moving your arm” to make the curve.
Step 3: At 02:14 – She explains we’re going to be working a lot with the pencil, as she adds a bit of weight at the bottom of the stem, then adds offset veins for the leaf on each side of the stem.
Step 4: At 02:43 – “This is going to be a combination of Icanthis and Sampson.”
Step 5: At 03:00 – She begins adding the Icanthis leaves, starting with “a little U cup, like a little smile in there” facing outward between each pair of veins. “It guides you along to where the auras are going to be”.
Step 6: At 03:40 – “With our pencil we’re going to do a wiggly caffeine-induced line all around that spine and then connecting up with the U. This is the Sampson part of it.” She repeats this all around the spine, still using the pencil.
Step 7: At 04:05 – Maria explains that Sampson was designed by Nancy, “one of our original crew members at Zentangle, and she named it after her grandson Sampson.”
Step 8: At 04:46 – She extends the ends of each vein line until it connects with the wiggly line.
Step 9: At 05:11 – In each lobe of the leaf, she adds a couple more vein lines, “intuitively where it makes sense to you”.
Step 10: At 05:35 – Switching to the Brown Micron 01 Maria adds small Crescent Moon “ladybug” shapes, one on each lobe’s center vein, on the under side of the vein.
Step 11: At 06:33 – “So now we want our pencil to be fairly sharp, but not pointy,” as she scribbles a bit on the back of the tile to soften the tip.
Step 12: At 06:46 – “We’re going to do auras that are weighted on the top”, she adds a graphite aura around the ladybug shape, with weighting at the top (aka peppering). She repeats adding two or three more weighted auras outwards from the ladybug shape and repeats this on the remaining ladybug shapes. She points out she was turning her pencil around to get the edge she wanted on it.
Step 13: At 08:31 – “We’re actually going to do this technique all around the leaf.” She continues to add weighted auras to fill the leaf, beginning the weighted part of each line at the edge of the leaf. She continues around the tile, filling each lobe of the leaf with the weighted auras.
Step 14: At 13:28 – Using the tortillion, “we don’t have to add any pencil, we’re going to work with whatever pencil’s there.” Maria softens and blends the graphite under the mail vein line on each lobe.
Step 15: At 14:18 – She lightly blends and softens the weighted edges all around the leaf.
Step 16: At 15:40 – She goes over the spine with the pencil, restating the initial pencil stroke for definition. She does the same at the edge the strokes where the ladybug shapes were placed.
Step 17: At 16:37 – She touches it up “here and there” with the White Charcoal pencil.
Step 18: At 18:46 – Maria adds her chop.
Wrap Up
In the final video in the Project Pack 27 Series (15:47) – Rick and Maria look back and review all the tiles we created in this Leonardo da Vinci-inspired Project Pack.

Step 1: At 00:48 – Maria explains they looked through some da Vinci books, “at some of his drawings and tried to get in the mood of being Leo.” Rick shows several Tan Opus tiles where Maria “took it away with different ideas, different inspirations.”
Step 2: At 01:38 – He follows that with an Opus tile of his own explorations.
Step 3: At 02:30 – He shows Martha’s Opus tile explorations.
Step 4: At 02:48 – He displays Molly’s Opus tile explorations.
Step 5: At 03:13 – They then begin their review of each day’s tile. This is Rick’s Day 1’s tile.
Step 6: At 03:56 – Maria’s Day 2 tile and more of her examples. “I tried to see how many colors I could get out of the white pencil and the red chalk.”
Step 7: At 05:02 – Julie’s Day 3 tile.
Step 8: At 05:46 – Molly and Martha’s Day 4 tile.
Step 9: At 07:17 – Maria’s Day 5 tile.
Step 10: At 08:06 – Molly and Martha’s Day 6 tile.
Step 11: At 08:47 – Rick’s Day 7 tile.
Step 12: At 09:21 – Julie’s Day 8 tile.
Step 13: At 10:25 – Molly and Martha’s Day 9 tile.
Step 14: At 11:09 – Rick’s Day 10 tile.
Step 15: At 12:03 – Maria’s Day 11 tile and some exploration tiles.
Step 16: At – Maria’s Day 12 tile.
Step 17: At 14:54 – Rick makes a mosaic out of all the tiles as they say goodbye and offer holiday wishes.
This recap of Zentangle’s Project Pack #28 will make it easy for you to find all the related videos and any parts of them you may wish to refer to again.
Remember the images above are linked to their YouTube video, simply click the image to go to the video. Or, you can view the complete video on the corresponding tangle’s page on TanglePatterns, they make a fascinating “historical” record of Zentangle videos on each tangle.
For a complete list of Zentangle’s Project Packs click the PROJECT PACKS link in the pink alphabetic tangle menu bar.
And for the complete historical list of Zentangle’s “Twelve Days of Zentangle” holiday projects, visit the ZENTANGLES > TWELVE DAYS OF HOLIDAY PROJECTS page on the top menu bar of any page.
|
.oOo. |
|
Enhance your Zentangle experience while supporting TanglePatterns: |
|
BRAND NEW! TanglePatterns.com TANGLE GUIDE, 2026 Edition |
|
 |
The 15th Edition of the TanglePatterns.com TANGLE GUIDE is an instant-download 123-page interactive digital eBook/PDF containing over 2,300 tangles on the site from May 2010 through December 31, 2025. It's a great resource and a must-have digital tool for using the site. Visit the STORE > E-BOOKS page and help keep TanglePatterns.com going by getting your copy now! |
|
"Linda, Thank you! I was relying on too few and getting stuck after 3 years of daily working with Zentangle. This has inspired me to ‘begin again’ with renewed excitement." ~ Barbara R. |
|
| See the BOOK REVIEWS page for more details on its features and view a sample page. Note: this is a digital product downloaded immediately when ordering, nothing will be physically mailed to you. | |
| If you're new to Zentangle® and tangling, my TanglePatterns.com BEGINNER'S GUIDE TO ZENTANGLE is just what you need to get started. Also available en Français and en Español. | |
|
|
|
 |
This is the only Zentangle book you'll ever need: the fabulous Zentangle PRIMER Vol 1. It's your CZT-in-a-book by the founders of Zentangle®. For more about the content and to read the rave reviews, visit the BOOK REVIEWS tab. |
| Available in KINDLE format for $9.99. Spanish Edition here. Japanese Edition here. | |
| "Absolutely the best Zentangle Book yet! As an accomplished artist I used to think I did not need instruction on this art form. How wrong I was! My tangling improved by leaps and bounds after reading this book. If you think you have Zentangle down then you need this book more than ever!" ~ Kris H | |
|
|
|
|
.oOo. |
|


Thank you very much for the detailed project pack summary! There’s so much work involved with each day and noting times, and adding in quotes and links and content – and there’s 12 days plus the intro and wrap up!! Your time, energy and commitment to our Zentangle community is incredibly appreciated <3
Thanks so much Jenn, always appreciate your kind words 🙂
Thank you for the summaries! Linda, I am very stupidly confused about the new dark renaissance tiles. Other than color, is there any difference from the lighter ones? Is the project pack the only way to get them? I have been searching all over for more information. Do you happen to know?
Thanks Donna, glad you’re enjoying the Project Pack summaries.
In their recent (January 8th) newsletter this explanation is given about the Renaissance tan tiles and notes the darker color is available now in Phi and 5xPhive tiles in the zentangle.com store.
“Over the years, we have explored and enjoyed different shades of tan paper and their unique perks. Lighter shades offer more room for dark shades of graphite and color, while darker tan tones illuminate the white highlights more. For this most recent Project Pack, we opted to work with a slightly darker tan tone. Our Renaissance tiles paper is custom-made for us here in the USA. Over time, you will start to see this slightly darker shade in our tile offerings. As we sell out of the current, lighter paper in different sizes and shapes, the new, darker shade will become available.
Now available in the darker shade Renaissance paper, Phi and 5xPhive tiles!”
Hope that helps!