


 Recently in the comments on how to draw Miasma, tangler Suzanne asked for some tips on drawing grids: “General Question: how best to practice making grid based designs. I’m having difficulty establishing an equal base grid.”
My response to Suzanne’s question prompted her to suggest it would make a good tips section. Thus this post and for future reference, you can find it on the Tutorials tab in the pink alphabetic tangle menu bar.
In the Zentangle Method™ we don’t use rulers or other straight edges or any other type of “mechanical aids”. As soon as you get out a ruler, you’re into planning and measuring – and that’s not Zentangle. The small size of a Zentangle is perfect for drawing freehand and eliminates anything but a pen and pencil as the “tools” needed for tangling.
Below are the steps for creating three types of grids (now four, with the addition of Hexagonal grids) for your tangles. At the end I’ve included a link to a free 1-page PDF containing all three for you to download.
Basic Freehand Squared Grid
Here is an easy way to get a pleasing basic grid established for your tangles. Whether you want to have straight lines, or “warped” or curved lines as the basis for your grid there are just a few steps.
- To establish the start of your grid, draw a horizontal line in the center of the selected section on your tile.
- Add a vertical line across the center of the previous line – basically you’re forming a cross in the middle of the section. (Steps 1 and 2 are interchangeable, you can start with either one.)
- Then you can eyeball where you want the rest of the lines to go by evenly spacing them on either side of the vertical and horizontal baselines.
- Don’t worry if some of your grid lines look a little wobbly – mine often are, you can tell when I’ve been drinking tea. When you add the next steps of your tangle, the wobblies disappear into the tangle, much like a Zentangle string magically disappears.

The lines can all be wavy or straight, whatever type of grid you choose. For a warped grid, start with curved baselines in Steps 1 and 2 to establish the grid and simply mirror those shapes outwards in the section.
Freehand Diamond-Shaped Grid (and Triangle variation)
On CZT® Sandy Hunter’s blog in her steps for her Veezley tangle pattern, she refers to “an old cookie-decorating trick” to demonstrate a foolproof way to produce a freehand grid with diamond-shapes instead of the squares we see most frequently. It’s basically the same concept but it uses an X in the chosen section instead of a cross.
When I finished the steps below for the diamond grid, I was thumbing through Saturday’s Wall Street Journal and came across this reminder that there’s a variation of this grid which I’ve added in Step 6 below.
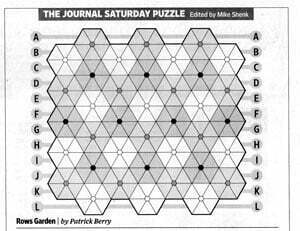
Here are the steps for the diamond grid and triangle variation.

Freehand Ogee-Shaped Grid
This may be a technique that’s old news to some of you but I accidentally stumbled on a cool way to draw it when I was practicing one of the tangles I was adding to the site. I think it might have been Groovy. In any case …
I was trying to figure out a way to draw a nice uniform wavy line like a sine wave, and after much trial and error I came up with this.
I’d completely forgotten about my discovery until the question of grids came up so this is a good time to share it in case it’s useful to others. This grid-shape is seen less often but it’s fun to draw and many cool tangles grow from it.
IMPORTANT TO NOTE: The placement of the first 4 dots determines the size of the ogee shape – you can visualize the points of a diamond that indicate where the top and bottom and endpoints of your onion shape will be. Compare Steps 1 and 4 and you’ll get the idea. Increase or condense the spacing as desired, but try to be consistent unless you’re going for a different (eg. graduated) effect.

- Lay out a grid of offset pen dots – make them small, like a stipple dot. In my illustrations here I’ve exaggerated them so you can see them, but just touch your pen tip lightly to the paper to place the dots. (Unless you want dots/orbs/pearls/beads to be prominent in your grid/tangle and that looks pretty cool too.)
- Then turn your tile as needed and connect pairs of dots in the right-leaning diagonal using shallow S-shaped strokes (Step 3).
- Turn your tile and connect pairs of dots in the left-leaning diagonal using shallow “backwards” S-shaped strokes (Step 4).
- Voilà, Linda’s Ogee Grid! The ogee shape magically appears, ready to be filled with strokes to your heart’s content.
UPDATE October 2016: Tangler Jenna Black demonstrates another easy way to draw an ogee grid using “curly brackets” in her Shark Kisses tangle steps.
UPDATE March 2022: I’ve added tips for drawing a dot grid here.
UPDATE December 2025: CZT Marty Greiner creates a cool combination diamond-and-ogee grid here.
Freehand Hexagonal Grid
UPDATE APRIL 2025: To accompany his Tau tangle, Spanish CZT Tomàs Padrós created this illustration demonstrating four different ways to draw hexagonal grids using the methods from these tangles posted on the site: Hexonu, Loblolly, Hayastone, Barney and Sparkool.
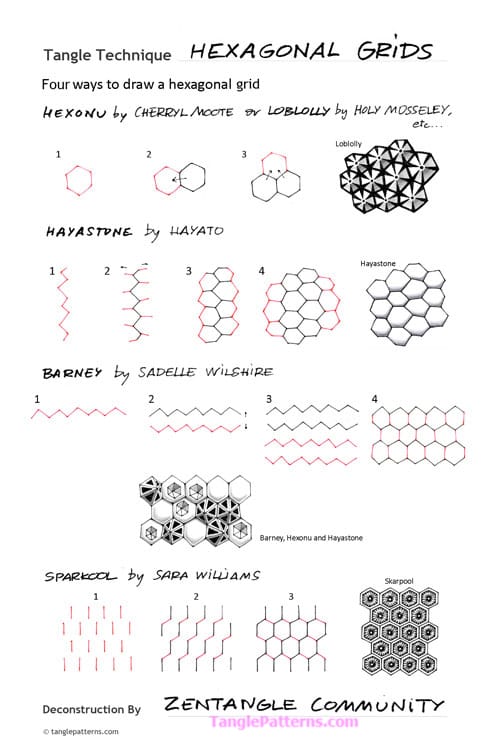
Image copyright the artist and used with permission, ALL RIGHTS RESERVED. These images are for your personal offline reference only. Please feel free to refer to the images to recreate this tangle in your personal Zentangles and ZIAs. However the artist and TanglePatterns.com reserve all rights to the images and they must not be publicly pinned, altered, reproduced or republished. (Small side note: if you look at the legalese in Pinterest, you are legally responsible for obtaining permission to post every photo that gets ‘Pinned’. Giving credit or sharing the source link doesn’t count.) Thank you for respecting these rights. “We must all face the choice between what is right and what is easy.” ~ Albus Dumbledore
How about you?? What tips can you share about drawing grids that might assist your fellow tanglers?
Free PDF of these techniques
Here’s a free PDF of all three freehand grids for your reference, with my compliments. Right click the link to save the file to your computer for printing. Enjoy!
|
.oOo. |
|
Enhance your Zentangle experience while supporting TanglePatterns: |
|
BRAND NEW! TanglePatterns.com TANGLE GUIDE, 2026 Edition |
|
 |
The 15th Edition of the TanglePatterns.com TANGLE GUIDE is an instant-download 123-page interactive digital eBook/PDF containing over 2,300 tangles on the site from May 2010 through December 31, 2025. It's a great resource and a must-have digital tool for using the site. Visit the STORE > E-BOOKS page and help keep TanglePatterns.com going by getting your copy now! |
|
"Linda, Thank you! I was relying on too few and getting stuck after 3 years of daily working with Zentangle. This has inspired me to ‘begin again’ with renewed excitement." ~ Barbara R. |
|
| See the BOOK REVIEWS page for more details on its features and view a sample page. Note: this is a digital product to download immediately when ordering, nothing will be physically mailed to you. | |
| If you're new to Zentangle® and tangling, my TanglePatterns.com BEGINNER'S GUIDE TO ZENTANGLE is just what you need to get started. Also available en Français and en Español. | |
|
|
|
 |
This is the only Zentangle book you'll ever need: the fabulous Zentangle PRIMER Vol 1. It's your CZT-in-a-book by the founders of Zentangle®. For more about the content and to read the rave reviews, visit the BOOK REVIEWS tab. |
| Available in KINDLE format for $9.99. Spanish Edition here. Japanese Edition here. | |
| "Absolutely the best Zentangle Book yet! As an accomplished artist I used to think I did not need instruction on this art form. How wrong I was! My tangling improved by leaps and bounds after reading this book. If you think you have Zentangle down then you need this book more than ever!" ~ Kris H | |
|
|
|
|
.oOo. |
|


Great info! Thank you! Cheryl 🙂
How cool is this? Thanks for a great tutorial. A very useful resource that is worth saving for future reference.
Great resource! Thanks for sharing the processes – I’m sure I’ll be using more grids now!
this is so helpful to a beginner like me.
I have been printing out the how to’s so that I can keep referring to them.
Thanks so much for these- and ALL the great stuff I have collected from you! I have been enjoying it all so very much.
Thank you so much for providing this wonderful information in downloadable PDF form. I love this site and how helpful it is. Your hard work and amazing organization of the exponentially growing number of Zentangle patterns and blogs are very much appreciated. Keep up the great work! Cheers… ~Christina~
I just love this stuff!! I’ve only been doing this for about 6 weeks and am so hooked. I’d love to find someone in Los Angeles, CA that’s into Zentangle. I’ve been teaching myself, as most of us do, but am looking forward to going to a workshop some day, they look like a lot of fun.
Linda, thank you so much for doing the PDF file. I have a file on my desktop where I store all of the new patterns, strings and related info. Now I can find it when I need a little help. I have been doing my grids a different way, but this is a much better way to do them!
Hi Linda thanks so much for the PDf flie,I have just stumbled acrossed zentangle and love it but i had no idea where to start but this helps loads.
Linda, thanks for these. I’m tangling in Australia and it’s very hard to find information on Zentagles here. We don’t even have books in the library! Your web site is a fantastic source. Thanks :^D
I’ve just discovered some amazing French ink cartridges by Herbin which are really for calligraphy- they come in little tins of six cartridges of one of the twenty fabulous colours. Also they make a roller ball pen to take the cartridges, and an adaptor to use your favourite ink. In UK, Hobbycraft keep them, but you can find other firms using Google. I’m joyously doing ZIA’s but a Cloud grey and ‘pearl black’ give fav.mid-tones to any Zentangle as a change from a pencil. Oh, best of all, even for a pensioner like me, with £25 pocket money a month they’re not expensive.
The adaptor or cartridges fit most pens except Parker for some reason, and are great in Rotring Artpens if you still have them.
Hi Judy, I notice these ink cartridges (J. Herbin Fountain Pen Perle Noire Ink Cartridge) are lightfast but not permanent, so you might want to be aware of that for your Zentangle art.
Bless you.
Wow! What an enlightening post. Thank you so much for all the information you share.
Thanks so much for sharing this. I’ve had tons of trouble with grid patterns, so I’m hoping this will help me keep all my lines in place and crossing at the right points!
Help, Please. When I click the link to download the pDF it says nothing is found. Will it not work on a MAC? Thanks, Shirley
Hi Shirley, be sure to right click the link and use that menu to save the file to your computer (regardless of operating system).
Same thing happened to me until I changed my browser back to DuckDuckGo, used two fingers on the link, and saved it my downloads folder. Hope it works for you!
Thanks Sheree, I wonder if a “long tap” (if no mouse is used) will accomplish the same thing. Guessing, as not a Mac user.
I had saved this file before and I am a Macbook Pro user. Could be the browser and or change in the OS operating system? Tried a bit longer right tap but that still resulted in nothing found. The “two finger” tap works. The right tap gave the option to save but did not save the file. Linda, many thanks for your website….I love it!
I had the same problem on my iPad, 404 error file not found, but when I switched from mobile to traditional website it worked fine ( hope that’s clear)
Steve (Lake District, u.k)
Thanks Steve.
For those who aren’t clear about how to switch between desktop and mobile versions of the site, please see this page: Tangle Refresher 98
Thank´s for sharing this Linda! Sometimes it is useful to verbalize things! I will refer to this article further on! 🙂
The explanation of the ogee-grid is exactly what I need!
Hi, Linda,
Thanks for all the patterns and info to help us “Zen”.
Just ordered your 2025 book a few days ago. It is such a wonderful resource.