



 About three times each year Zentangle HQ launches a new Project Pack, a curated collection of supplies that pair up with a series of tutorials, all on the same theme.
Project Pack #30 is the second of the series this year, it introduces another new Zentangle tile and explores the concept of nomadz. The new 5-inch square tile has a suede-like surface of flocked cardstock and is called the Zuede tile.
From the newsletter introduction:
When Maria was a young mother, she helped run an art supply and frame store. This gave her the opportunity to learn new skills around frame building and to gain knowledge about papers, pens, paints, and more. One of her favorite items was a drawing surface that she recovered from the scrap bin. The moment she saw it, she knew her pens would just sink into the surface. It was love at first stroke.
Over the years, Maria continued to use this beautiful surface as a backdrop, protecting her desk while offering a comforting surface to lay her paper. It became a place to catch spilled ink, a wandering stroke, or a meandering drawing. She always sensed that this surface was so much more, and that its true moment to shine was yet to come. Years later, the surface or “blotter,” as she called it, would become a work of art in itself.
Today, we revisit this gorgeous surface in a Project Pack, offering it as an ideal landscape for tangles. Get ready … there’s a new tile in town!
SUPPLIES: This Project Pack is available here ($39.95) in the zentangle.com store and it’s a convenient way to get all the supplies for the project. However, the introductory video reviews the items in the Project Pack and you might discover you have suitable alternatives in your own Zentangle supplies. “If you do not have the project pack materials, we encourage you to follow along with whatever you have available.”
- One canvas tool pouch containing:
- One Sakura Micron 01 pen, Brown
- One Sakura Micron 05 pen, Brown
- One Sakura Gelly Roll 10 pen, White
- Two General’s Multi-Pastel Chalk pencils: 4461 Sea Green, 4460 Midnight Blue
- One Zentangle graphite half pencil
- One Zentangle/General’s white charcoal (chalk) half pencil
- Four tortillions
- New Zentangle tile:
- Four 5-inch square suede-like Zuede tiles (flocked cardstock): 2 tan, 2 green
The following chronology is a summary of the videos for this Project Pack with links to the individual videos. Either click the Day #’s title link or the image itself to view the full video on YouTube.
In this Project Pack the videos are cumulative, it is recommended to watch the videos in sequence. It will also be very helpful for you to watch the Introduction video first.
CZT Molly Hollibaugh recommends we watch each Project Pack video completely through once before beginning our tiles:
“You’re going to have a little more confidence, you’re going to be a little more aware of what’s happening next. Then you might try something different, you might explore it in a different way”.
QUICK LINKS TO DAILY SUMMARIES
Jump to:
Day 1 – Julie tangles Coofia nomadz
Day 2 – Molly tangles Moon Pie nomadz
Day 3 – Maria tangles Ravel nomadz
Day 4 – Rick tangles Huggins nomadz
Day 5 – Martha tangles Icanthis nomadz
Day 6 – Maria tangles Mysticle nomadz
Day 7 – Maria, Molly and Rick add zement
Wrap Up
Introduction
(27:23) – Rick, Maria, and Molly introduce Project Pack 30 through an unboxing of supplies and a tour of Maria’s historic blotters. Along the way, they introduce the concepts of nomadz and zement, which form the foundation of this project pack’s freer, string-free approach to Zentangle. They introduce the new Zuede tiles with a suede-like surface similar to Maria’s blotters.
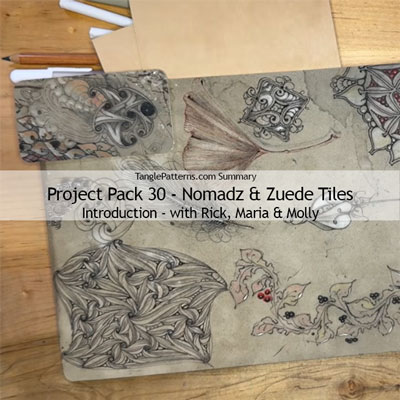
0:33 — Project Pack Materials
The Project Pack includes a Gelly Roll 10 white, Brown Micron 01, Brown Micron 05, white charcoal pencil, blue and green pastel chalks, tortillions, and graphite pencil. The featured surface is the new Zuede tile, made from the same soft material Maria has long used for her desk blotters.
2:06 — The Story Behind Zuede
Maria discovered the material years before Zentangle while working in her frame shop in Worcester, Massachusetts. She began using large sheets as desk blotters because their soft, slightly spongy surface felt comfortable beneath her lettering work. Drawing on them with Micron pens revealed how beautifully the surface accepts ink, and the blotters gradually became places to draw, experiment, test ideas, and tangle while thinking, talking on the phone, or working between projects.
5:22 — Maria’s Blotters
A tour of Maria’s blotters traces their evolution from pre-Zentangle lettering, drawings, and accidental ink blots to surfaces filled with tangles and other explorations. Ink spills become part of the compositions rather than mistakes to remove. Later blotters show the intense ink color and effective highlights possible on the surface, as well as the spontaneous way individual elements gradually grow into larger compositions.
10:35 — From Blotter to Finished Artwork
One large blotter became sufficiently compelling that Rick encouraged Maria to remove it from her desk and develop it as finished artwork. Maria continued adding tangles and color without restricting herself to a predetermined border. Drawing on her framing experience, she created a custom-cut mat that follows elements extending beyond the composition and embellished the mat itself with additional tangling, including a border of Pokeleaf.
14:32 — Tangling as an Ongoing Practice
Maria’s current desk blotter demonstrates how these compositions develop gradually rather than as planned projects. She adds to them when she is between jobs, on the phone, experimenting with a tangle, or testing an idea. The blotter serves as a continuing creative sounding board where individual explorations can accumulate naturally.
16:56 — Introducing nomadz
Project Pack 30 builds on this free-form approach through nomadz, a tangling technique previously introduced at the April 2025 CZT-only zenAgain seminar. Nomadz are small, self-contained tangle expressions that gather freely without a conventional string or fixed arrangement. They may be detailed fragments, portions of familiar tangles, dingbatz, or expressions that eventually develop into tangles of their own. They can remain isolated or gather into loose compositions while retaining space around them.
18:49 — Zement and the Project Pack Approach
Nomadz may form small communities connected by zement, the element that visually bonds them together. This Project Pack intentionally works with fewer rules and “no strings attached,” encouraging confidence in using familiar tangle vocabulary in new ways. The emphasis is on exploration rather than constructing a predetermined composition.
21:12 — Exploring and Developing nomadz
Maria’s sketchbook shows how nomadz can function as small tangle studies or “tangled etudes.” Familiar tangles, fragments, and shapes can be isolated, altered, shaded, combined, and developed into more complex expressions. These exploratory drawings offer a glimpse of the creative process — thinking on paper without requiring the result to become finished artwork. Throughout the Project Pack, participants will experiment with creating and arranging nomadz, allowing them space while using zement to establish connections between them.
Day 1
In Day 1’s video (20:24) – Julie and Molly begin Project Pack 30 by taping four flocked Zuede tiles into an ensemble and introducing the nomadz concept. Julie uses Coofia to begin building the composition across the tile seams, then adds shading and highlights suited to the unusual surface.
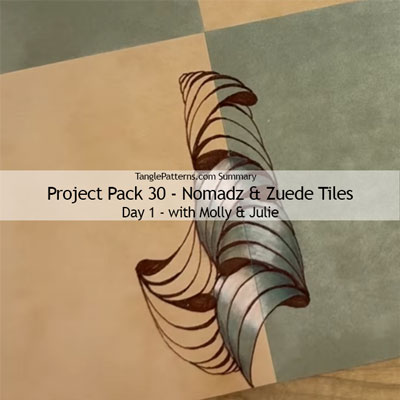
0:00 — Zuede Tiles and Ensemble Setup
Project Pack 30 uses flocked Zuede tiles in tan and earthy green. Molly tapes four tiles together from the back in either a checkerboard or grouped-color arrangement. Masking, painter’s, or washi tape will work. Because removing the tape may damage the backing, the tiles are intended to remain assembled. Small dents or marks are normal on the textile-like surface and will become less noticeable as the composition develops.
4:08 — Materials and Surface Tips
Materials include pastel pencils, white charcoal, graphite, brown Micron 01 and 05 pens, white Gelly Roll 10, and tortillons. Ink remains wet longer on the flocked surface, so Julie recommends working slowly and softly and avoiding contact with freshly inked areas. Pens may also become clogged by the surface or powdered media, so keep scrap paper nearby for cleaning the nibs.
5:12 — Beginning Coofia
Julie begins Coofia directly on a seam with the Brown Micron 05 using alternating Fescu-like strokes and filled pods, then adds tethered auras and additional Coofia segments. Working somewhat larger than usual leaves room for detail and helps create variation in scale.
8:34 — Introducing nomadz
Coofia demonstrates the nomadz approach: tangles or tangle fragments can exist without strings, appearing alone or clustering together in an unplanned composition. Julie places Coofia in several areas rather than planning the finished arrangement in advance. Throughout the Project Pack, additional nomadz will be added in the same way, with the seams helping anchor the composition.
12:10 — Shading and Layering
Julie shades Coofia with sea-green pastel pencil and graphite, blending lightly with a tortillon. White charcoal is added more heavily so it stands out against the Zuede surface. Starting lightly is recommended because more color can always be added. Julie works one section at a time, then reinks selected brown lines after shading to restore sharpness and add line weight. Loose pigment is best blown or tapped away rather than brushed off by hand, which can cause smearing.
18:56 — Gelly Roll Highlights
Julie finishes with subtle white Gelly Roll highlights beneath some of the weighted brown lines. Because the pen is moving over layered pencil and charcoal, the imperfect white line creates the soft highlight she wants. Day 1 establishes Coofia as the first nomad and begins the larger composition that will continue growing across the four-tile ensemble.
Day 2
In Day 2’s video (22:23) – Molly and Martha continue exploring nomadz on the Zuede tile surface. Molly builds an unnamed “cone full of Moon Pie” nomad across the seam between two tile colors. The lesson also expands on what defines a nomad and introduces the idea of zement, which will later connect the separate nomadz into a unified composition.
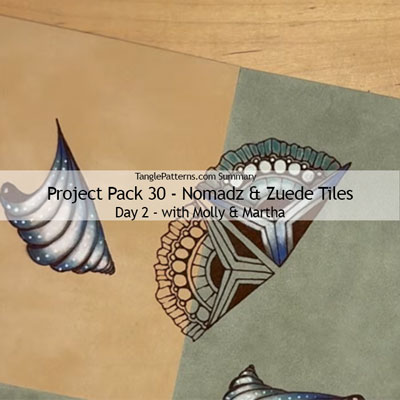
1:53 — Brown Microns on the Zuede Surface
After their introductions and a moment for gratitude, Molly reminds us that having a spare sheet of paper handy to protect our tile and hands from wet ink is a good idea for this project. She then uses a Brown Micron 05 for the larger initial strokes, with the Brown 01 available for finer detail and texture. Because the ink remains wet longer on this surface, she recommends keeping scrap paper handy and working slowly with light pressure so the ink flows evenly and produces a rich brown line.
2:13 — Building a “Cone Full of Moon Pie” Nomad
Beginning along the seam between tile colors helps visually tie the pieces together. Molly constructs an unnamed nomad from an L-shaped form, aura-like arcs, radiating lines, orbs, and smaller orbs, combining ideas reminiscent of Crescent Moon and Moon Pie. Small variations and character in the lines are encouraged rather than striving for mechanical uniformity. Molly describes nomadz as detailed, independent expressions or fragments of tangles — somewhere between a fragment and a blossoming tangle — that retain their own identity while relating to the surrounding composition.
11:25 — Adding and Positioning More Nomadz
Molly repeats the form nearby, using the existing Coofia as a launch point. Nomadz can vary considerably in size, and because six will be introduced during the Project Pack, she recommends preserving some open space. Each instructor is working on their own tiles, allowing different interpretations of the same lessons. The initial nomadz are generally placed across the seams. Later in the series, smaller tangles and texture tangles called zement will fill gaps and visually connect these separate, floating elements into a unified composition.
16:33 — Pastel Pencil, White Charcoal & Gelly Roll
Molly adds blue and green pastel pencil selectively rather than filling entire areas, leaving portions untouched for more interesting effects. The pencils can be worked directly into the Zuede surface or blended with a tortillion for lighter color. White charcoal pencil works particularly well directly on the surface. Because pastel dust can smear, blow excess dust away rather than wiping the tile. A sharp pencil is helpful; the recommended General Pencil All-Art sharpener reduces breakage with these softer pencils.
Molly finishes with white Gelly Roll, filling selected orbs and adding bright highlights. She emphasizes taking time with the shading and highlighting, which creates much of the dimensional effect and makes the nomadz appear to float above the Zuede surface.
Day 3
In Day 3’s video (15:45) – Maria adds Ravel nomadz to the composition using broad tethered auras, then builds depth and continuity across the tiles with enthatching, layered color, graphite shading, and Gelly Roll highlights.
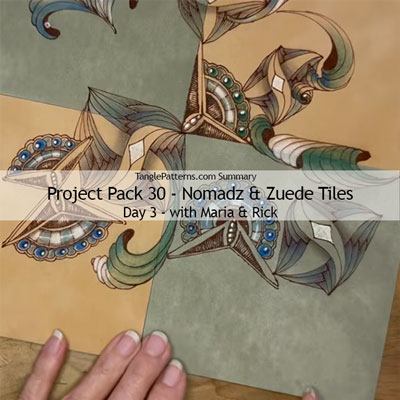
0:37 — Building the Nomad
Using a Brown Micron 05, Maria begins her Ravel nomad with an elongated S-shaped line and surrounds it with wide tethered auras, alternating direction and using the Hollibaugh-technique of drawing behind previous strokes. The repeated back-and-forth strokes create a broad, unified form.
6:50 — Placement and Composition
Maria positions the new nomad in relation to the earlier ones, deliberately crossing a seam between tiles. This helps carry color across the individual tiles and visually unify the larger composition.
8:56 — Enthatching
With a Brown Micron 01, Maria adds enthatching where sections pass beneath one another, creating additional depth with short, closely spaced strokes.
11:02 — Color, Shading and Highlights
Maria layers green and blue chalk pencils, varying their order and intensity among the forms to enrich the color and further blur the tile boundaries. Graphite shading lifts overlapping sections forward, and light White Gelly Roll highlights add contrast without overwhelming the composition.
Day 4
In Day 4’s video (17:35) – Rick explores Huggins nomadz, beginning with a structured version and then progressively stretching and repositioning its elements to demonstrate how the same underlying tangle can take on very different forms.
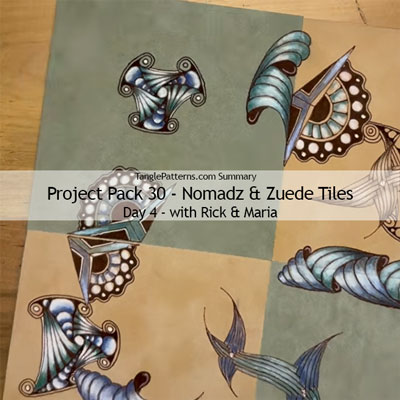
0:36 — Building Nomadz
Using a Brown Micron 01, Rick places three orbs in a triangular arrangement, then builds six surrounding orbs. Using takeoff and land, he connects the outer orbs with alternating curves that do not cross, creating three Huggins-like “hugs.” Reverse curves divide these into smaller sections.
3:44 — Adding Texture and Contrast
Rick alternates textures within the sections, filling some with Tipple and adding straight, flaring Scena-like strokes (aka peppering) to the others. He then adds auras around the projecting and inner shapes, creating a circle-and-line contrast.
7:13 — Distorting Nomadz
Once the basic structure is established, Rick demonstrates that the surrounding orbs do not need to be evenly positioned. He stretches and skews the arrangement while using the same takeoff-and-land connections, showing how nomadz can change proportions without losing their underlying structure.
10:34 — Developing the Variations
Rick adds inner auras to the outer orbs and emphasizes designing intuitively rather than following the tangle mechanically. He extends another nomadz across the tile to interact with existing tangles, using the same structure at greatly stretched proportions.
14:15 — Adding Color and Highlights
Rick shades portions of the orbs with the blue colored pencil and adds white charcoal to the opposite sides, blending with a tortillion. He uses the other colored pencil on the straight-line sections with white between them, then fills the small inner orbs with white Gelly Roll and reinforces the inner auras with a light touch of the pen.
Day 5
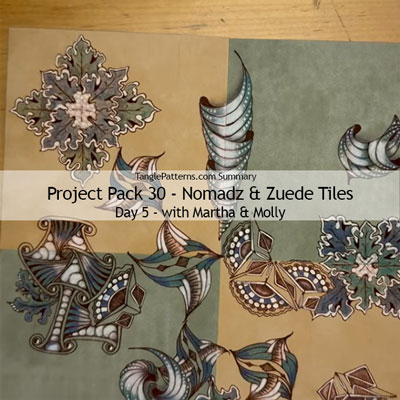
In Day 5’s video (15:59) – Martha adds an organic, layered nomad inspired by Sampson and Icanthis. Its loose, gestural construction contrasts with the other nomadz and helps connect the four sections of the ensemble. Blue, green and white chalk, White Gelly Roll and graphite add soft color, definition and depth.
1:45 — Building the Icanthis Nomad
Beginning with an X, Martha adds small C-shaped strokes and connects them with loose, squiggly lines to create organic leaf-like forms. Additional Xs are drawn behind using the Hollibaugh technique of drawing behind, building three overlapping layers. Auras help define the shapes. The nomad can be drawn as a complete form or broken into individual leaf-like fragments and tucked among existing nomadz. Its placement along the seams helps visually connect the four squares of the ensemble.
8:01 — Working with the Organic Strokes
The nomad combines ideas from Samson and Icanthis, but its spontaneous, ruffled edges give it a distinct character. Practicing the loose, wiggly connecting stroke separately can help develop a comfortable gesture before adding it to the ensemble.
9:46 — Adding Color and Highlights
Using blue and green chalk pencils on their sides, Martha softly layers and blends the colors for a pastel effect, then adds white chalk to the centers. White Gelly Roll reinforces the auras and adds small dots for texture and definition. Graphite placed where leaves overlap adds depth and helps establish which forms sit behind others.
14:32 — Finishing Touches
The chalk pencils can be worked directly into the flocked surface with small circular motions, reducing the need for a tortillion. Continue revisiting earlier nomadz as the ensemble develops, adding subtle embellishments wherever they help the individual forms interact and the composition come together.
Day 6
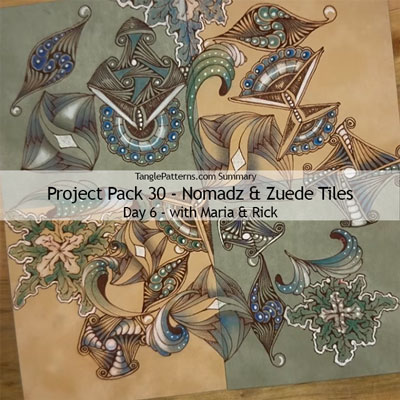
In Day 6’s video (11:42) – Rick and Maria add the final nomad of the project, Mysticle, introduced at the April 2025 zenAgain CZT-only seminar. Maria builds its distinctive form then incorporates Scena, orbs and Mooka. Shading and highlights give the forms dimension as the growing collection of nomadz begins to come together.
1:23 — Mysticle
Maria begins Mysticle with a Brown Micron 05, combining two opposing question-mark curves and joining their edges with a gently curved line to create its distinctive folded form.
2:40 — Adding Scena and Orbs
Maria adds Scena (aka peppering) and orbs, repeating elements used in other nomadz to create visual connections throughout the composition. Leaving small areas of untouched paper within the inked lines creates natural highlights and contrast.
5:36 — Mooka, Shading and Highlights
Maria adds Mooka where the form needs a finishing element, then uses graphite, blue pastel and white highlights to develop dimension. When highlighting an orb, she leaves an aura of the surrounding surface visible rather than taking the highlight to the edge; additional shading beside the white increases the contrast.
8:27 — Sculpting and Bringing the Nomadz Together
Scena can be twisted and shaped to fit available spaces, reinforcing the idea of sculpting as well as tangling. Maria continues fitting nomadz into open areas, allowing their edges and tips to touch adjacent forms while preserving space for the final stage. Rick describes the limited palette of colored surfaces, pens and pencils as an example of the Zentangle principle of “elegance of limits.”
Day 7
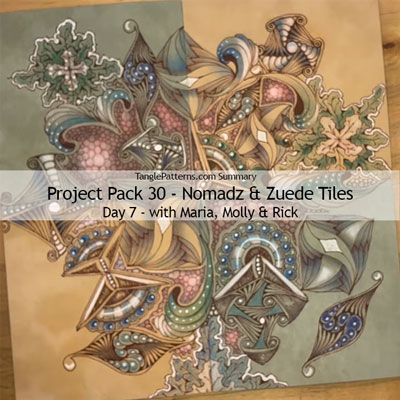
In Day 7’s video (15:44) – Rick, Maria and Molly bring the composition together using zement — simple tangles or textures that connect the individual nomadz. Maria demonstrates Tipple, Molly uses Hollibaugh, and Rick uses a variation of Flux. They also discover an unexpected effect created when white chalk interacts with still-damp Brown Micron ink on the flocked card.
0:33 — Bringing the Composition Together with Zement
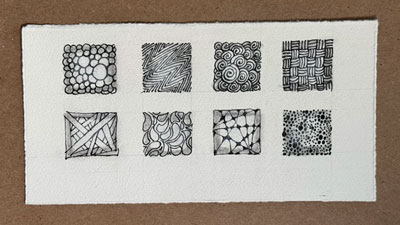
Rick and Maria introduce zement as a way to visually connect the individual nomadz into a unified composition. Simple, repeatable tangles and textures work particularly well for filling the spaces between them. Examples of simple texture tangles:
1:29 — Maria Uses Tipple
Maria first auras the individual nomadz with the Brown Micron 01, leaving some of the flocked card visible between them and the surrounding zement. She fills the intervening spaces with Tipple, beginning with larger orbs toward the center and gradually reducing their size toward the edges to create dimension.
3:43 — An Unexpected Chalk-and-Ink Effect
Because the Brown Micron ink is still damp, Maria’s white chalk picks up and blends with the brown pigment, unexpectedly creating a glowing pinkish color. To reproduce the effect, work one section at a time and apply the white chalk before the ink has fully dried. She adds graphite along the edges for additional depth.
6:16 — Molly Uses Hollibaugh as Zement
Molly uses very fine Hollibaugh as her zement, creating thread-like lines that appear to stitch the nomadz together. She uses the Hollibaugh technique of drawing behind as the lines cross and extend toward the edges. Unlike Maria, she does not aura the individual nomadz, demonstrating that the composition works with either approach.
9:42 — Rick Uses Flux as Zement
Rick begins with a very thin aura, then fills the spaces with a variation of Flux, alternating its leaf-like forms with orbs as they fit. Rather than planning the arrangement, he allows the forms to develop organically within the available spaces. He applies white chalk while the Brown Micron ink is still damp to create the same softened color effect Maria discovered.
12:48 — Finishing the Composition
Rick darkens the remaining interstices, emphasizing the contrast between the zement and the aura surrounding each nomad. He shades the individual forms and adds highlights with a White Gelly Roll. The different approaches demonstrate how the same limited toolkit and concept can produce distinctly individual compositions.
Wrap Up
In the final video in the Project Pack #30 Series (8:16) – Concludes with Rick and Maria reviewing the completed pieces and reflecting on the many possibilities discovered while working on the flocked surface of the Zuede tiles. The finished work highlights how differently each artist approached the same materials and techniques, and how experimentation and unexpected results can lead to new ideas.
0:06 — Reviewing the Completed Pieces
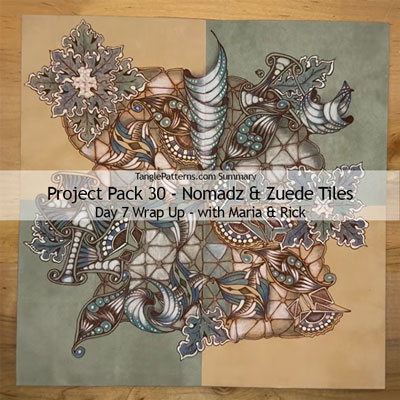
Rick and Maria begin with Martha’s piece (image above), where Sampson and Icanthis appear among her nomadz, tied together with ‘Nzeppel. They particularly admire the orderly underlying grid, which gives the individual forms the feeling of tiles set into zement. Martha also created an earlier version using materials and colors she already had, reinforcing the invitation to experiment beyond the Project Pack palette.
2:45 — Individual Approaches
Julie’s piece uses a light touch of blue, sparkling highlights and small unexpected details, including an Icanthis leaf. Rick’s piece demonstrates the effect of filling the interstices, shading and highlighting each area, creating a darker zement and greater dimensionality. Rick and Maria encourage looking at completed work as inspiration for what to try differently next time rather than judging one approach against another.
4:54 — Unexpected Discoveries
Maria recalls how much she enjoyed discovering her zement technique accidentally while working on camera. Her piece incorporates Mooka and builds rich green and blue through repeated layers. The flocked surface allows especially intense saturation of color, shading and highlights.
6:09 — Molly’s Finished Piece
Molly’s completed work shows the shading that was not included in the earlier video. After covering the zement with chalk, she developed it with intense, repeated shading and finished the outer edge with an aura of Printemps. Rick notes that although the videos were relatively short because much of the work was repetitive, the artists spent hours developing their pieces.
7:25 — Closing Thoughts
Maria encourages taking inspiration from this unfamiliar surface into future work, comparing the tiles to the canvas of life and the opportunities to create small pieces of beauty everywhere. Rick and Maria close Project Pack #30 by celebrating the pleasure of discovering something entirely new through experimentation.
This recap of Zentangle’s Project Pack #30 will make it easy for you to find all the related videos and any parts of them you may wish to refer to again.
Remember the images above are linked to their YouTube video, simply click the image to go to the video. Or, you can view the complete video on the corresponding tangle’s page on TanglePatterns, they make a fascinating “historical” record of Zentangle videos on each tangle.
For a complete list of Zentangle’s Project Packs click the PROJECT PACKS link in the pink alphabetic tangle menu bar.
|
.oOo. |
|
Enhance your Zentangle experience while supporting TanglePatterns: |
|
BRAND NEW! TanglePatterns.com TANGLE GUIDE, 2026 Edition |
|
 |
The 15th Edition of the TanglePatterns.com TANGLE GUIDE is an instant-download 123-page interactive digital eBook/PDF containing over 2,300 tangles on the site from May 2010 through December 31, 2025. It's a great resource and a must-have digital tool for using the site. Visit the STORE > E-BOOKS page and help keep TanglePatterns.com going by getting your copy now! |
|
"Linda, Thank you! I was relying on too few and getting stuck after 3 years of daily working with Zentangle. This has inspired me to ‘begin again’ with renewed excitement." ~ Barbara R. |
|
| See the BOOK REVIEWS page for more details on its features and view a sample page. Note: this is a digital product downloaded immediately when ordering, nothing will be physically mailed to you. | |
| If you're new to Zentangle® and tangling, my TanglePatterns.com BEGINNER'S GUIDE TO ZENTANGLE is just what you need to get started. Also available en Français and en Español. | |
|
|
|
 |
This is the only Zentangle book you'll ever need: the fabulous Zentangle PRIMER Vol 1. It's your CZT-in-a-book by the founders of Zentangle®. For more about the content and to read the rave reviews, visit the BOOK REVIEWS tab. |
| Available in KINDLE format for $9.99. Spanish Edition here. Japanese Edition here. | |
| "Absolutely the best Zentangle Book yet! As an accomplished artist I used to think I did not need instruction on this art form. How wrong I was! My tangling improved by leaps and bounds after reading this book. If you think you have Zentangle down then you need this book more than ever!" ~ Kris H | |
|
|
|
|
.oOo. |
|
 August 20, 2026 |
  More like this:
RECENT COMMENTS