


VIDEOS RETIRING August 28, 2026.
From the Zentangle newsletter introducing Project Pack #13:
If we have learned anything in the past 12 months, it is that times of transition challenge us, make us stronger and create beautiful seams in the space between what was and what will be. As we embrace all stages of our journey, one might also notice that our lives are not linear, but rather filled with overlapping layers of experiences that are constantly changing and morphing.
For Zentangle Project Pack No. 13 we will bring this thought process into our Zentangle practice and bring focus to working in overlapping layers and creating beautiful transitions between tangles and the compositions on our tiles. We will incorporate some exciting new tools and explore some fun techniques to use with them.
As Molly explains in the introductory video:
We’re going to “think about transitions and tangles and compositions and play with the layers of our tiles and look at them as ways to have one tangle transition into another or morph into another instead of having isolated tangles on our paper.“
SUPPLIES: This Project Pack is available here ($31.95) in the zentangle.com store and it’s certainly a convenient way to get all the supplies for the project. However, the first video reviews the items in the Project Pack and you might discover you have suitable alternatives in your own Zentangle supplies:
-
- Sakura Micron 01 pen, Black
- Sakura Micro Perm pen, Black
- Sakura Glaze pen, Clear
- General’s Sketch & Wash pencil
- #4 round paintbrush – Creative Inspirations by Creative Mark
- Zentangle graphite pencil
- Zentangle white charcoal pencil
- tortillions
- square Zentangle tiles, grey and white
- Phi Zentangle tiles, grey and white
The following chronology is a summary of the videos for this Project Pack with links to the individual videos. Either click the Day #’s title link or the image itself to view the full video on YouTube. Also, the full video is included on each of the corresponding tangle’s page on TanglePatterns.
It isn’t necessary to watch the videos in sequence, but it will be very helpful for you to watch the Introduction video first.
In previous Project Packs CZT Molly Hollibaugh recommended we watch the videos completely through once before beginning our tiles:
“You’re going to have a little more confidence, you’re going to be a little more aware of what’s happening next. Then you might try something different, you might explore it in a different way”.
Day 1 – Introduction
In the introductory video (15:25) – Molly and Julie introduce the materials found in the Project Pack and give helpful tips about using them.

Step 1: At 00:00 – Molly introduces this series and explains we’re going to “think about transitions and tangles and compositions and play with the layers of our tiles and look at them as ways to have one tangle transition into another or morph into another instead of having isolated tangles on our paper.“
Step 2: At 02:37 – Julie goes over the contents of the Project Pack which include white and grey square tiles, white and grey Phi tiles and some new pens and tools.
Step 3: At 05:03 – They recommend we explore the tools before we begin this series “to kind of get a scrap piece of paper and maybe get a feel for them yeah maybe you work on the back of a couple tiles maybe you have some other papers you can work on but we always encourage people to just like get familiar with those materials before the lesson.“
Step 4: At 05:40 – “We’re going to play around with them a little bit to give you an idea of how some of them act.“
Step 5: At 05:51 – They talk about the Sakura Glaze Clear pen and give some tips about using it.
Step 6: At 07:05 – Molly shows a tile she has applied Clear Glaze ink to and allowed to dry. Then she describes the Sketch & Wash and how it works. “One thing I’ve learned from fooling around is that i don’t actually apply the Sketch & Wash right on top of the Gelly Roll, I either apply it on a separate piece of paper, pick it up with the brush, and then brush it over or I apply the Sketch & Wash sort of around it because the pencil itself might sort of mark up the glaze a little bit.“
Step 7: At 07:40 – She demonstrates by adding Sketch & Wash pencil marks on the tile between the Glaze marks she had previously created and allowed to dry.
Step 8: At 08:48 – She adds water with the paint brush and covers the tile to spread out the wash. Then she goes back in with the Sketch & Wash pencil and adds darker areas to the wet wash.
Step 9: At 11:45 – They give a few notes about about the Micron versus the Micro Perm. While both are best used once the wash has dried, they included the Micro Perm because it can be used over the Glaze surface. The Micron should be used on the paper and over the wash. Molly notes that the Micro Perm tends to get clogged when used over the Sketch & Wash.
Step 10: At 13:27 – Julie notes that over time in this series the Glaze pen tip might pick up residue but this can be wiped off on a paper towel.
Step 11: At 13:45 – Molly notes that patience is required for this Project Pack series because there will often be drying times required between layers so they are completely dry and won’t damage the pens. Linda’s note: for those of us lucky to have one, a Ranger Heat It™ Craft Tool (aka heat gun) is perfect for immediate drying between layers. A hairdryer will also work but tends to blow everything in the vicinity around too. Forewarned.
Step 12: At 14:28 – She suggests working on more than one tile at a time so one can be worked on while the other is drying. Also, when one is damp/semi-dry she puts it between two pieces of copy paper, then under a book so that it dries flat.
This series will be every other day to allow for exploration and drying times between lessons.
Day 1
In Day 1’s video (24:40) – Tangle along with Maria as she and Rick guide you through the first video in this series. The transitions we’re going to do in this lesson use “these great classic old tangles: from Quabog to Pokeroot to Crescent Moon to Betweed.”

Step 1: At 00:45 – Maria puts down some Sketch & Wash on a scrap paper then adds water with her brush to create a palette of “paint”, and she demonstrates this very important TIP: “whenever you go to grab some of this paint you should twirl your brush so you’re always creating a point“.
Step 2: At 01:29 – On a square grey tile, “We’re going to put down some leaf shapes and create a background pattern. It’s going to be a tangle in itself done with a brush.”
Step 3: At 03:57 – After she completes the tile with the leaf pattern, she shows another tile done in the same fashion with spirals. after the first layer she went over it in the opposite direction with water, making a layered effect.
Step 4: At 04:22 – Another tile done “sort of like a Diva Dance-y kind of thing … anything you do will be beautiful as long as it’s consistent.“
Step 5: At 04:31 – Returning to her leaf tile (“I actually took a hairdryer to this so we could go right way“) …
Step 6: At 04:51 – These are the transitions we’re going to do using “these great classic old tangles – Quabog to Pokeroot to Crescent Moon to Betweed.“
Step 7: At 05:20 – She begins by adding a simple large orb, slightly off-center, for the string then adds Quabog to the other edge of the orb. Rick comments that Quabog reminds him of sea anemones.
Step 8: At 06:36 – She adds Pokeroot by “adding some of these Quabog things but a little longer and they’re peeking out beyond and these are going to become the stem for the Pokeroot.” She completes the layer with the berry tops facing in the same direction.
Step 9: At 07:46 – She adds Pokeroot growing out of the previous layer and facing in the opposite direction.
Step 10: At 09:25 – She adds a row of partial berries “in a Hollibaugh-way” behind the previous row, then adds a second row of them.
Step 11: At 10:44 – She begins to add smaller “berries” spacing them out and coloring them in to transition to Crescent Moon.
Step 12: At 11:37 – She adds Crescent Moon‘s traditional auras to the blackened shapes.
Step 13: At 13:12 – She adds more Crescent Moon shapes around the perimeter, then adds auras to those, alternating them Betweed-style to create a woven effect to the outer band filling up the remaining space in tile.
Step 14: At 18:51 – She goes back towards the center and colors in some of the background spaces between the Pokeroot berries.
Step 15: At 19:47 – She adds dimension with graphite.
Step 16: At 22:48 – She adds highlights with white charcoal.
Step 17: At 24:16 – She shows some of the prototype tiles she created when she was designing today’s tile.
Day 2
In Day 2’s video (13:59) – With Maria keeping him company, Rick tangles Fragment D1 from the Zentangle PRIMER Vol 1 on a white Phi tile.

Step 1: At 00:00 – Rick creates a grid/reticulum of squares on the Phi tile.
Step 2: At 01:37 – On a Bijou tile he demonstrates two ways of creating the fragment he will be using.
Step 3: At 02:41 – He adds the fragment to the grid squares.
Step 4: At 05:01 – “I’m going to put different things in certain sections.” First he fills alternate triangles with solid ink.
Step 5: At 08:23 – With the Sakura Clear Glaze pen and using a very light touch he adds an oval of ink to the middle of each diamond shape. The Glaze will act as a resist. Be mindful not to smudge this ink, it takes a while to dry. Let the tile dry completely – Rick estimated 10-15 minutes for his.
Step 6: At 09:49 – Using the Sketch & Wash pencil, he lightly colors around each of the Glaze ovals.
Step 7: At 10:24 – With the paint brush, he adds water to activate and blend out the Sketch & Wash in the diamond shapes. As the ink sinks into the paper and the wash dries, the Glaze ovals become more apparent.
Day 3
In Day 3’s video (35:10) – Molly and Martha tangle Tipple using the Sakura Clear Glaze pen, then add a Sketch & Wash “fringe” and with the Micron 01 add Bales-like rice-shapes to their white Phi tiles.

Step 1: At 01:40 – After talking about this project pack Molly explains in this lesson we’ll be tangling on a white Phi tile. She also covers the tools she’ll be using and discusses the importance of the gratitude and appreciation phase of the Zentangle Method.
Step 2: At 04:21 – Molly begins with the Clear Glaze pen and takes a while to explain the challenges of working with essentially “invisible ink”, including filming it so we can see it.
Step 3: At 06:00 – She adds Tipple, a cluster of orbs in the top corner of the tile, “tickle the paper and let the ink roll out … nice and slow too.” It does take some time to dry before moving on to the next stage.
Step 4: At 10:46 – Using the General’s Sketch & Wash, Molly adds short strokes radiating out from the edge but not touching the Tipple cluster, creating a band of graphite about 1/2″ wide surrounding the Tipple, “like fringe on a carpet“.
Step 5: At 14:00 – Martha has been working on another tile at the same time and her cluster is composed of Printemps and she adds the graphite fringe to her tile.
Step 6: At 14:49 – As Martha works on her tile, Molly explains “one of the things we wanted to share with you when we though about this project pack was we wanted to think about ways that one tangle relates to another or inspires another. Instead of having isolated angles on a composition, how does the first tangle you put down lead you to the next one, and maybe inspire you to the one after that. .. and really working with your Zentangle art as a composition, as a whole.“
Step 7: At 16:00 – With all of the Sketch & Wash down, it’s time to bring in the paintbrush and water. Molly puts lots of water on her brush and starts by activating the Sketch & Wash.
Step 8: At 17:40 – After she’s dampened the graphite, she begins to pull the wet graphite into the center, over the orbs.
Step 9: At 19:23 – Molly shows Martha’s tile. Molly was more heavy-handed with the graphite than Martha so her tile has a little bit of a different look. Then both tiles are left to dry completely, they suggest about an hour.
Step 10: At 20:30 – After the tiles have dried Molly explains she’s going to “respond to” the tile using the Micron 01 and using “elements of Bales and Rumpus“. She adds rice shapes in the “fringe” area, coming out from the Tipple.
Step 11: At 23:16 – The second layer is the same shape “going between, falling behind) creating a dense layer.”
Step 12: At 24:06 – Molly adds detail by inking in the spaces (interstices) between the rice shapes.
Step 13: At 24:42 – She adds a little rounding to the spaces around the outer edge.
Step 14: At 25:42 – Molly adds hatch marks, “like eyelashes“, to the tips of the petals around the center.
Step 15: At 27:37 – She adds a single hatch mark to the outer edges of each petal tip.
Step 16: At 28:50 – She adds graphite shading and white charcoal highlights.
Step 17: At 32:40 – She adds a stem to her flower. Then they display their tiles side by side with Martha noting she had an accidental drip of graphite that she played with instead of a stem.
Day 4
In Day 4’s video (45:00) – Molly and Martha tangle Cadent and Crazy Cadent on a white square Zentangle tile.

Step 1: At 01:12 – After an introduction, Molly notes we’re working on a white square tile together with the tools in the project pack and explains the Gratitude step in the Zentangle Method.
Step 2: At 03:39 – The tangle to today is Cadent and with the black Micron 01 Molly begins by drawing the “peg board” of orbs that form the base of Cadent – spaced out, aligned and about the same size.
Step 3: At 06:30 – “I want you to think about drawing the letter S“, and she connects the columns of orbs using the take-off-and-land technique.
Step 4: At 08:55 – She turns the tile and adds the same S stroke to the pairs of orbs.
Step 5: At 10:29 – “We’re going to transition from this regular Cadent, into an tangleation we call Crazy Cadent.“
Step 6: At 11:02 – Molly adds a tiny orb and connects to the orb above using the letter S, then connects it to the next nearest orb. This creates a “triangle” of orbs connected with S strokes.
Step 7: At 11:40 – She adds a bigger orb and connects it with S strokes and continues adding different size orbs and connecting them, creating Crazy Cadent.
Step 8: At 16:50 – “I’m going to do the same filler in each of these open spaces.”
Step 9: At 22:40 – Using the Clear Sakura Glaze pen, Martha adds ink to fill in each of the orbs on the tile and then allowed all the ink to dry completely.
Step 10: At 24:31 – Using the General’s Sketch & Wash, she adds graphite by going around each orb without touching the gel ink inside.
Step 11: At 27:10 – Using the paintbrush, she activates the Sketch & Wash with a good amount of water.
Step 12: At 29:11 – She adds extra water to create random drips and runs. “Now we’re going to let this dry, preferably overnight but at least a few hours.“
Step 13: At 30:32 – With the Micron 01, Molly starts to add detail, beginning with strokes that make the orbs appear to be hanging onto the edge of the graphite area.
Step 14: At 34:42 – She consults with Martha about adding some line weighting around the tile and begins to add “a drama effect” to help draw the eye in a little bit.
Step 15: At 36:42 – When she’s finished “adding love“, she swaps her Micron for the MicroPerm pen, “for anywhere you want to put a black mark over anywhere you had gel pen” and adds strokes to the orbs to “almost make it look like a bunch of flat head screws”.
Step 16: At 38:56 – In order to add a little contrast, Molly adds more graphite using a regular graphite pencil around the orbs and a tortillion to lightly blend it out.
Step 17: At 39:58 – She adds a little white charcoal for highlights then additional touches of graphite, “more love”. Molly and Martha finish by adding their chops to their tile collaboration.
Day 5
In Day 5’s video (32:50) – Julie Willand tangles Shattuck and Flux inside an Aquafleur “string” on a white square Zentangle tile.

Step 1: At 01:39 – After an introduction to the series and the tools we’re using, Julie selects a square white Zentangle tile and the black Micron 01.
Step 2: At 02:03 – She uses the Micron 01 to begin adding the tangle Aquafleur to her tile by drawing the outer “blob” shape.
Step 3: At 02:50 – She adds bands inside the shape that “hook around” to sit on top of the outer edge of the shape.
Step 4: At 03:55 – She repeats this, adding bands emanating from the same point until the outline is filled with bands.
Step 5: At 06:21 – Julie explains that normally with Aquafleur the bands would be filled in solid with ink, “but we’re going to fill it with another tangle“. She fills the first band with Shattuck.
Step 6: At 08:42 – She continues to fill the rest of the bands with Shattuck while talking about the project’s concept of transitions.
Step 7: At 13:13 – Now finished with the Micron, she uses the Glaze pen to tangle Flux in the spaces between the Shattuck bands, not quite filling each one to the top but leaving a bit of space. In places where there are large spaces between the Flux petals, she fills them with an orb.
Step 8: At 17:49 – When all the spaces have been filled with Flux, Julies allows the Glaze ink to dry for 3 to 5 minutes.
Step 9: At 18:26 – Once the tile is dry, Julie uses the Sketch & Wash pencil to add graphite to the spaces at the top where she didn’t fill with Flux.
Step 10: At 19:46 – Using the dampened (not too wet) paint brush, she activates the Sketch & Wash and pulls it down over the Flux sections.
Step 11: At 23:03 – When finished with the Sketch & Wash, she allows the tile to dry “for a couple of hours at least to get nice and dry.”
Step 12: At 23:35 – “We’re going to give it a little more dimension.” Using the MicroPerm pen, she redefines the original lines of the bands.
Step 13: At 25:38 – She adds shading to the Shattuck bands using the graphite pencil then softens it with a tortillion.
Step 14: At 28:32 – She adds highlights to the Shattuck with the white charcoal pencil and blends it out with a tortillion.
Step 15: At 29:35 – She adds graphite along one edge of the Flux bands so they appear to go under the Shattuck bands.
Step 16: At 30:59 – She redefines the top arcs of the Shattuck with the Micron 01.
Step 17: At 31:58 – She adds her chop using the Glaze pen then puts some Sketch & Wash down on a spare piece of paper, and picks it up with a damp brush to brush graphite over her chop.
Day 6
In Day 6’s video (25:46) – With Rick keeping her company, Maria tangles Mooka which transitions to Springkle then to Bunzo on a grey Phi tile.
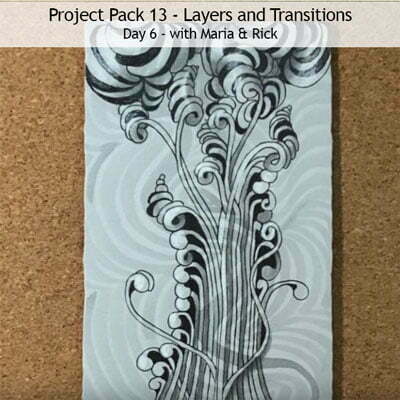
Step 1: At 00:54 – After introducing the project pack and the tools she’ll be using as well as demonstrating how to point the paint brush, Maria takes the Sketch & Wash pencil and puts some graphite down on a scratch paper as a palette. With the brush, she wets the graphite well to “make our ink“.
Step 2: At 01:42 – “So we’re going to draw these stripes on and create a background almost like marbled paper.” She makes a curvy stroke diagonally from one corner to the other, then adds auras on the right side of it to fill the space..
Step 3: At 03:13 – “We did half the tile, now we’re going to go in another direction just to be fun and add a little unexpected pattern to it.” Turning her tile, she adds a stroke perpendicular to the first one and then adds aura strokes on each side of that to completely fill up the tile.
Step 4: At 04:30 – After waiting for the Sketch & Wash to dry, Maria takes a black Micron 01 and starts with her favorite tangle, Mooka. “Right up the middle, we’re going to do like a spray of Mookas.“
Step 5: At 08:16 – “So I’m getting ready to start morphing my tangles from one to the other. We’re starting with Mooka then we’re going to go into a few other different tangles.”
Step 6: At 10:10 – “So now I’m going to go into those ends there,” as she adds a stroke shaped like the number 6 and fills the bowl of the 6 with ink. “This is the beginning of Springkle … we’re making the Mookas into Springkles.“
Step 7: At 12:52 – She transitions one of the Mooka tops into Bunzo.
Step 8: At 14>13 – She adds Bunzo coming down from the top of the tile, then she goes back into the Mookas and adds Bunzo-like crescents to balance the composition.
Step 9: At 18:38 – She adds black behind the Mooka stems where there’s a space.
Step 10: At 19:38 – Using the graphite pencil, she adds shading for dimension and colors in a few Mooka stems to differentiate one from another. She blends out the graphite with her tortillion.
Step 11: At 22:54 – She adds a little bit of graphite to the Bunzo.
Step 12: At 23:35 – She adds white charcoal pencil highlights and finishes her tile by adding her chop.
Day 7
In Day 7’s video (17:26) – With Maria keeping him company, Rick tangles ING using the Clear Glaze Jelly Roll pen on a white Phi tile and adds Crescent Moon with his Micron 01 before he performs “a magic trick“.

Step 1: At 00:17 – Rick uses the Clear Glaze Jelly Roll pen on a white Phi tile to tangle ING. “This pen works really well with a light touch and in slow motion.”
Step 2: At 01:54 – “I’m going to do something a little bit different.” He adds an aura on two or three sides of each triangle, then fills in the space between, creating a “heavier structure“.
Step 3: At 04:30 – He allows the finished structure to dry, approximately 15 minutes or so.
Step 4: At 05:02 – He adds a background layer of Sketch & Wash, including inside the ING triangles, “sort of avoiding the plastic“.
Step 5: At 05:50 – He makes the brush nice and wet and puddles the water on to blend and spread the graphite.
Step 6: At 07:23 – Maria notes “so that had to dry for quite a while. Either take a hairdryer to it or leave it for an hour or so.“
Step 7: At 07:38 – Rick uses the black MicroPerm to first add a black line on the outer right side of the entire structure and then inside the triangles.
Step 8: At 08:34 – “Since we’ve got a straight line shape, and very graphic, I’m going to use my Micron 01,” he draws a straight line “at the Phi point” and adds some Crescent Moons.
Step 9: At 10:56 – He adds another series of Crescent Moons growing out of the top of the first series, and another series on top of that.
Step 10: At 12:01 – With his finger Rick rubs on the Micron ink that goes over the Glaze structure thus removing the Micron ink and making the Crescent Moon appear to move behind the ING. “A magic trick!”
Step 11: At 13:06 – With a graphite pencil Rick adds shading inside the triangles where the first MicroPerm lines were adds, being careful not to go right into the corners. He also adds it to the Crescent Moon, making it appear to be popping through “a slit in the paper“. Then he blends the graphite out with a tortillion and adds his chop.
Day 8
In Day 8’s video (36:12) – Martha and Molly make six “prep tiles” to leave us with extra tiles to explore once the series is finished and then use one of their example tiles to tangle a combination of Arukas and Diva Dance.

Step 1: At 02:00 – After introducing the series and the philosophy behind it, Martha says we’ll first be working with the Sketch & Wash pencil and a paintbrush, on square white and grey tiles.
Step 2: At 04:02 – “We’re going to be making backgrounds”. Martha takes the Sketch & Wash pencil and the first white tile and makes a series of wide horizontal strokes down the tile.
Step 3: At 05:34 – She uses her wet paintbrush to activate the pigment and blend it out below each stroke. Once she has done all the stripes, she suggests allowing it to dry overnight.
Step 4: At 07:40 – On the second tile she uses the Sketch & Wash to “lay down a wonky grid“.
Step 5: At 09:03 – She goes over the whole tile with the paint brush using a light touch and once finished, Molly lightly touches the intersections of the grid with the Sketch & Wash pencil which adds a small dark spot.
Step 6: At 11:13 – For her third tile, Martha uses a grey tile and “an entirely different approach“, adding a thick arc from corner to corner and a border along the edge of the tile. She then activates the graphite with her very wet brush and fills in the semi circular shape she created with the Sketch & Wash.
Step 7: At 13:50 – She turns the tile and “purposely kind of open the door a little here to let out some of the water” and allows the wet graphite to run down the tile. The tile is put aside to dry completely.
Step 8: At 14:50 – Molly does her first tile using the Sketch & Wash on a white tile to add a spiral and adds a little weighting to one side of it then goes over the whole spiral to widen up the strokes of graphite.
Step 9: At 16:35 – She goes “right over the spiral with a bunch of water”, then she moves the graphite around the entire tile. The tile is put aside to dry completely.
Step 10: At 17:50 – On her second tile, Molly uses a grey tile and adds a “nice dark” blotch of Sketch & Wash about the size of a quarter in the middle of the tile. The orb of graphite gets a little lighter around the outer edges.
Step 11: At 18:35 – Doing something similar to Martha’s tile, Molly adds “a bunch of water right in the middle“, then adds six “entry places” around the outer edge and tilts the tile to allow the water to run down the tile, adding more water as necessary.
Step 12: At 20:17 – “This is the one we’re going to do a little demo on.”
Step 13: At 20:30 – Molly has prepared a grey tile in advance by writing some words to a song on it using the Glaze pen. She uses the Sketch & Wash to add radiating arcs across the tile, then turns the tile and adds lines crossing the arcs to create a web of sorts. She adds extra graphite at the corner.
Step 14: At 22:11 – She goes over the graphite with a damp brush and the Glaze pen writing appears in the wash. The tile is put aside to dry completely.
Step 15: At 23:39 – Molly shows some of the tiles they had previously done for examples.
Step 16: At 24:11 – Molly takes one of the dried tile examples like her second one created earlier in the video (17:50) and notes that they will be tangling a combination of Diva Dance and Arukas.
Step 17: At 25:57 – With the Micron 01 Molly traces the edges of the spokes and adds a “little bump” around the edges of the center orb.
Step 18: At 27:43 – She adds an aura to the center shape.
Step 19: At 27:29 – She adds an aura to each of the spokes.
Step 20: At 28:55 – For the next round of auras around the center orb, Molly also adds a little Diva Dance bump.
Step 21: At 29:39 – “And then I go back to aura-ing the spokes“. “And we’re gong to just keep going back and forth, taking our time and enjoying the process” to fill the tile.
Step 22: At 30:51 – Martha shows the completed Micron 01 phase, then begins to add regular graphite shading and white charcoal highlights.
Step 23: At 35:30 – Molly shows how her tile has turned out, placing it beside Martha’s. They add their chops to their tiles.
Day 8 – Wrap-Up
In the final video in the Project Pack 10 Series (11:20) Rick and Maria are joined by Molly as they wrap up this series.

Step 1: At 00:00 – Rick and Maria introduce themselves and then introduce Molly. Molly explains the Project Pack development process and how they go about deciding on what the next Project Pack will entail. She explains how she was introduced to the Sketch & Wash and how it eventually sparked the idea for this Project Pack.
Step 2: At 02:18 – Rick shares his experience of working with the materials, struggling with them at first but then exploring what they can do. He shares some of these early exploration tiles.
Step 3: At 03:46 – He shows some tiles he did, “that I started to like” once he got over his initial struggles with the Sketch & Wash.
Step 4: At 04:25 – Maria says “I went about it totally different” and was interested in using the Sketch & Wash like a watercolor pencil. She shows some of her early tiles of backgrounds. “I was big into the backgrounds and I was thinking more along the lines of like marbled paper“.
Step 5: At 05:14 – She shows the first two tiles she did with tangles over the backgrounds she had created.
Step 6: At 05:34 – Rick shows some of the tiles that Molly had done with her explorations.
Step 7: At 06:16 – He says that after he had seen the explorations Molly had done, he was ready to go back and explore other ideas “and at that point I let the materials more show me what they could do“.
Step 8: At 06:37 – “Here’s a few others,” as he shares many tiles done as prep for the series.
Step 9: At 08:00 – Rick talks about their experience of the transitions and shows several versions of Day 3’s tiles and Molly says, “I feel like that’s a good example of how you could take the same lesson and do it over and over again but get something slightly different as you go through and explore it in a different way.” As Rick shows more tiles, the three of them have a discussion about doing Project Pack lessons over again and exploring the ideas with different supplies and materials.
Step 10: At 10:00 – Rick thanks Molly for “giving us these things to stretch a little bit” … and Molly says she’s already working on PP#14 “so get ready my friends“.
Step 11: At 10:53 – “These ideas are being planted like seeds and then you’re going to grow them in ways that only you can.“
Step 12: At 11:03 – “Like mom said, ‘You can plant your Bunzo anywhere!’ “
Bonus Video from General’s Pencil with tips on how to use their Sketch & Wash pencil
In this short bonus video, (06:52), Kathi Hanson from General Pencil Company shares some tips on using and exploring the General’s Sketch & Wash.
This recap of Zentangle’s Project Pack #13 will make it easy for you to find all the related videos and any parts of them you may wish to refer to again.
Remember the images above are linked to their YouTube video, simply click the image to go to the video. Also: each of the complete videos are included on the corresponding tangle’s page on TanglePatterns.
For a complete list of Zentangle’s Project Packs click the PROJECT PACKS link in the pink alphabetic tangle menu bar.
|
.oOo. |
|
Enhance your Zentangle experience while supporting TanglePatterns: |
|
BRAND NEW! TanglePatterns.com TANGLE GUIDE, 2026 Edition |
|
 |
The 15th Edition of the TanglePatterns.com TANGLE GUIDE is an instant-download 123-page interactive digital eBook/PDF containing over 2,300 tangles on the site from May 2010 through December 31, 2025. It's a great resource and a must-have digital tool for using the site. Visit the STORE > E-BOOKS page and help keep TanglePatterns.com going by getting your copy now! |
|
"Linda, Thank you! I was relying on too few and getting stuck after 3 years of daily working with Zentangle. This has inspired me to ‘begin again’ with renewed excitement." ~ Barbara R. |
|
| See the BOOK REVIEWS page for more details on its features and view a sample page. Note: this is a digital product to download immediately when ordering, nothing will be physically mailed to you. | |
| If you're new to Zentangle® and tangling, my TanglePatterns.com BEGINNER'S GUIDE TO ZENTANGLE is just what you need to get started. Also available en Français and en Español. | |
|
|
|
 |
This is the only Zentangle book you'll ever need: the fabulous Zentangle PRIMER Vol 1. It's your CZT-in-a-book by the founders of Zentangle®. For more about the content and to read the rave reviews, visit the BOOK REVIEWS tab. |
| Available in KINDLE format for $9.99. Spanish Edition here. Japanese Edition here. | |
| "Absolutely the best Zentangle Book yet! As an accomplished artist I used to think I did not need instruction on this art form. How wrong I was! My tangling improved by leaps and bounds after reading this book. If you think you have Zentangle down then you need this book more than ever!" ~ Kris H | |
|
|
|
|
.oOo. |
|


Thank you once again for an incredibly thorough and detailed summary of PP13 all in one place with the videos! I really appreciate that you have notes along with the times – I normally take notes when i watch videos and yours help me immensely. Massive applause Linda!!