


Last Monday I had this article all set to publish and then in one of those strange coincidences, the same day Laura Harms’ challenge was about what she inadvertently called “Pointillism”. Actually the challenge was about Stippling but more about that in a moment. In any event, in order not to overlap with the essence of the challenge I delayed adding this until today. Hope you enjoy!
* * *
 One of thefreedictionary definitions for the term “dotty” is “Amusingly eccentric or unconventional.” And today I thought I’d share my exploration with an approach to creating a Zentangle® that’s a little unconventional. And a little dotty.
Several years ago, around about the time I was working on getting ready to launch TanglePatterns in the Spring of 2010, I saw some unusual and wonderful Zentangles on the Zentangle blog.
The Zentangles were by Maria’s daughter, CZT and Zentangle Product Manager Molly Hollibaugh. Molly had created them “with just dots following and flowing from her string”. (See Molly’s Zentangles in the post Well Apointed.)
I’ve been meaning to give this technique a whirl for a very long time and I finally got around to it. After I got started I thought I’d share my journey of discovery with you. This is a fun project requiring time, patience and focus. As you’ll see and as Rick points out, you can create an interesting and unconventional Zentangle “one dot at a time”.
Stippling and Pointillism
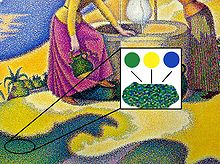
Paul Signac’s pointillist painting, Femmes au Puits, 1892, showing a detail with constituent colors. Image courtesy of Wikipedia.
First I brushed up with a little research on the related-but-different techniques of stippling and pointillism.
“Stippling: In a drawing or painting, the dots are made of pigment of a single colour, applied with a pen or brush; the denser the dots, the darker the apparent shade — or lighter, if the pigment is lighter than the surface.
This is similar to — but distinct from — pointillism, which uses dots of different colours to simulate blended colours.” – Wikipedia
The Impressionist artists Georges Seurat and Paul Signac are considered the “fathers” of Pointillism. Their technique, usually done in oil paint, “relies on the ability of the eye and mind of the viewer to blend the color spots into a fuller range of tones.”
However, the technique we are exploring today is Stippling and for our single color pigment we use the black 01 Sakura Micron on a white Zentangle tile. You could also use a white Sakura Gelly Roll on a black Zentangle tile.
This technique doesn’t need instructions for you to jump in and enjoy. But I thought I’d share the procedure I used and some things I learned along the way in case it’s helpful. Or maybe just amusing.
Step 1: Pencil a String
Using the usual first steps of the Zentangle Method, after our moments of gratitude, we make our penciled corner dots then lightly connect them for the border and add a string. Unless you prefer not to use a border and you can go directly to …
Lightly pencil a string on your tile.
For my example shown below in Step 2, I chose the curvy, swirly TanglePatterns String 050, contributed to our string resource by Zentangle co-founder Maria Thomas.
After working with this string for a bit, I learned that unless you want large open, unstippled spaces in your finished Zentangle, using a fairly intricate string makes this technique a little more interesting because the dots are going to “flow from and follow” your string.
If a string has spaces you can divide up into smaller sections, that might be another way to go.
Step 2: Gently Ink the String with Dots
Holding your pen as upright as is comfortable, slowly and deliberately follow your string lines placing dots spaced however closely or far apart you want to. Random spacing seems to work well.

Note that by “dots”, I don’t mean drawing tiny little orbs. At the bottom left of the tile above, for the first part of the line I used tiny orbs so you can see the difference in size by comparing them with the rest of the dots.
Stipple dots are created by touching the nib firmly to the tile and releasing it vertically. Dots, not orbs.
Try to hold your pen firmly but gently. If you grip the pen too tightly your hand will tire and even cramp.
Don’t jab at the paper, instead you want to gently but firmly touch the nib where you want the dot placed. Are we getting the “gently” message yet 😉 ?
Take your time and place each dot deliberately, just as you would any Zentangle stroke. If you make your dots too quickly, the pen nib can drag and create a tail or flag on it which makes a messy-looking result. A tail can appear as the pen is lifted too quickly and not quite completely from the tile, it’s almost like a tiny check-mark. Slow down. Remember Zentangle is about the journey, not the destination.
The Zentangle tiles are wonderful for this technique because they are so cushion-y. The gently placed Micron nib seems to sink into the paper a bit making a perfectly formed dot.
Step 3: Fill, Expand and Define the Shapes with Dots
Dot ’til you like it …
Once you’ve got your stippled string in place, continue to add dots to and around the string. Add or emphasize shapes that flow from the string as your intuition wants to.
I found what worked best for me was to ink dot the outline of any additional shape I wanted to add and then fill it, as opposed to trying to create the shape at the same time as I was doing the dot “fill”. Tried it, didn’t work. Wonky shapes.

To achieve the darker value areas, continue to add deliberate dots until you are satisfied with the density and contour you’ve added with them. Getting a smooth transition from a light value to a darker one is going to take some practice with this technique. And since this was my first attempt, I’m cutting myself some slack here.
This type of Zentangle is particularly nice because you can put it down and pick it up at any time, adding as few or as many dots as you want to until you’re satisfied with the overall look. No need to remember where you left off and where you were headed next. This is a good thing, because your hand will very likely want a break every 10 minutes or so.
Step 4: Add Shading
I think this step can be important for really effective results. As the original inspiration from Molly shows, shading adds impact that makes this type of Zentangle stand out. My Zentangle below uses just a touch of shading here and there. I might not be done with that one yet.
You don’t have to be an expert “stippler” when pencil shading will soften and define edges and pull the whole piece together.
Step 5: Appreciate!
That’s it. I hope you enjoy giving stippling a whirl with your next Zentangle. BTW – I’ve also been experimenting with some of the tangles and stippling them, in fact Raindotty is a tangle that’s already stippled for you. More fun with Zentangle!
And if you’ve tried this unconventional technique with your Zentangles, please feel free to add a comment and share any tips you might have with us.

Another Stippled Zentangle – Linda Farmer, CZT. Image © the artist and TanglePatterns.com. ALL RIGHTS RESERVED. You may use this image for your personal non-commercial reference only. The unauthorized pinning, reproduction or distribution of this copyrighted work is illegal.
Update January 2019
California tangler Melena Schneider gave me permission to share several ZIA’s she created using this stippling technique for “other people to see what can be done.”
Melena created six Stippled ZIAs then printed them on notecards which she bundled into sets to make lovely personal gifts. I’m a lucky recipient 🙂
Here are three examples of Melena’s Stippled ZIAs.
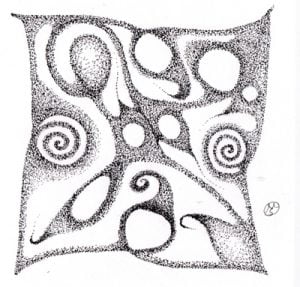
Image © Melena Schneider. ALL RIGHTS RESERVED. You may use this image for your personal non-commercial reference only. The unauthorized pinning, reproduction or distribution of this copyrighted work is illegal.
Melena’s second ZIA example:
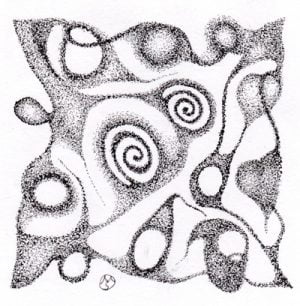
Image © Melena Schneider. ALL RIGHTS RESERVED. You may use this image for your personal non-commercial reference only. The unauthorized pinning, reproduction or distribution of this copyrighted work is illegal.
Melena’s third ZIA includes the Zentangle-originals Gneiss, Flux and Fescu with some perfs, some Curli•Q and a Henna Drum element:
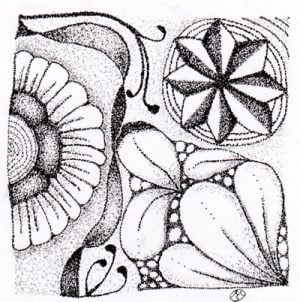
Image © Melena Schneider. ALL RIGHTS RESERVED. You may use this image for your personal non-commercial reference only. The unauthorized pinning, reproduction or distribution of this copyrighted work is illegal.
Related Links
- CZT Genevieve Crabe’s tutorial on Stippling to Create Shading
- CZT Margaret Bremner’s article on stippling – Stippling – A Tutorial
- TanglePatterns Mini Clinic on Shading – Part 1, by CZT Marizaan van Beek
- TanglePatterns Mini Clinic on Shading – Part 2, by CZT Sandy Bartholomew
- Visit the TUTORIALS tab on the pink alphabetic menu for more great tutorials
|
.oOo. |
|
Enhance your Zentangle experience while supporting TanglePatterns: |
|
BRAND NEW! TanglePatterns.com TANGLE GUIDE, 2026 Edition |
|
 |
The 15th Edition of the TanglePatterns.com TANGLE GUIDE is an instant-download 123-page interactive digital eBook/PDF containing over 2,300 tangles on the site from May 2010 through December 31, 2025. It's a great resource and a must-have digital tool for using the site. Visit the STORE > E-BOOKS page and help keep TanglePatterns.com going by getting your copy now! |
|
"Linda, Thank you! I was relying on too few and getting stuck after 3 years of daily working with Zentangle. This has inspired me to ‘begin again’ with renewed excitement." ~ Barbara R. |
|
| See the BOOK REVIEWS page for more details on its features and view a sample page. Note: this is a digital product downloaded immediately when ordering, nothing will be physically mailed to you. | |
| If you're new to Zentangle® and tangling, my TanglePatterns.com BEGINNER'S GUIDE TO ZENTANGLE is just what you need to get started. Also available en Français and en Español. | |
|
|
|
 |
This is the only Zentangle book you'll ever need: the fabulous Zentangle PRIMER Vol 1. It's your CZT-in-a-book by the founders of Zentangle®. For more about the content and to read the rave reviews, visit the BOOK REVIEWS tab. |
| Available in KINDLE format for $9.99. Spanish Edition here. Japanese Edition here. | |
| "Absolutely the best Zentangle Book yet! As an accomplished artist I used to think I did not need instruction on this art form. How wrong I was! My tangling improved by leaps and bounds after reading this book. If you think you have Zentangle down then you need this book more than ever!" ~ Kris H | |
|
|
|
|
.oOo. |
|


Hi Linda,
While I can’t say I’ve done Zentangle patterns in the “dotty” form, I have done small drawings that way–I particularly like the work of Georges Seurat–and have always had fun with it.
Don’t know why it didn’t occur to me to do it with Zentangle patterns, but now I’m going to try it. Thank you for the update!
I love the look of this! Will definitely have to play with it. Also, thanks for clarifying the terms for us.
Thank you very much for this generous post. Your tile is beautiful! I am absolutely in love with this technique. In fact, I will go and zenstipple something right now.
Look at my website bij zentangle for stippling zentangle
Love this technique Linda, and your examples are beautiful! Have already tried it in a corner of a piece I have been trying to finish and it’s perfect.
Slightly different, – and apologies if I have missed a ‘pointer’ ;0) to this already – but it reminds me of Aboriginal art. My husband is covering this in his Design Technology lessons at the moment and sent me this clip, which he showed to one of his classes last week. Enjoy!
Thanks Henny, I’ve long been an admirer of Australian Aboriginal artist George Tjungurrayi and this type of art goes back to ancient times. Wikipedia has an interesting background about the Aboriginal Art form and dot paintings here: http://en.wikipedia.org/wiki/Indigenous_Australian_art
Lovely examples! I enjoy stippling, but it takes so long. Thanks for the terminology clarification too.
Linda would like to clarify … Dot painting is not ancient nor traditional but was developed in the 1970s. Traditional Aboriginal art is varied. Ancient art is a different style to dots … Views the ‘inside’ often of animals. The first modern Aboriginal artists painted not unlike European with watercolour scenes of the bush.
The wiki site is extremely limited. In saying what I have, everyone has different vipoints across tribal groups in Australia. If you look back pre 1970, the only Aboriginal art work is in the style of Albert Namatjira
Thanks for the clarification, Jenn. Whenever it started (and by whomever) it’s certainly lovely!
Hi Linda,
I already used this techniques in some of my zentangles and really love it.
There’s an alternative to create darker area : using different pens sizes. Fill the entire area using a 0.1 pen first, then use successively 0.3, 0.5 and 0.8 pens on selected overlapping areas.
Some variations are also possible for strings : line, dots or even none.
Enjoy !
Henny, what utensil is she using to apply the paint? Which leads to my next question, what kinds of paint do you use, if any different.
I’ve just tried this and I love it! I love the control it gives and it’s very meditative (for me anyway).
I found that holding the tile at arm’s length and squinting at it helps with the gradation from dark to light and vice versa.
Thanks Tracey, and Rick and Maria always coach us to hold our tiles at arms length and turn them around to view from all sides, just as you’re saying. You get a whole new appreciation of your Zentangle art when you observe it this way. Glad you enjoyed stippling your Zentangle.
California tangler Melena Schneider gave me permission to share some ZIA’s she created using this stippling technique for “other people to see what can be done.”
Melena created six Stippled ZIA’s then printed them on notecards which she bundled into sets to make lovely personal gifts. I’m a lucky recipient 🙂
Check out the post above for three examples of Melena’s Stippled ZIA’s.
Thanks for sharing Melena!