


 Project Pack #29’s seven-day series began April 3rd and wrapped up earlier this week, today’s article is a detailed Summary of each day’s lesson.
However, before we get to that I need to point out a significant change from the way I’ve prepared these articles in the past.
As you might imagine my Project Pack Summaries took considerable hours of time to prepare the images and the text and now of necessity I need to seriously reduce that workload of both time and physical keyboarding.
In this case, fortunately AI has entered our lives and it can be used to summarize pretty much anything on the internet. So beginning with this Project Pack it’s my intention to add AI summaries of the videos. These give a very good concise overview of each video and I’m confident you’ll find these a very useful summary of each Project Pack.
Thanks for your understanding!
.oOo.
Zentangle HQ recently launched the first in their series of Project Packs for 2026. (Traditionally there’ve been three Project Packs each year: Spring, Summer, Christmas.)
This one is the 29th in the series and seven days of video instruction focus on the new Scroll-Z template, a large-scale tangle composition and how to transition from one tangle to another.
From video introductions:
Join us as we create a larger piece of Zentangle art with confidence – one stroke at a time. In Zentangle Project Pack No. 29, we explore how to approach big, beautiful compositions using simple patterns, mindful drawing techniques, and a step-by-step process designed to calm the mind and spark creativity.
Many artists feel overwhelmed when starting a larger piece. We begin to focus on the result and lose sight of the present moment. The Zentangle Method gently reminds us that every masterpiece is created through a series of small, intentional strokes. With each mark, we build trust in the process and discover that what once felt daunting becomes possible.
In this series, we will work together on a larger tangled composition using a custom Scroll-Z template. As we move from tangle to tangle, we will explore creative ways to blend and connect patterns, creating a seamless and cohesive design. Along the way, we embrace the Zentangle philosophies of “No Mistakes” and “Anything is Possible … One Stroke at a Time.”
SUPPLIES: This Project Pack is available here ($39.95) in the zentangle.com store and it’s a convenient way to get all the supplies for the project. However, the introductory video reviews the items in the Project Pack and you might discover you have suitable alternatives in your own Zentangle supplies. “If you do not have the project pack materials, we encourage you to follow along with whatever you have available.”
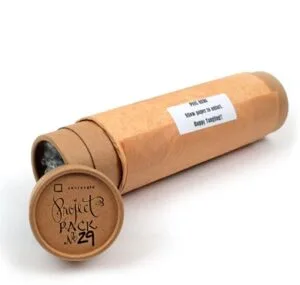
- One bubble wrap pouch containing:
- One Sakura Micron 03 pen, Black
- One Sakura Micron 08 pen, Black
- One Sakura Gelly Roll 10 pen, White
- One General’s Sketch & Wash #588 pencil
- One #7 Round Watercolor Brush
- One Zentangle graphite half pencil
- One tortillion
- One Scroll-Z – a 7″ x 21″ piece of 100% cotton Fabriano Tiepolo paper with a custom-printed template string
The following chronology is a summary of the videos for this Project Pack with links to the individual videos. Either click the Day #’s title link or the image itself to view the full video on YouTube.
IT IS RECOMMENDED to watch this Project Pack’s videos in sequence.
CZT Molly Hollibaugh recommends we watch Project Pack videos completely through once before beginning our tiles:
“You’re going to have a little more confidence, you’re going to be a little more aware of what’s happening next. Then you might try something different, you might explore it in a different way”.
QUICK LINKS TO DAILY SUMMARIES
Jump to:
Day 1 – Parts 1 & 2 – Molly and Martha prepare the Scroll-Z; tangle Fife, Ravel
Day 2 – Rick tangles Waybop, Tipple, Betweed
Day 3 – Maria tangles Pokeroot
Day 4 – Rick tangles Arukas
Day 5 – Martha tangles Crescent Moon & Tripoli
Day 6 – Maria tangles Pokeleaf, Doodah & Pokeroot
Day 7 – Molly & Martha “Add love”
Wrap Up
Introduction
(08:07) – This introduction video brings together Rick, Maria, and Molly to unveil Project Pack No. 29, a series focused on creating a large-scale Zentangle composition using a new Scroll-Z template. The trio walks through the materials, the philosophy, and the creative themes that will guide the entire project pack.

1. What’s inside the project pack
The team unpacks the tube to reveal the Project Pack supplies listed above. They highlight the return to a black, white, and gray palette, reconnecting with Zentangle’s roots.
2. Why the scroll is rolled outward
The templates are intentionally rolled template-side out so gravity naturally flattens them over time. They encourage gentle unrolling rather than reverse-rolling to avoid stressing the paper.
3. The creative focus of Project Pack 29
This series explores:
-
- Working on a larger composition without feeling overwhelmed
- Breaking the project into small, digestible daily steps
- Tangle transitions — learning how one pattern can flow seamlessly into another
- Letting the original string fade into the background as the composition evolves
4. Zentangle philosophy woven throughout
The instructors reinforce:
-
- “Anything is possible … one stroke at a time.”
- A large piece becomes approachable when you focus on today’s small step
- Mixed media is an invitation to experiment, get messy, and take creative risks
- Documenting progress (e.g., taking photos each day) helps you appreciate the transformation
5. A warm send-off
They close by encouraging you to:
-
- Have fun
- Take chances
- Enjoy the process
Follow along as Molly leads the next step in the series
Day 1 – Part 1 – Preparing the Template
(08:32) – Molly and Martha guide you through preparing the Scroll-Z template before any tangling begins. The focus is on creating a soft, atmospheric graphite background using a Sketch & Wash pencil, water, and a brush. NOTE: Molly recommends watching this all the way through and practice getting used to the Sketch & Wash on a scrap piece of paper before moving to your template.

0:09 Welcome & Materials – Martha and Molly introduce Project Pack 29.
You’ll need the template, Sketch & Wash pencil, brush, water, and paper towel. They encourage embracing the natural folds and curves of the paper.
1:15 Laying Down Dry Graphite
Graphite is applied before adding water. Darkest graphite sits at the points; it fades toward the string line. They recommend practicing on scrap paper to understand how the pencil behaves.
2:42 Soft Edges for Better Blending
Using the pencil on its side creates a soft, wide line. Softer graphite blends more beautifully than hard, sharp lines.
3:21 Activating the Graphite with Water
Start by placing clean water in areas without graphite. When water meets graphite, it “ignites,” creating a watercolor-like effect. Keep the brush clean to avoid muddying the center.
4:44 Maintaining a Light Center
The goal is not to cover the whole area with graphite. Leave a bright center for later pen work. Aim for a “whisper of gray” fading inward.
6:27 Letting Water & Graphite Move Organically
Add water near the graphite and let it flow naturally. Avoid overworking the wash to preserve soft gradients. If the brush makes noise, you need more water.
7:06 Drying & Natural Variations
The wash dries lighter. Watermarks, blooms, and irregularities are welcome—they add character.
8:20 Closing & Next Steps
The graphite wash becomes the “canvas” for tomorrow’s tangling. Let the piece dry completely before moving on.
Day 1 – Part 2
(21:20) – In this lesson, Martha and Molly guide you through the first major tangling step of the Scroll-Z composition. After the graphite wash from Part 1, this session focuses on building the first two tangles — Fife and Ravel — and learning how to transition them seamlessly.
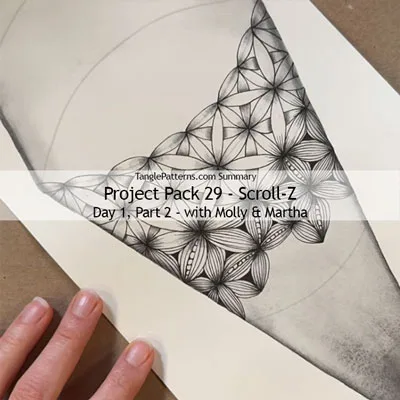
00:00 – Welcome & Overview
The instructors introduce Part 2 of Day 1, continuing the large-format Scroll-Z project. They explain that this session builds on the graphite wash foundation created in Part 1. Emphasis on working “one stroke at a time” and staying present.
00:30 – Reviewing the Prepared Scroll
They show the dried graphite wash from Part 1. Point out natural blooms, gradients, and how these will support the tangles. Encourage noticing the organic shapes created by the wash.
01:20 – Choosing the First Tangles
Introduction of the first patterns for the Scroll-Z path. They explain why these tangles work well as “openers” on a large composition. Focus on simple strokes to ease into the project.
02:10 – Beginning the First Tangle – Fife
Demonstration begins with a Micron pen. Slow, deliberate strokes; emphasis on breathing and pacing. They remind you that the template’s curves are guides, not rules.
04:00 – Building Rhythm
The pattern begins to repeat and expand. They discuss how to maintain consistency without rigidity. Tips for spacing, line weight, and flow.
06:00 – Adding Embellishments
Small details are added to enhance depth. They show how embellishments interact with the graphite wash underneath. Encouragement to let the wash influence your choices.
07:30 – Transitioning to the Next Section – Ravel
They demonstrate how to move from one tangle to another smoothly. Discussion of “tangle-to-tangle transitions,” a key theme of Project Pack 29. Suggestions for blending strokes so the composition feels unified.
09:00 – Final Touches
They refine the section with small accents. Reminders to pause, step back, and appreciate the emerging piece.
10:00 – Closing Thoughts
Encouragement to trust the process and enjoy the unfolding artwork.
Day 2
(16:39) – Day 2 focuses on tangle-to-tangle transitions, using Waybop, Tipple, and Betweed, along with thoughtful shading to create depth and cohesion. Rick demonstrates how to extend Molly’s Day 1 work, blend tangles seamlessly, and use auraing and drawing-behind to build a dimensional, flowing composition.

0:09 Introduction & Materials
Rick and Maria welcome viewers to Day 2. Tools: black pen (PN by accident, but 03 is intended), pencil, tortillon. They appreciate Molly’s Day 1 work and the evolving composition.
1:09 Extending Fife & Beginning the Transition
Rick lengthens the seed shapes from Fife and adds dots as reference points. Introduces the idea of tangle-to-tangle blending. Begins drawing new seed shapes that flow out of Molly’s earlier strokes.
3:02 Shifting from Fife into Waybop
Rick uses the negative space of Waybop to transition. Demonstrates the “take off and land” technique, skipping arcs to create horseshoe-like shapes. This becomes the structural base for Waybop.
4:01 Auraing & Drawing Behind
He auras each horseshoe shape, rotating the scroll for comfort. Maria explains how right- and left-handers position lines to avoid covering the stroke they’re mimicking. Rick adds the second layer of Waybop by drawing behind, reinforcing the “Hollibaugh” concept.
7:12 Completing the Waybop Structure
The full Waybop form emerges. Maria compares the look to decorative garden wire fencing. They discuss how Waybop can take many creative directions.
7:41 Adding Tipple (Orbs)
Rick fills interior spaces with Tipple, starting with the center orb to create depth. Overlapping orbs enhance the 3D effect. Darkened interstices help the orbs pop.
9:26 Adding Betweed
Rick introduces Betweed, one of Zentangle’s early magical tangles. He draws tiny woven strips, reinforcing under-over weaving with darker tips. The weaving subtly extends back into the Fife tangle to strengthen the transition.
12:30 Shading the Orbs
Adds graphite “smiles” to each orb. Blends with the tortillon to create pearl-like highlights. Encourages shading as part of the whole composition, not just isolated tangles.
13:40 Shading Waybop
Shades where Waybop goes under Fife and where its own arcs overlap. Blending softens transitions and enhances dimensionality. They reflect on how shading reveals the interaction between tangles.
15:00 Shading Betweed
Rick deepens the woven look by shading the under-strips. Uses leftover graphite on the tortillon to push Betweed behind adjacent tangles. Demonstrates how subtle shading choices change the hierarchy of elements.
16:14 Closing Thoughts
They celebrate the collaborative nature of the project (Molly, Martha, Maria, Rick, Julie). Encourage viewers to enjoy the process and return tomorrow for Day 3.
Day 3
(12:16) – In Day 3 of Project Pack 29, Maria builds on Rick’s previous tangles by adding large, expressive Pokeroot forms to the composition. She demonstrates how to use open spaces, aura lines, and intuitive placement to create a lively, organic cluster of Pokeroot berries. The second half of the video focuses on advanced shading, including a counterintuitive technique that leaves a thin white rim around each orb to enhance volume and glow. The lesson emphasizes flow, connection, and trusting your instincts as your composition grows.

0:09 Introduction & Setup
Rick welcomes viewers to Day 3. Maria takes over, using an 08 Micron to work larger and bolder. She encourages settling into focus before beginning.
0:50 Connecting From Previous Tangles
Maria uses the in-between spaces Rick left to extend stems. She auras existing lines to create natural transitions. The goal: smooth tangle-to-tangle flow.
1:15 Drawing Large Pokeroot
Pokeroot is intentionally oversized for the large format. She varies pressure to add expressive line weight. Stems flare at the ends, with a delicate V-shape cap.
2:38 Placement & Rhythm
Pokeroot points in different directions for movement. Auras stay consistent to unify the composition. Lines touch strategically to strengthen structure.
3:32 Building the Cluster
Each stem gets a berry; overlapping requires drawing behind. Maria imagines them “bobbing along,” filling space gracefully. Rick notes the intuitive, playful feel.
5:00 Working Larger Than Usual
They discuss how freeing it is to work big. The composition grows from all directions, not symmetrically. Maria adds more Pokeroot, some disappearing off the edge.
6:41 Final Pokeroot & Flow
She adds the last few Pokeroot berries, focusing on balance and movement. Rick encourages viewers to let their own version evolve uniquely.
Day 4
(14:39) – Day 4 focuses on expanding the Scroll-Z composition by adding the tangle Arukas, woven seamlessly into Molly’s earlier Ravel section. Rick leads the drawing while Maria offers commentary, humor, and insight into the Zentangle philosophy.

00:00–00:40 — Welcome & Gratitude
Rick and Maria open Day 4 with humor and appreciation. They pause to acknowledge gratitude for the opportunity to create something beautiful.
00:40–02:30 — Introducing Arukas & Connecting from Ravel
Rick begins by connecting Molly’s Ravel tangle to a new Arukas section. He lays down large orbs as anchor points and uses a “tethered aura” inspired by Ravel. Notes that Arukas usually begins with one central orb, but here they’re filling a whole area.
02:30–04:20 — Aura Rhythm & Spatial Consistency
They emphasize keeping aura widths similar to maintain rhythm and texture. Rick begins auraing the orbs and arms, noting the meditative repetition.
04:20–05:50 — Where the Name “Arukas” Comes From
Maria asks about the name. Rick explains Molly invented it while on a long phone call with Peter from Sakura. She reversed “Sakura” > Arukas.
05:50–07:20 — The Arukas Process
Arukas is built by alternating: Aura all arms, Aura all centers, Repeat. This creates a woven, stair-step texture reminiscent of Betweed inside Waybop.
07:20–09:00 — Tangle for Straight Line Lovers
Rick enjoys the back-and-forth rhythm and the surprising patterns that emerge. They discuss how Zentangle is like a magic trick — the outcome is a delightful surprise.
09:00–10:40 — Tangle-to-Tangle Integration
Rick brings Arukas right up to Molly’s Ravel, creating interwoven transitions. Maria notes the Escher-like quality of the interlocking patterns.
10:40–13:20 — Shading the Arukas
Rick shades where Arukas goes under Ravel to emphasize depth. This enhances the woven, dimensional effect.
13:20–14:10 — Texture & Final Touches
They compare the texture to woven rush chairs and the tangle Hurry. Rick adds final touches with leftover graphite on the tortillon.
14:10–End — Wrap-Up
They thank viewers and tease Day 5.
Day 5
(15:36) – Day 5 continues the large-scale collaborative composition by introducing a bold spiral structure that weaves behind existing Pokeroot. Martha leads the drawing adding Crescent Moon and Tripoli while Julie offers observations and context, emphasizing how each day builds on the previous ones.

0:09 Welcome & Setup
Martha and Julie introduce Day 5. They encourage starting from Day 1 for continuity.
02:07 Drawing the Large Spiral
Martha uses a pencil guideline to place a big spiral behind Pokeroot. Julie notes how spirals suit her style. Lines weave behind existing tangles to maintain depth.
02:59 Auras & Common Strokes
Martha adds an aura around the spiral, spacing it to echo Pokeroot stems. They discuss how shared strokes help tangles “speak the same language.”
03:46 Creating Fragment Spaces
The spiral is divided with double lines into square-ish fragments. Care is taken to continue lines behind Pokeroot for cohesion. A spontaneous extra Pokeroot is added when a “begging space” appears.
05:27 Filling Fragments: Crescent Moon
Each band gets Crescent Moon shapes on both sides. The Micron 08 makes bold “ladybug” fills. Martha emphasizes working slowly and embracing “wonkiness.”
07:13 Triangular Variation
Switching to a Micron 03, Martha adds triangular fragments between crescents. Auras differ slightly in thickness, adding texture. The spiral becomes meditative — “just the next little space.”
10:30 Shading the Spiral
Traditional Zentangle shading: graphite on the inside edges of each band. White space in the center creates highlights. The initial spiral stroke is kept clean for contrast.
11:44 Adding Tripoli in White Gelly Roll
In the dark-shaded corner, Martha draws Tripoli with a white Gelly Roll. Triangles are intentionally imperfect for movement. Favorite filler: three arcs + inked center. Light pressure is essential for smooth gel flow.
14:09 Meta Patterns & Final Touches
A meta-pattern emerges naturally from the Tripoli grid. Martha adds small details with the Micron 08, leaving a tiny white dot. They encourage continuing to build layers and explore possibilities.
15:25 Closing
Martha hands the composition off to the next day’s instructor. They wish viewers a joyful, creative Day 5.
Day 6
(13:23) – Rick and Maria add new organic elements — Pokeleaf leaves — to the large composition. The focus is on long S-curve stems, elongated leaves filled with the tangle Doodah, and rich graphite shading to create shiny, dimensional berries. They emphasize rhythm, natural variation, drawing behind existing elements, and the creative freedom that comes with working large.

0:09 Opening & Gratitude
Rick and Maria welcome viewers to Day 6. Maria reflects on appreciating the tools and paper. They introduce the plan: adding “life”—elements that grow.
0:48 Drawing Long Stems & Pokeleaf
Using an 08 black pen, Maria draws long S-curve stems. Leaves are elongated, inspired by Pokleaf shapes. A consistent aura gap is added around stems. Maria encourages embracing “going outside the lines.”
2:17 Filling Leaves with Doodah
Leaves are filled with the tangle Doodah. Lines alternate: one starts at the top but doesn’t finish; the next starts lower and goes down. Emphasis on rhythm, line pressure, and natural variation. They compare the pattern to Disney queue lines when looking at the white space.
4:31 Second Leaf & Drawing Behind
A central vein is added. Doodah continues on both sides with mirrored slants. Rick notes drawing behind existing stems — an essential Zentangle technique.
6:02 Building More Leaves
“Rinse and repeat” — adding 4–5 leaves. Focus on takeoff and landing, restating lines, and enjoying each stroke. A stem segment becomes the vein of a new leaf.
7:01 Adding Pokeroot from Tripoli
Maria flips the tile and adds Pokeroot berries/”cherries” emerging from Tripoli. Negative space between triangles becomes stems. Stems weave behind berries and leaves.
8:18 Organic Growth & Flow
Pokeroot “grows” in different directions. A small line at the top adds depth and texture. They note how tangles evolve over years of practice.
9:31 Pencil Holder Tip
Maria uses a pencil holder/lengthener to grip shorter pencils. They mention inexpensive options online.
10:07 Shading Pokeroot
Graphite shading begins with a white halo aura left around the edge. Heavy graphite is added, then buffed with a tortillon for a shiny surface. Larger scale allows more expressive shading.
11:39 Shading Takeaways
This shading method works for circles, ovals, and other shapes. Working large allows shading inside tangles and more detail.
12:20 Working Big Without Taking Long
They note the project is large but manageable daily. Working big “covers acreage” but still allows intricate detail.
12:43 William Morris Inspiration
The Pokeleaf interior patterns evoke William Morris textile motifs. Small background patterns enrich the composition.
13:03 Closing
They thank viewers and tease that Day 7 will be surprising and fun.
Day 7
(28:25) – Day 7 is the “adding love” stage—final touches, enhancements, shading, and mixed media details that bring the entire Scroll-Z composition to life. Molly leads the lesson, with Martha commenting throughout. The focus is on connecting tangles, using orbs as unifying elements, adding Bronx Cheer, using white Gelly Roll for dramatic highlights, and deepening graphite shading to create depth and cohesion.

0:09 Opening & Gratitude
Molly and Martha welcome viewers to the final day. They reflect on the collaborative nature of the project and the joy of seeing everyone’s unique interpretations. Today’s goal: final touches—inking, graphite, and enhancements that take time but transform the piece.
1:47 Using Orbs to Connect Tangled Areas
Molly begins by adding dense orbs to unify sections like Waybop and Fife. Orbs “spill over” into neighboring tangles, creating continuity. She varies density—full clusters near the top, scattered orbs lower down—to suggest movement.
5:13 Revisiting Earlier Tangles
They discuss the freedom to leave areas unfinished and return later with fresh ideas. Molly reinforces that large compositions evolve over time—no need to finish each tangle in one pass.
6:02 Arukas Background & The “Blue Pen Story”
Martha explains how Arukas became a textured background. She shares a humorous story: working in the dark, she accidentally used a blue pen for 30 minutes. This “misstroke” led her to incorporate Bronx Cheer to harmonize the area—an example of the Zentangle philosophy “No Mistakes.”
8:13 Adding Bronx Cheer + Introducing White Gelly Roll
Molly demonstrates Bronx Cheer. She introduces the white Gelly Roll to create opaque berries that sit on top of the ink. Tips: Warm up the pen, Clean the tip often, Let layers dry before adding Micron ink nearby.
12:02 Mixed Media Magic
They highlight how the graphite wash background allows black and white ink to blend seamlessly. White and black lines weave together, creating optical illusions and depth.
14:01 More Orb Connections Near Pokeroot
Molly adds orbs behind Martha’s earlier Pokeroot, extending the motif across the scroll. She emphasizes pen maintenance—cleaning tips frequently due to mixed media buildup.
15:29 “I Was Here” – Artistic Presence
A brief philosophical moment: every mark is a record of presence. They reference a Kurt Vonnegut quote about leaving evidence of being here through art.
16:00 White Tripoli Variation
Molly mirrors Martha’s earlier black orb Tripoli by creating white orb Tripoli with Gelly Roll, then outlining with Micron for contrast. This inversion ties the composition together.
17:41 Outlining & Layering for Contrast
Once dry, white orbs are outlined to give them structure. They compare the effect to “caviar”—small, whimsical, dimensional dots.
19:00 Selective Outlining for Starfish Effect
Instead of outlining every stroke, Molly outlines only arcs of the white Tripoli, creating a starfish-like look.
20:03 Transforming a Missed Pokeroot into Bronx Cheer
A forgotten unshaded Pokeroot becomes a new Bronx Cheer cluster. In busy areas, Molly works orb by orb, alternating Micron and Gelly Roll to avoid losing her place.
22:00 White Paper Bronx Cheer
On the white portion of the scroll, she still adds Gelly Roll for consistency with the rest of the piece.
22:35 Black & White Line Interplay
They discuss how black and white lines blend and overlap, creating a playful, layered look.
23:02 Graphite Shading Begins
Molly adds deep graphite shadows to push elements back. Zentangle shading focuses on contrast, not light sources. She shades Bronx Cheer consistently on one side for cohesion.
24:14 Shading Over Gelly Roll
She shades directly over dried Gelly Roll using the side of the pencil to avoid scratching. If shading becomes too heavy, you can restore highlights with another Gelly Roll layer.
25:02 Deep Shadows Behind Stems
Strong shadows behind stems make them pop dramatically. She considers adding even more because the effect is so striking.
26:38 Tortillon Work
The tortillon blends graphite smoothly. They note the challenge of avoiding smudging once the tile is heavily shaded.
27:15 Edge Shading
Molly adds a final graphite border to frame the composition. They joke about “using an entire pencil on one piece.”
28:01 Closing Reflections
They celebrate the transformation created by layering ink, white highlights, and graphite. Encourage viewers to get another template and make more scrolls. Rick and Maria will share final thoughts in the wrap-up video.
Wrap Up
(03:59) – A warm, celebratory closing where Rick and Maria look back at the Scroll-Z journey, highlight staff contributions, and reflect on the beauty of individual artistic expression.
0:07 – Welcome & Introduction
Rick and Maria open the wrap-up video. They’re delighted by how the project unfolded and how much they learned while doing it.
0:24 – Staff Participation
For the first time, the entire Zentangle staff played along. Participants included Jean, Jen, Julie, Martha, Molly, Rick, and Maria.
0:39 – The Group Scroll
They begin by showing the collaborative scroll created by everyone. They emphasize the Zentangle philosophy: you don’t know what it will look like until the end—and that’s the beauty.
0:54 – Learning Through Transitions
Maria reflects on how each project teaches her new ways to gracefully transition from one tangle to another. They discuss how revisiting tangles helps them blend more elegantly with adjacent patterns.
1:41 – Jean’s Scroll
Jean’s piece is shown. They admire the personal touches and unique style she brought to the project.
2:03 – Julie’s Scroll
Julie’s version is highlighted next. They note how each artist follows the same instructions but expresses them differently.
2:29 – Jen’s Scroll
Jen’s scroll is shown. Again, they celebrate the individuality and personality visible in each piece.
2:55 – Martha’s Scroll (The Blue Pen Story)
Martha’s scroll includes blue ink, which wasn’t part of the original plan. She accidentally grabbed a blue pen in the dark—then committed to it. Rick and Maria laugh and reinforce the Zentangle motto: “No mistakes.”
3:15 – Gratitude & Encouragement
They express deep gratitude for everyone who participated. They describe the scrolls as “frameable” and beautiful. They encourage anyone who hasn’t tried the project to dive in.
3:36 – Looking Ahead
Maria teases that they already know what the next Project Pack will be—and it’s going to be great.
3:53 – Closing
They send love, appreciation, and encouragement to continue exploring where this “magic carpet of paper” takes you. Final goodbyes.
This recap of Zentangle’s Project Pack #29 will make it easy for you to find all the related videos and any parts of them you may wish to refer to again.
Remember the images above are linked to their YouTube video, simply click the image to go to the video. Or, you can view the complete video on the corresponding tangle’s page on TanglePatterns, they make a fascinating “historical” record of Zentangle videos on each tangle.
For a complete list of Zentangle’s Project Packs click the PROJECT PACKS link in the pink alphabetic tangle menu bar.
|
.oOo. |
|
Enhance your Zentangle experience while supporting TanglePatterns: |
|
BRAND NEW! TanglePatterns.com TANGLE GUIDE, 2026 Edition |
|
 |
The 15th Edition of the TanglePatterns.com TANGLE GUIDE is an instant-download 123-page interactive digital eBook/PDF containing over 2,300 tangles on the site from May 2010 through December 31, 2025. It's a great resource and a must-have digital tool for using the site. Visit the STORE > E-BOOKS page and help keep TanglePatterns.com going by getting your copy now! |
|
"Linda, Thank you! I was relying on too few and getting stuck after 3 years of daily working with Zentangle. This has inspired me to ‘begin again’ with renewed excitement." ~ Barbara R. |
|
| See the BOOK REVIEWS page for more details on its features and view a sample page. Note: this is a digital product downloaded immediately when ordering, nothing will be physically mailed to you. | |
| If you're new to Zentangle® and tangling, my TanglePatterns.com BEGINNER'S GUIDE TO ZENTANGLE is just what you need to get started. Also available en Français and en Español. | |
|
|
|
 |
This is the only Zentangle book you'll ever need: the fabulous Zentangle PRIMER Vol 1. It's your CZT-in-a-book by the founders of Zentangle®. For more about the content and to read the rave reviews, visit the BOOK REVIEWS tab. |
| Available in KINDLE format for $9.99. Spanish Edition here. Japanese Edition here. | |
| "Absolutely the best Zentangle Book yet! As an accomplished artist I used to think I did not need instruction on this art form. How wrong I was! My tangling improved by leaps and bounds after reading this book. If you think you have Zentangle down then you need this book more than ever!" ~ Kris H | |
|
|
|
|
.oOo. |
|


I loved, loved, LOVED doing this project pack! It was so much fun to learn how to merge different tangles together into a large, gorgeous, totally “frame-able” masterpiece. Zentangle Inc. outdid themselves on this one!
Thank you!