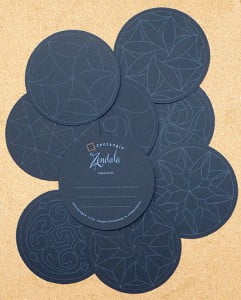
 With the new Black Zendala Sets now available along with the regular black Zentangle® tiles, you might be wondering what pens to use on them. How to draw strings? How to shade with white on black? Here are a few tips to get you started and you are encouraged to add your own suggestions for working with white-on-black in the comments below.
There’s just no doubt about it. Using white ink gel pens on black tiles is an entirely different ballgame from our trusty black Microns on the white tiles. And the results can be stunningly, dramatically beautiful.
Which pens to use?
The White Sakura Gelly Roll ($3.36) is the pen of choice. Also recommended by fellow tanglers are the Sanford Uniball Gel Pen ($3.91) and the Pentel Sunburst Permanent White Gel Pen ($4.31), which I haven’t tried yet. Metallic Sakura Gelly Rolls are also a very good choice and can be quite elegant. Check out the TIPS & TOOLS > PENS & MORE > WHITE INK page on the top menu bar for more information about white ink.
Sakura uses titanium white pigment (dioxide) in the White Gelly Roll ink. The ink is “light-fast and water-proof when used on paper and has the same archival qualities as the Microns.” From Wikipedia: “Titanium dioxide is the most widely used white pigment because of its brightness and very high refractive index.”
How to handle white gel pens?
The first thing you’ll want to do is test your pens on the back of the tiles to get a feel for the paper’s texture and the handling characteristics of your pens.
Use a very light touch and hold the pen upright. You can change the width of your stroke through light pressure alone. Maria recommends just “tickling” the surface of your tile with the white pen. She writes, “I love going in and texturizing the backgrounds with bubbles or carefully drawn dots…. the white ink has a character all its own….acts totally differently than the black. If you go ever so lightly, the ink just flows out …. then you can go back over some of them and make them more white for highlights.”
Because of the viscosity required to achieve the desirable opaqueness in white ink, the range of choice in pen nib widths is limited. So use your white gel pen like a fine instrument. How, you’re asking. Turn the tile over and practice strokes on the back. You might use the exercises Maria suggests in this post.
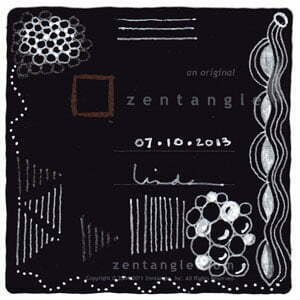
Testing the Sakura Gelly Roll pen on the back of the Zentangle® tile. Also a few orbs done with the Sakura Clear Stardust Gelly Roll around the edges of the white orbs in the top left corner.
With the white Gelly Roll, besides tickling the tile, you will REALLY want to slow down your strokes. White ink takes “deliberate strokes” to a whole new level of awareness. Sometimes the nib on the Gelly Roll will build up a blob of ink on it. Keeping a piece of paper towel handy to remove that excess will prove very useful.
If you find your nib clogging, which seems somewhat of a common experience, carefully and quickly wipe the nib with a tissue dampened with nail polish remover. (I’m not responsible for ruining your manicure.) Then test with some strokes again.
I thought it would be interesting to duplicate my original Rosé tile as an experiment to compare the difference between the white and black tiles.
First I drew the border with my shading pencil. The rest of this tile has no inner string, it’s based completely on a grid. So I picked up what I thought was my White Gelly Roll and began to draw the grid. Surprise! The pens look very similar and I’d used the Clear Star pen from the Gelly Roll Stardust Galaxy collection instead. (I should have noticed the pen caps are different.) No mistakes in Zentangle … I thought it looked kinda cool so I decided to proceed.
Here’s the almost-finished tile, before the shading stage. The glitter of the Stardust pen doesn’t pick up well in a scan so I thought I’d better explain why the foundation grid isn’t bright white.
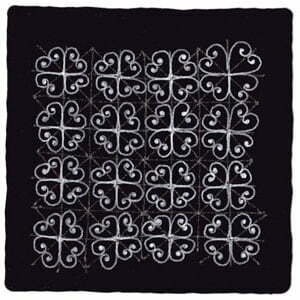
Rosé Zentangle tile before shading.
Ready for a real adventure? Take the calligrapher’s route and try using a pointed pen and Dr. Ph. Martin’s Bleed Proof White Ink ($8.22). “With this pen’s ability to alternate between thin and thick lines” you can enjoy “exploring its Zentangle potential.” Here are some tantalizing Zentangle examples with the pointed pen from Maria. If you have The Book of Zentangle (and if you are into Zentangle you really must have this book) you’ll find a beautiful related illustration on page 70.
How do I draw strings?
Using a light touch with your regular shading pencil is a good start, just the same as you would on the regular white tiles. However if you need to have a more visible line to work with some folks like to use a White Charcoal Pencil ($5.16 for 2) or even the metallic Gelly Rolls. Again, test on the back of your tiles. Find out what suits your taste and remember that strings are intended to blend into the background so you don’t want a big obvious line but something just visible enough to work with.
What about shading?
The most important tip here is to be very sure your white ink is COMPLETELY dry or you’ll end up with horrendous smudges. Gel pen inks are almost sticky and take much longer to dry thoroughly than the black Microns, so you’ll want to be careful about smudging in general even while you’re tangling.
Shading is a technique you’re really going to have to play with when it comes to white-on-black. I used a General’s White Charcoal Pencil and softened and blunted the tip a bit first on a scrap piece of rough paper. Sometimes the “lead” in the White Charcoal Pencil can be hard and you can easily damage or tear the tile’s surface. Gently, gently. The white charcoal can be smudged and moved with a tortillion you’ve reserved to use with white ink. My results weren’t as smooth or as subtle as pencil shading on white tiles, but it works.
Here is the finished Rosé tile on the left compared with my original white version on the right. I had to be very careful with the tortillion here because its tip is sharp and even gentle blending threatened to scratch the tile. Next time I might try using a cotton swab to see if that achieves smoother blending results (Hindsight 20:20). After I shaded the black tile, I went back in and restated most of the Rosé scrolls because shading had dulled the original strokes and I wanted a brighter white. To give you an idea of the difference, if you look at the right side of the second row down on the black tile, you’ll see 2 “sets” that I didn’t restate. I wasn’t totally wild about the look of the large solid area of white pen so I didn’t duplicate the white tile completely.
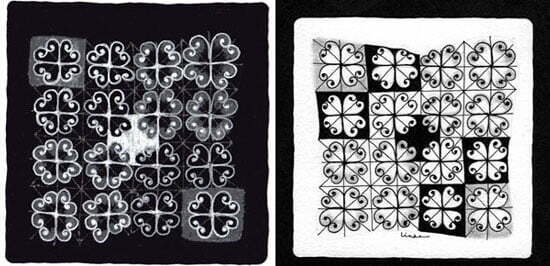
Conclusion: Shading on black tiles requires experimentation!
Some people like to use watercolor pencils for shading but I haven’t tried that myself yet. I have some Faber Castell Albrecht Durer watercolor pencils but no white. I do have an enticing-looking Silver one that I might just play with …
The gray Sakura Fabrico dual marker pen we use for shading on fabric is also popular for shading on black tiles and you can create many different effects with it. Try using the Fabrico as an accent over your white Charcoal shading for some really cool results.
Another interesting and perhaps challenging way to create additional accents or achieve “shading” is to use the 01 Micron black pen over the white ink. I tried this too and found the white ink clogged up the Micron so I’m not too wild about this idea.
Protecting your finished art
It’s a good idea to spray your final tile with a fixative, especially if you’ve used a charcoal pencil, so you don’t accidentally smudge your gorgeous Zentangle and to preserve it.
Experiment! Play! Allow yourself to make “mistakes”. You’ll have fun and learn a lot in your exploration process.
And please share what you learned with us about working with white-on-black and any tips you can offer fellow tanglers in the comments below.
BTW – do not ignore the classic white Zentangle tiles, if you haven’t tried them yet you are missing out on a treat. Both the white and the black are totally yummy to draw on.
For future reference this post can be located on the TUTORIALS tab.
|
.oOo. |
|
Enhance your Zentangle experience while supporting TanglePatterns: |
|
BRAND NEW! TanglePatterns.com TANGLE GUIDE, 2026 Edition |
|
 |
The 15th Edition of the TanglePatterns.com TANGLE GUIDE is an instant-download 123-page interactive digital eBook/PDF containing over 2,300 tangles on the site from May 2010 through December 31, 2025. It's a great resource and a must-have digital tool for using the site. Visit the STORE > E-BOOKS page and help keep TanglePatterns.com going by getting your copy now! |
|
"Linda, Thank you! I was relying on too few and getting stuck after 3 years of daily working with Zentangle. This has inspired me to ‘begin again’ with renewed excitement." ~ Barbara R. |
|
| See the BOOK REVIEWS page for more details on its features and view a sample page. Note: this is a digital product to download immediately when ordering, nothing will be physically mailed to you. | |
| If you're new to Zentangle® and tangling, my TanglePatterns.com BEGINNER'S GUIDE TO ZENTANGLE is just what you need to get started. Also available en Français and en Español. | |
|
|
|
 |
This is the only Zentangle book you'll ever need: the fabulous Zentangle PRIMER Vol 1. It's your CZT-in-a-book by the founders of Zentangle®. For more about the content and to read the rave reviews, visit the BOOK REVIEWS tab. |
| Available in KINDLE format for $9.99. Spanish Edition here. Japanese Edition here. | |
| "Absolutely the best Zentangle Book yet! As an accomplished artist I used to think I did not need instruction on this art form. How wrong I was! My tangling improved by leaps and bounds after reading this book. If you think you have Zentangle down then you need this book more than ever!" ~ Kris H | |
|
|
|
|
.oOo. |
|




Thank you very much for this great, detailed explanation, Linda! I still haven’t tried tangling white on black, except for some accents on black parts. But after reading your tips I’m eager to explore the possibilities. Just the push I needed!
THANKS Linda! Just what I needed to get going with white on black! What a wonderful explanation.
I have done this before on black “inchies” using uni-ball Signo pen.
Really cool.
Great information, as always. Has anyone tried the new soapstone marker from Zentangle? They certainly look cool.
OMG! After I saw this page, I sat and did about 15 white on black tiles! I love them! Thank you for the instructions!
I agree with everyone above, what a great explanation. Don’t know how I missed this before but thanks to the link from today’s Refresher, I’m bookmarking this one. Thanks again for all you do, Linda!