 Hi everyone! Here’s an extra special weekend treat for your Zentangle®-inspired tangling explorations.
I came across CZT Lynn Mead’s Tree of Life Labyrinth tutorial recently and asked for her permission to share it with you. To my delight she readily agreed.
Lynn is from Monroe, Washington, and she has several tangles on the site. You will also want to check out the links to her Dewdrop, TransluZENce and Zentwining tutorials on the Zentangle Terminology page.
Here’s Lynn’s article, with many thanks to her for graciously agreeing to share this with us here on TanglePatterns.
.oOo.
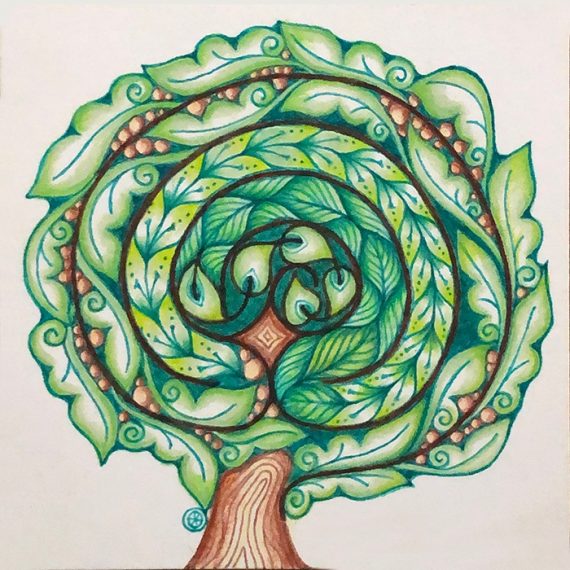
Recently I wanted to draw a freehand labyrinth. I like the quality of a simple freehand labyrinth and had used the “connect the dot” method in the past starting with a cross in the center. I tried to recreate that version but found that I couldn’t remember exactly how I had done it before. As I was trying to figure it out I stumbled on to this variation that turns out to be very similar, but starts out a little differently. To me it resembles a tree, so I have decided to call it the Tree of Life Labyrinth.
Following is the step-out to create this labyrinth on a 3 1/2 inch tile. As you will see, I have used a numbering system to indicate how to draw the lines. It may seem complicated at first but once you understand the process and draw the labyrinth you will see how naturally it flows from one step to the next until the labyrinth is completed.
STEP 1
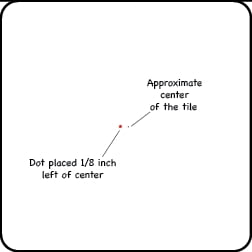
Place a dot approximately 1/8 inch [about 3 mm] to the left of the center of the tile.
Note: placement of this dot will determine where and how your finished labyrinth is placed on the tile.
STEP 2
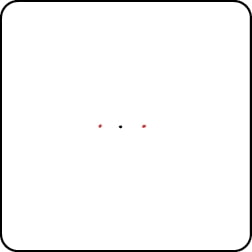
Place a dot horizontally approximately 3/8 inch [about 9.5 mm] to the left and right of the first dot.
STEP 3
Using the same 3/8 inch spacing, add five more dots below the first three dots to create a square.
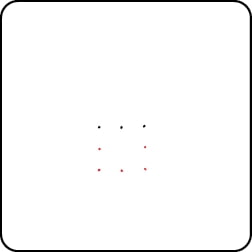
As a reference for the remaining instructions I am assigning a number, 1 through 8, to each of these dots.
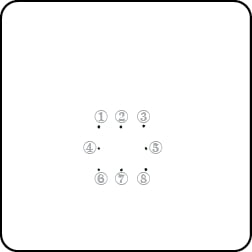
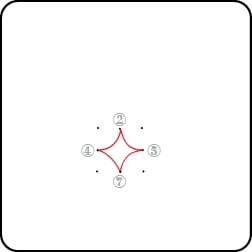
STEP 4
Connect dots 2 and 4 with an inward curved line. Do the same for dots 2 and 5, 4 and 7, and 5 and 7. This will form a curved diamond shape in the center of the square of dots.
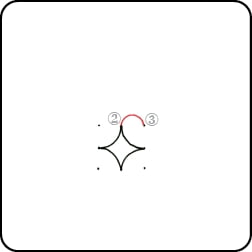
STEP 5
You will draw the labyrinth from the center out. Start by drawing an upward curved line connecting dots 2 and 3.
STEP 6
Continue with an upward curved line connecting dot 1 to dot 5. This line should aura the first line keeping the distance between the lines roughly equal. Turning the tile as you draw will help you keep the spacing consistent.
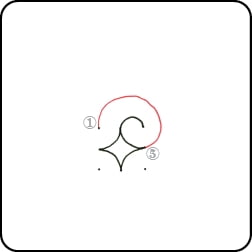
STEP 7
Connect dots 4 and 8 in the same manner.
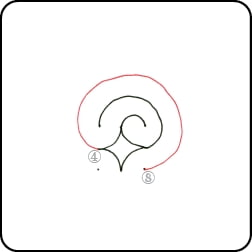
STEP 8
Continue by connecting dot 6 to dot 7.
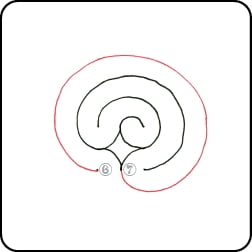
STEP 9
Finish by starting at dot 7 and adding a final line around the outside of the labyrinth. Stop at the bottom and add a slight downward curve to create the entrance.
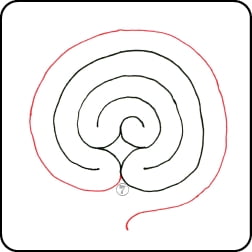
STEP 10
The completed labyrinth is now ready for you to travel to the center and back by adding tangles along the path.
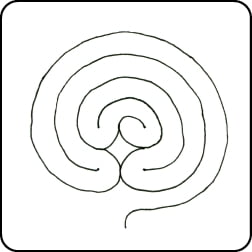
This labyrinth suggests a tree to me so I called it the Tree Of Life Labyrinth and filled it in with tangles accordingly. It was a lovely meditation for me.

Here is another drawing I made using this labyrinth. Masking fluid was used for the labyrinth with water color marker added over that. When you remove the masking you end up with a white line.
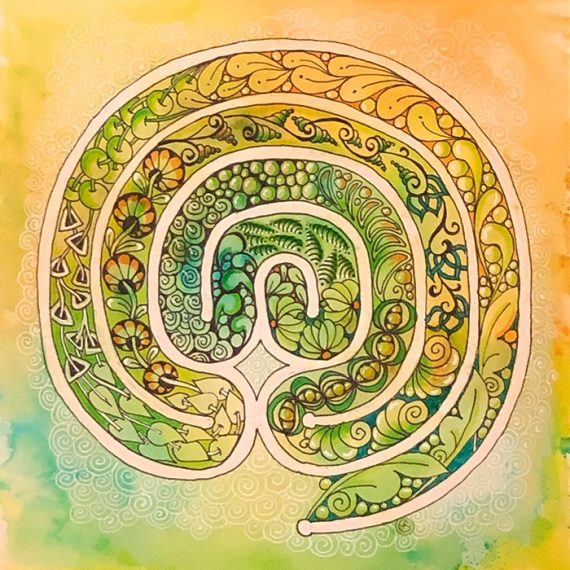
I feel that drawing a labyrinth freehand adds another level to the meditative experience. I hope you give it a try and don’t worry if it is not centered on the paper, that just makes it more interesting.
As usual I encourage you to try anything you see in this blog post in your own work.
Blessings,
Lynn
NOTICE: All images in this article are © Lynn Mead and used with permission. ALL RIGHTS RESERVED.
For Lynn’s original post on her website visit this link.
.oOo.
Meet Lynn:
About Me, Lynn Mead
One of the underlying principles of the Zentangle Method is “the elegance of limits.” I live with the elegance of limits every day. I was born with several vision issues which can be quite limiting. As I grew, my brain learned ways to cope with them. To me, how I see is normal. I didn’t realize until I was older, that my normal is not the same as others. I believe my ability to visualize, see connections, and turn them into art, is a direct result of my brain having to make sense of what I see. So while it may seem ironic that someone with vision problems would be a visual artist, to me, it is a perfect example of adapting to limits, seeing things differently, and using that to create.
I was introduced to Zentangle in 2013 and immediately knew I had found an art form that would help me express myself and grow as an artist. It was during this time that the idea for my Tangle Decks took root. When I went to Providence RI in 2014 to become a Certified Zentangle Teacher, I already had a prototype of Tangle Deck 1 and it was released soon after. I can’t believe that was 7 years ago. Since then, there have been four more decks; Tangle Decks 2 & 3, Tiny Tutorials, and the Tiny Tangle Deck. I have grown as an artist, been able to educate and inspire others through my Tangle Decks, collaborated with other talented tanglers, and taught at some of the premier tangling conferences. But the best part is the wonderful friends I have made in this worldwide tangling community.
I live and tangle in Monroe, Washington USA. If you would like to know more about my work or Tangle Decks please visit my website.
For future reference you can find this article on the TUTORIALS and the STRINGS tabs on the pink alphabetic tangle menu bar.
|
.oOo. |
|
Enhance your Zentangle experience while supporting TanglePatterns: |
|
BRAND NEW! TanglePatterns.com TANGLE GUIDE, 2026 Edition |
|
 |
The 15th Edition of the TanglePatterns.com TANGLE GUIDE is an instant-download 123-page interactive digital eBook/PDF containing over 2,300 tangles on the site from May 2010 through December 31, 2025. It's a great resource and a must-have digital tool for using the site. Visit the STORE > E-BOOKS page and help keep TanglePatterns.com going by getting your copy now! |
|
"Linda, Thank you! I was relying on too few and getting stuck after 3 years of daily working with Zentangle. This has inspired me to ‘begin again’ with renewed excitement." ~ Barbara R. |
|
| See the BOOK REVIEWS page for more details on its features and view a sample page. Note: this is a digital product to download immediately when ordering, nothing will be physically mailed to you. | |
| If you're new to Zentangle® and tangling, my TanglePatterns.com BEGINNER'S GUIDE TO ZENTANGLE is just what you need to get started. Also available en Français and en Español. | |
|
|
|
 |
This is the only Zentangle book you'll ever need: the fabulous Zentangle PRIMER Vol 1. It's your CZT-in-a-book by the founders of Zentangle®. For more about the content and to read the rave reviews, visit the BOOK REVIEWS tab. |
| Available in KINDLE format for $9.99. Spanish Edition here. Japanese Edition here. | |
| "Absolutely the best Zentangle Book yet! As an accomplished artist I used to think I did not need instruction on this art form. How wrong I was! My tangling improved by leaps and bounds after reading this book. If you think you have Zentangle down then you need this book more than ever!" ~ Kris H | |
|
|
|
|
.oOo. |
|






WOW!!!! This just arrived in my inbox and I am very happy and excited about this tutorial! I love labyrinths and have walked many in my time, and it’s incredibly meditative and grounding for me. To be able to integrate the Zentangle method with labyrinths is a beautiful marriage and I am very appreciative! Thank you <3
Crikey, this one is a beaut !!! Really gorgeous, sat down, got pencil and paper to have a crack at it :-))) I’ll have to practice this quite a few times more, before it’s to my liking, but what a lovely creation Lynn, Thank You !! & and as ever a Thank You to Linda for putting it up and sharing it with us all !! :-)))
KIndest regards,
Les:) XXX2
This is amazing! I can’t wait to get started making a Tree of Life Labyrinth. Lynn, you did a fantastic job explaining this. Wonderful deconstruction!!!!!
This is totally amazing. Thank you Lynn so much for sharing how to create a Tree of Life Labyrinth. It is fabulous. Thank you Linda for making such a wonderful website available for the sharing and creating of Zentangles around the world.
Bertha
The tangle is truly beautiful! Your story and the encouragement to continue to create despite challenges is inspiring! May the Lord bless you as you continue to live a creative lifestyle and encourage others to fly with you!
Thanks for sharing! Now have another thing to try and inspire me! Really enjoy the tree but also the use of color. Added your blog to my inbox and looking forward to exploring your site more.
Thank you , Lynn , for this amazing pattern offering numerous possibilities!
Amazing way to do a hand drawn labyrinth. Thanks for sharing this with all of us.
Stunning, Lynn!!! I’ve been wanting to follow your labyrinth instructions for a long time … now it’s at the top of my list! I will send a link to this tutorial to ALL of my students! I know they’ll be thrilled … xoxoxo
Exactly what i was hoping and looking for all along. Thank you so very very much
Wow this is beautiful !!
Oh, cool! This is a square version of the Chakra labyrinth. I generally don’t like the one that starts with the cross-shaped seed pattern b/c the center of the labyrinth is not the center of the design, and to me it feels lopsided. I usually start with concentric circles and add the breaks, but I like the Chakra labyrinths as well and I’ve been trying to figure out how to do one based on a square.
Truly wonderful. Thank you so much for sharing — it’s a fabulous gift. Arlan
I expected this to be difficult to draw but with the excellent step-by-step guide it was quite easy! Thanks for this wonderful tangle and this awesome website!
I love it! Can hardly wait to try it with my new watercolor pencils. Thank you, thank you!
Lynn, I am in awe of you, your story, and this lovely labyrinth. I am eager to get started with it, Thank you!
Your Labyrinth is awesome and I love your drawing is genius!