


 Greetings my tangling friends, welcome to a special Sunday edition and a wonderful Zentangle®-inspired tutorial from avid tangler Frieda Klotz.
Recently Frieda submitted a comment for the TIPS & TOOLS > PENS & MORE > FABRIC PENS page on the site. Her comment was so detailed with great tips that instead of adding her comment I asked if she’d like to develop it into a tutorial for us. And lucky for us, she agreed.
With many thanks to Frieda for sharing her knowledge and expertise, I suggest you grab a cup of coffee or tea and enjoy learning exactly how Frieda tangled her beautiful canvas shopping bags …
.oOo.
Hi Folks! My name is Frieda Klotz. Linda Farmer asked if I would write a tutorial regarding Zentangle®-inspired fabric art. I gave her an enthusiastic, “Yes!” I am honored to share my experience…
I’ve been a Zentangle enthusiast for 9-10 years. Like many of you, I discovered Zentangle during a stressful period in my life. The Zentangle practice gave me the relief I sought, and so much more!
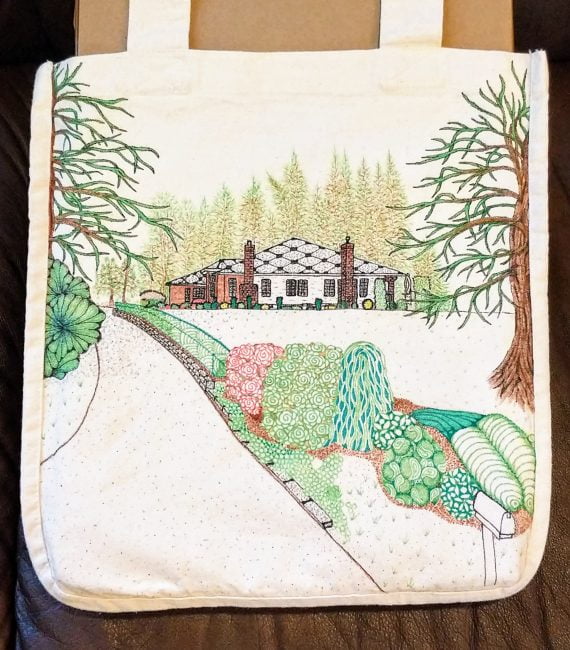
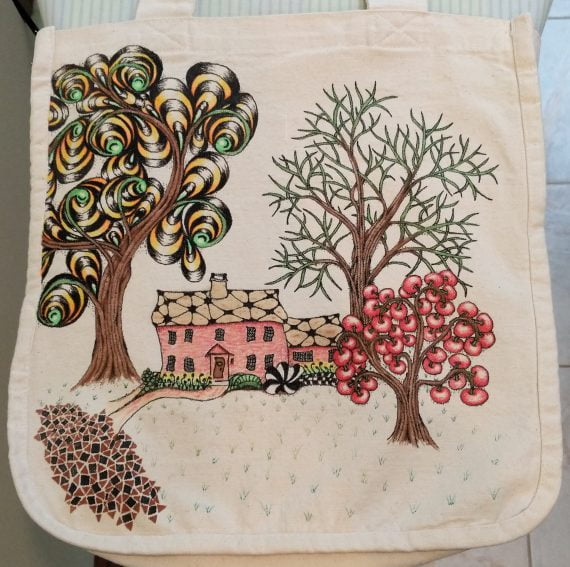
As an amateur artist and avid crafter, I enjoy making gifts for family and friends. Recently, we had three birthdays in one month. I chose to decorate eco-friendly canvas grocery bags for gifts. I made each one unique to its recipient by using their home or house location, as inspiration for my designs.
Supplies:
- Pentel Gel Rollers for Fabric
- Tulip Fabric Markers
- 100% cotton fabric – canvas bags in this case
- freezer paper (optional)
- stiff cardboard for stabilizing project
- Saral Wax-Free graphite tracing paper to transfer design
- a piece of thick card stock or paper under your hand as you draw
It had been many years since I played with fabric art, so I did some online research for recommended tools and techniques. I decided to use a combination of Pentel Gel Rollers for Fabric and Tulip Fabric Markers. I chose 100% cotton fabric, so the artwork could withstand repeated washing. Some people suggested using freezer paper to stiffen the material. The last tip isn’t necessary, but it makes drawing on fabric so much easier.
Prepare the fabric
In preparation, I machine washed and dried the bags in cold water and low heat to remove any sizing in the fabric. In hindsight, for thick material like canvas, I recommend re-shaping and letting it air dry on a hanger, etc. (Canvas has stiff wrinkles when machine dried.)
Iron your fabric to remove any wrinkles.
Then back your material with freezer paper. Cut a piece of freezer paper to fit the area you wish to decorate. Lay the material on your ironing surface with its back (wrong) side facing up. Lay the freezer paper on top of the fabric with the shiny, waxy-looking side against the material. Iron on top of the freezer paper with a dry iron (no steam, and appropriate heat setting for the fabric). This sticks the paper to the fabric. Keep your iron moving over the paper, so it doesn’t scorch.
Decorating your project!
Now, comes the fun part—decorating your project! I suggest drawing on a scrap piece of similar fabric to get a feel for how the pens and markers work. This is also a great time to test your ideas before you begin the final piece.
Lay your fabric on a flat, protected work surface. If you are working on a 3-dimensional item like a shirt or bag, put stiff cardboard or another hard surface between the layers to avoid getting ink everywhere.
I put a narrow wide cardboard box inside my grocery bags, then stretched the fabric tight around the back of the box and taped it. This gave me a smooth drawing surface, and kept the bag from shifting while I drew. Feel free to turn your item when tangling, just as you would on paper.
To protect your designs from smudging, rotate working in different areas of your design. This gives the newly inked areas some drying time before you draw in or near them.
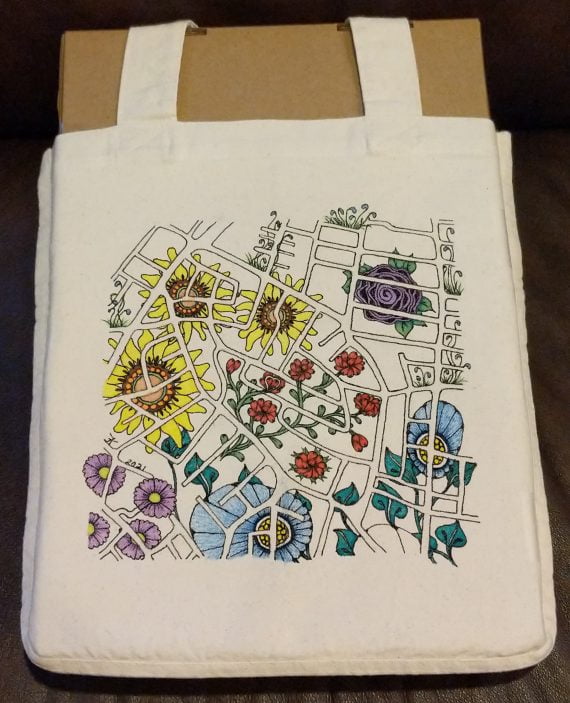
If you want to draw a “string” for Zentangle, it’s beneficial to let the string dry for several minutes or longer, before adding tangles. I allowed the thicker Pentel ink to dry overnight on my street map before adding Zentangle inspired flowers.
Use a piece of thick cardstock or paper under your hand as you draw, and be careful not to drag the paper or your hand across your work.
Keep in mind that I’ve only used these pens and markers on 100% cotton canvas bags. That said, I think the black Pentels work very well. They glide easily over canvas, and leave a distinct black line. Get the ink flowing on a scrap piece of fabric or paper before drawing your design. They are comparable to a Sakura Micron 03-05, depending on how heavy-handed you draw with them. They didn’t have any ink “bleeding” issues. How long they last depends on how much you use them in your artwork. I used one pen (+/-) for a 12”x12” design with lots of black. Some reviewers said Pentel has discontinued the pen. In Feb. 2021, I easily found them online.
The Tulip markers also work well. Their tip shapes include: extra-fine point, fine point, bullet, chisel and brush. Obviously, the broader the tip, the wider the stroke. I primarily used the extra-fine and brush tips. The extra-fine tips are comparable to a Sakura Micron 01. They work well for detailed tangling, though they feel a bit scratchy on canvas. The brush tips also work on canvas, but expect the tips to show wear fairly quickly. I like the versatility of a brush tip, but you may prefer to use other tips for filling in large areas.
For typical gray shading on black tangles I used an extra-fine tip and tiny black dots—Pointillism-style art. (I couldn’t find Tulip’s gray in an extra-fine tip.) The rare “bleeding” issues I had, only happened when I saturated the fabric (resting the marker in one spot too long, or adding more color without allowing a few minutes dry time). Another tiny “bleed” happened when I drew over the thread used to stitch the bags together—I don’t think it was 100% cotton. The ink followed the thread line. I never ran out of ink for the three 12”x12” designs, but I was using multiple colors and marker sizes.
Tulip markers are not shockingly bright, but they have pleasing tones. The colors get brighter/ bolder with repeated layers. It lightens a bit while drying, so give it a few minutes to assess the color before adding more. The black extra-fine markers will give you a finer line than Pentel pens, but you may have to go over the lines a couple of times to get the depth of black you want.
If you prefer drawing on paper, then transferring the design to fabric, you can. I suggest, you transfer only the bare necessities of your design to use as guides for the final drawing. Don’t transfer any fill you added to the drawing. The more you transfer, the greater risk of having excessive marks which may be hard to cover later with fabric pens or markers.
I used this technique for the initial street map and for general placement of some objects on the other bags. I found the design easier to transfer when I made the initial drawing on thin tracing paper. Then I retraced it, transferring the design with Saral Wax-Free graphite tracing paper. It’s relatively easy to punch through the tracing paper over fabric, so work carefully. Peek under the paper to ensure the design transferred before removing it. Rather than a pencil, I used a slightly-rounded, pointed stylus tool for transferring. I made dots and line strokes with lighter pressure for thinner marks.
Preserving your masterpiece
To preserve your masterpiece and make it user friendly, I recommend letting it dry for at least a day, and probably 2-3 days.
Then heat set the design with a dry iron at the highest heat setting recommended for the fabric.
Both Pentel and Tulip brands say your artwork doesn’t have to be heat set to be permanent. Instead, they recommend letting it air dry before using. Tulip brand suggests air drying for 24 hours. Online reviewers recommend letting Pentel ink dry one to several days. Since I used both brands, I chose to air dry mine for 2-3 days. Some fabric artists recommend always heat setting your artwork to be on the safe side. From my experience, I agree.
To heat set your design, and for any future ironing, either iron your artwork on the back (wrong) side of the fabric or use a pressing cloth between your artwork and the iron to protect it from scorching. Always keep the iron moving slowly, and be sure to iron every area. I ironed my 12”x12” designs for approximately 4-5 minutes.
To finish, set your project aside for several hours to one day before washing, drying and ironing it one last time. (You don’t have to do this, but I wanted to get rid of wrinkles and make sure the designs didn’t bleed or wash out before gifting them.)
I can’t say if the designs will fade with lots of use and washing, because I gave them away. I don’t think they will, at least for awhile. If you’re concerned about this, I recommend gently hand washing them in cold water and air drying.
My canvas bags turned out great, and the recipients loved them! Give it a try, and have fun!
.oOo.
Thanks again Frieda! Fantastic tutorial.
Frieda is available to answer your questions so be sure to leave them in a comment.
Do let her know if her efforts have inspired you to create your own ZIA fabric art project.
And finally, if you’d like to share your expertise with the community, Zentangle-inspired tutorial submissions are always welcome! Shoot me an email with your ideas 🙂


What a lovely surprise for a Sunday morning. Great tutorial. Thank you so much.
oh, this is so cool! I love the idea for Christmas cards, too.
I’m glad you both like the tutorial. 🙂 They were fun projects to make. I’m a card maker too. I’m surprised that I didn’t think to use this idea for cards. Thanks for the suggestion!
Thank you for a detailed and inspiring tutorial! This may be the basis for many wonderful fabric items. Appreciate you being so generous with your knowledge and taking the time to make a great tutorial. And thank you, Tangle Patterns, for making it available to us!
Hi Sandy,
I’m glad you liked the tutorial. You’re right, this is a great idea for cards! Thanks for the suggestion. I’m a card maker too. 🙂
Awesome article! Your bags turned out gorgeous! Thank you for sharing in such glorious detail so that I won’t get myself in trouble!
If anyone is thinking about doing a T-Shirt or other knitted fabric project, here’s an old Tri-Chemmer’s secret … use a sheet of very very very fine sandpaper over the board and under the fabric. It’ll keep your Tee from stretching.
Thanks! I’m glad you like the tutorial. Good luck, and thanks for the sand paper tip. Good to know!
Nice tutorial Frieda. Glad Deb C posted about the sand paper. I was going to until I saw her post. Been a fabric painter (Tri-Chemmer too) for many many years. Have done several t-shirts zentangle style now as well.
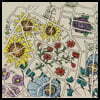
The third picture, which looks like flowers overlaid with a street map, can you please tell me the name of the tangle that looks like the street map?
Thank you! I’m glad you like it. I’m so glad other fabric artist/tanglers are chiming in. And thanks to Linda for her site,Tanglepatterns.com. It’s such a great platform for sharing Zentangle related information using many different types of media. 🙂
Tri-chem! Oh, that takes me back. My mom used to do it. It was beautiful. I still remember the smell! And Karen…in case Frieda didn’t see the question, that tangle might be a variation of blooming butter.
Thank you for the tutorial and information. I have done drawing and tangling on canvas shoes and bags. I am always interested to learn what pens and paints other artists use, and the results which can be achieved. I have ordered the Pentel and Tulip brands and will be excited to give them a try!
Beautiful designs. Thanks so much for the tutorial! I’ve been waiting to tangle my CZT bag because I didn’t want to ruin it & was unsure on how to proceed. This means that I’m going to need some more pens! ?
Thanks Josephine! Yes, I would suggest using pens that are made for fabric applications. While Sakura Microns, or even Sharpies, are considered permanent, I can’t vouch for how well they will hold up with regular washing as you would do with fabric items that may get dirty through use. Many people have used permanent pens that were not designed for fabric to create fabric art, but their pieces are not usually laundered. Examples would be quilted wall hangings that include drawings.
Hi Karen– The “street map” in my design is meant to represent the neighborhood where that bag’s recipient lives. It is not a tangle pattern. I used both traditional drawing and the Zentangle method to create Zentangle inspired art for my bags. If you want to create a similar project, you can draw a location from memory, create an imaginary/fantasy map or reference any number of sources for maps to get inspiration for your own designs.
Your question piqued my interest as to whether there are existing tangle patterns that would be suitable for drawing “maps”. I did a little research here on tanglepatterns.com, and came up a couple. They may be the easiest for building “maps”. The first is the Zentangle Headquarters original, “Molygon”. The second is a tangle called “Bumps” by CZT Sue Jacobs. (In Sue’s tangle, the interior shapes could be more tangles–perhaps added later.) Both use the “aura” technique to create a pattern.
If you look at a typical city street map, it is composed of a multitude of varying shaped polygons (city street blocks) adjacent to each other. The linear spaces between the polygons are the “streets”. As we know, many streets don’t follow the straight lines necessary for a true polygon. However, the concept of closed shapes separated by linear gaps (streets) forms a “map”. By mixing various polygon shapes you can simulate typical city neighborhood maps. If you add irregular shapes, you can simulate areas that grew up around natural structures like hills or rivers. Designs with mostly irregular shapes will simulate more rural suburbs or country neighborhoods. The possibilities are endless. If it helps, you can imagine where such natural structures would be in your drawing and create irregular shapes around them. I played with this idea a bit. I found it’s easy to make a “map” by either drawing various polygons/irregular closed shapes next to each other, or spacing the shapes around your paper and then filling in between them with more shapes. Just be sure to close each space whether it’s an irregular form or a polygon. I tried leaving gaps in my lines from which I could later add more “streets”, but that gets very confusing. I kept creating lines with no way to finish a shape. If you plan to fill in your “map” with other tangles, (like my Zentangle inspired flowers, or buildings,etc.), I suggest you draw polygons or other irregular closed shapes large enough to accommodate filler tangles. Be careful not to add too much detail or you may lose your “map” in the design. I hope this helps with your efforts to draw an abstract Zentangle-style “map”. Have fun!
Thank you for your tutorial. Its always interesting to learn how others approach a project and the tools they employ. I’ve used the ‘Pental gel roller for fabric’ pens for multiple projects (primarily on plain muslin aprons that were created for fundraising efforts of a charity) The color on these aprons was all done with Derwent Inktense Pencils. I applied the color dry then completely blended it with a water brush – once dry the color is permanent (these pencils are basically a dehydrated ink (permanent dye).
Thanks, Bette. I’m glad you liked it. I have considered using Derwent Inktense pencils on fabric, but I have yet to try them. I chose to use fabric markers, because I’ve read mixed reviews on how well the Inktense pencils work with regard to bleeding and permanency (fading) with repeated washings. It would be interesting to learn your experience with them. From what I’ve read, they have better results when activated with textile mediums or Aloe Vera gel and then heat set.