 As the calendar edges relentlessly closer to the holidays, it’s time to start thinking about getting a few of those seasonal crafts underway. If you haven’t started already.
Recently I invited Canadian nurse and CZT Anna Houston of Armstrong, British Columbia, to share how she tangled these beautiful ornaments.
Tangled ornaments are not only lovely to create for your own holiday décor but they will make truly treasured gifts for friends and loved ones.
Today Anna shares her process and also one or two things she learned that didn’t work, to save you the aggro.
Here are some of her gorgeous tangled ornaments, this is from the group she created for Christmas last year.
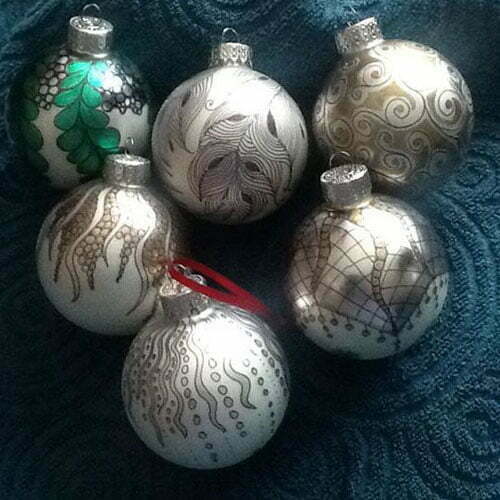
CZT Anna Houston’s tangled Christmas ornaments. Anna made these for Christmas 2013.
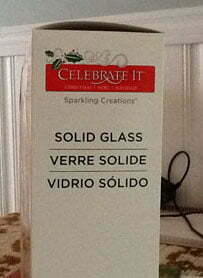 Materials
- Ornaments: Frosted gold and silver glass ball ornaments available from craft stores. Anna purchases hers from Michael’s. (You can also use colored ornaments, the instructions still apply.)
- White cotton gloves
- Choice of Pens: Sharpie Ultra Fine; Sakura IDenti-Pen; Faber-Castell Pitt Pen; Sakura Pen-touch Gold Metallic Ink; Tsukineko Fabrico Brush Pen
- Optional: Rubber bands (see “Related Posts” below)
Preparation
“I wear a white glove on the hand that holds the ball when I work because the oils from your hand will mark the ornament’s frosting. This also makes me more conscious of not touching the inked areas.”
Process
“I will try to make something which I do spontaneously without planning, into a guide for others …
First I remove the springy gold hanger from the top, then hold the ornament by the top and bottom. That gives you a secure grip and lots of tangling room.
I sit down in the evening in front of the TV usually, and pick up my pen and start.
I have found a Sharpie Ultra Fine to be best for this purpose although a Sakura IDenti-Pen works as well. Be aware that the Sharpies do take quite a while to dry, the IDenti-Pen is much quicker.
I’ve also tried a Faber-Castell Pitt Pen which is a thicker line but has a nice feel.
I usually do not have a plan until the moment I start. If I use a geometric pattern (W2 or Cadent come to mind), I will perhaps, with small dots, divide my ball into quarters then 12ths and space accordingly. If I use a more organic pattern I mentally divide the ball into thirds or put 3 dots around the top hangy gadget.
Sometimes I will add gold embellishments using Sakura Pen-touch pens, as seen on the left below.
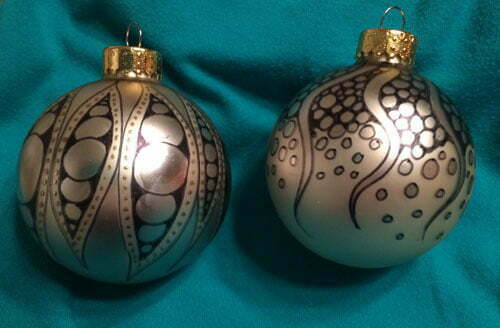
The ornament on the left above has added embellishments in gold.
Last year I used my Cool Gray Tsukineko Fabrico Brush Pen (a clear Tombow blender works for this as well) to remove the frosting from some parts of the ball to provide contrast. This was experimental as I didn’t know whether they would remain unfrosted. However, I have inspected last year’s ornaments recently and they are as fresh as I made them last year.
The frosting also seems to be what makes the gold balls gold so when you remove that, it is also a cool effect. It becomes silver and you can create a two-toned ornament with both gold and silver. See the ornament at the bottom right corner below.
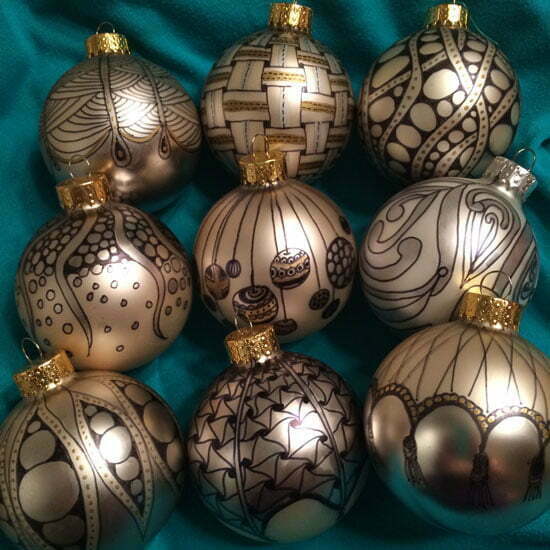
Anna’s new ornaments ready for Christmas 2014.
Finish and Sign
When I’m finished tangling and everything is completely dry, I put my initials and the year under the lip before replacing the ornament’s hanger.
Experiments
I tried some colored balls (eg. red and green) but was not happy with the Staedtler Triplus Fineliners I had last year. They did not fill the color in nicely and they left streaks.
This year I experimented with my Tombow brush markers and at first I thought they were winners. Although the color seemed a bit pale and streaky, a few seconds later they smoothed right out. A second coat (after the first coat has dried, which is pretty quick) intensifies the color. However about 10 minutes later I discovered the color wipes off on your finger. The Tombows truly were a bad idea, they never became dry and wiped off even several days later. I ended up discarding that experimental ball!
Tangles
I have found the organic patterns lend themselves nicely and allow for a lot of individuality. Mooka comes to mind, as well as Opus, and Flux. Msst comes in handy, as do many of Joanne Fink’s dangle designs.
I will say I prefer the ornaments that are just done in black, on silver and gold balls.
Go with your gut, just like when you’re doing a tile.
Try not to plan too much, definitely don’t stress too much. Enjoy the process and admire your work.
Keep it relatively simple. There is no end to the possibilities.”
.oOo.
Thanks so much, Anna. I’m sure you’ve inspired many of us to try our hand at this!
.oOo.
Your input and comments are invited! Please share your tips and techniques for tangling glass ornaments in the comments.
Related Post:
- From “How to draw HOLIDAY ORNAMENTS” comes this tip from CZT Bonnie Brown, “the quilting tangler”: if you want to add a band of design (or color) she suggests using rubber bands to help place your string.
- Anna says she tried the rubber band technique “but couldn’t get it to work for me. I felt like it restricted my lines and as you can see my balls don’t have many straight lines.”
- So it seems the rubber band idea may depend on what kind of designs you plan to use. Experiment to find what works best for you.
|
.oOo. |
|
Enhance your Zentangle experience while supporting TanglePatterns: |
|
BRAND NEW! TanglePatterns.com TANGLE GUIDE, 2026 Edition |
|
 |
The 15th Edition of the TanglePatterns.com TANGLE GUIDE is an instant-download 123-page interactive digital eBook/PDF containing over 2,300 tangles on the site from May 2010 through December 31, 2025. It's a great resource and a must-have digital tool for using the site. Visit the STORE > E-BOOKS page and help keep TanglePatterns.com going by getting your copy now! |
|
"Linda, Thank you! I was relying on too few and getting stuck after 3 years of daily working with Zentangle. This has inspired me to ‘begin again’ with renewed excitement." ~ Barbara R. |
|
| See the BOOK REVIEWS page for more details on its features and view a sample page. Note: this is a digital product to download immediately when ordering, nothing will be physically mailed to you. | |
| If you're new to Zentangle® and tangling, my TanglePatterns.com BEGINNER'S GUIDE TO ZENTANGLE is just what you need to get started. Also available en Français and en Español. | |
|
|
|
 |
This is the only Zentangle book you'll ever need: the fabulous Zentangle PRIMER Vol 1. It's your CZT-in-a-book by the founders of Zentangle®. For more about the content and to read the rave reviews, visit the BOOK REVIEWS tab. |
| Available in KINDLE format for $9.99. Spanish Edition here. Japanese Edition here. | |
| "Absolutely the best Zentangle Book yet! As an accomplished artist I used to think I did not need instruction on this art form. How wrong I was! My tangling improved by leaps and bounds after reading this book. If you think you have Zentangle down then you need this book more than ever!" ~ Kris H | |
|
|
|
|
.oOo. |
|




These ornaments are absolutely gorgeous!! Great job Anna!
(and good timing on the sharing of this idea – just in time for Christmas projects)
Nancy Barnhart
These are so beautiful and I love the difference in the shades while removing part of the original color. Very Cool Idea thanks for showing us and taking the time to write a spell about it.
Wow! I’m inspired!
I Can’t wait to do these. they will make great gifts for work friends and teacher gifts.
Thanks so much for the tips, especially reviewing the different pens and markers for this project.
Hmmm, now I know what I will do with all those Christmas balls in my craft cupboard. I’m looking forward to trying your idea.
Great work!! have you tried the clear glass ornaments? I have some and am thinking of trying those. tips? New to zentangles and wonder if spraying them after would help.
Thank you so much Anna! I’ve been looking around the ‘net for ideas for creating a tangled Christmas for my family. This year I want to give gifts from my heart and my hand and what greater idea than tangling beautiful gold and silver Christmas balls!
The detail and thought you put into your photos and instructions did not go unnoticed. (I especially appreciate the suggestions for tangles that work well.)You are truly inspiring. Thank you!!!
wow, those are just beautiful. Such heirloom pieces. I can’t wait to try a few.
Your ornaments are wonderful!! I was wondering if you’ve ever tried using the double ended Prismacolor pens on them?
Dear Anna, you must be a wonderful nurse to come up with something this amazing! Nurses do things to lift people’s spirits and make them smile, I have been smiling since I saw these and plan to make and give them for Christmas! Thanx!
Dear Linda,
Thank you for this site. I am new to tangling, wonderful for recuperating from Radiation. Ornaments are a great way of expanding the Art. Goes along with my past interest, Pysanka Egg Art. Information on Pens is really helpful.
Thank you and Anna for sharing, JOY
Very lovely Anna and thanks Linda for sharing! Our tangling club in California was planning to do ornaments and now we have super instructions and photos! Much appreciated!
The ornaments are gorgeous! I may have to try my hand at this. Thank you both for sharing!
Beautiful ornaments! I have some of the clear glass ball ornaments, and I’d like to swish around some paint on the inside of them to create an opaque finish. Tangling on the outside would give these a kind of “raised” effect. Can anyone tell me what type of paint works best to color the inside of these glass ornaments? What has worked for you?
Hi Elaine,
I’ve used regular acrylic paints to swirl inside clear ornaments. The metallic and pearl are especially pretty. They are really inexpensive and are always going on sale at craft stores. Be sure not to use too much paint or else you end up with a puddle at the bottom. It takes forever to dry and looks terrible. Also, don’t swirl it too much, the color blends too much and just gets muddy. I made some with my kids when they were small, and now that they are grown, I am giving the ornaments to them for their own trees. I love the Anna’s idea to embellish the outside with Zentangle designs. I think you are right that it would have a raised effect, with the paint color on the inside. I can’t wait to try this. Good luck and have fun with yours!
You can use nail polish too.
I have used the bottles of craft paints before. Remove the top attachment. Pour a little of the paint in and then you can add other colors (kind of like stripes) or swish the glass ball around to marbleize the effect. Then you have to turn it upside down for excess paint to eventually drip out. I haven’t tried the canned air to “push” it around inside the ornament and that may use up the paint better and make it dry faster. I am going to try the ones in this tutorial..I like the metallic effect of the alcohol inks. Good luck on your project.
Since I work at Michaels, I will definitely be purchasing supplies for this project. It is a great project and a wonderful gift giving idea made from the “heart”. Thanks Anna, for sharing your beautiful ornaments!
To answer Elaine’s question about paint to use in clear glass ornaments, acrylic craft paint (the inexpensive kind in small 2oz. bottles) works just fine. You can also use alcohol ink for a transparent look but you have to swirl quickly because it dries very fast.
Beautiful, I can’t express in words. You have done such a tremendous job. Perfect designs. Luv it. I would like to try and do some. Thanks for sharing.
For Elaine, you can use bottled acrylic paints. Go lightly, more can be added. The colors are endless. Happy painting,
Pat
Very nice. I want to try it, too.
Hi These are absolutely gorgeous. I am just starting So I will have to wait until next year to try. Thank you, Eleanor
Hi I started Tangleing this summer having spent time with my daughter in Alaska. Seeing this tangle on glass ornaments i decided to try it out. The results are really stunning , i have used fine sharpies which have proved very effective. We don’t have Micheals here so am on the look out now for clear glass baubles. I think I may have to try online sites. Thnk you for the wonderful inspirational ideas
These are wonderful! It inspired me to purchase some of the ornaments from Michael’s and give it a try as well as some porcelain ornaments. Thanks for all the good tips!
I purchased the clear shatter free really big bulbs. I purchased the metallic Sharpie oil based markers as well. My intention was to either use a gold metallic paint to swirl inside the bulb, or a light dusting of light gold glitter inside the bulb. I then planned to tangle like Anna did on the outside with my oil based pen. My question is has anyone ever tried this or something similar and if so how did the bulbs turn out. They will be gifts for my grandchildren. Any help would be much appreciated.
I am looking for an ink or marker to use on glass and can withstand the dishwasher. Does anyone know of such a thing. Thank you.
Marion
I purchased some matte black and ecru glass ornaments last year when they went on sale…looking forward to tangling them!
Stunning!!!!
These ornaments are such beautiful eye candy! Thank you for sharing your truly inspiring photos along with the invaluable time saving tips.
Thanks Anna for sharing. What a beautiful gift. Love them and think I will be on the lookout too for some plain bulbs too. Just thought of it my friend has more than enough plain ornaments so maybe she will share a few with me. What an inspiration you are.
I have some clear glass ornaments I got quite awhile ago to try to crochet around. Never did get that project started. So I just went and got some acrylic paint in metallic gold and silver to line the inside of them. Then I’ll tangle on them. Should be fun!
Any idea where to get frosted glass balls in Canada? I can only find clear or expensive ones that aren’t for crafting.
Would the plastic ornaments from a Dollar Store work for this project?
Thought it might be better for my grandkids and for a group.
Thanks Anna