More skills for your drawing repertoire! Guest Contributor Sandra Strait goes above and beyond with this highly detailed drawing techniques tutorial on how to make an object appear semi-transparent. She illustrates two versions, one using color and one in black and white.
Semi-Transparency

Guest Contributor, Sandra Strait
Afraid to use color in your Zentangle®-inspired art? I often see comments to that effect. Well, this is one example where color is easier. When implying semi-transparency, contrast is key, and color can help.
That said, it’s fun to know how to do semi-transparency without color, as well, so I’m showing it both ways.
I normally use pen for this, but I wanted a simpler method, and since many of you use those little golf pencils, I’m going to show you how to use them (but any soft lead pencil will do) for bubbles.
You will also need an eraser. I know. No mistakes in Zentangle. In this case, you will be drawing with the eraser. None of those pink erasers or pencil tips, though.
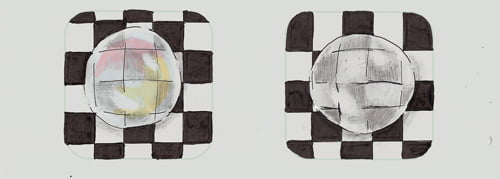
I’m showing you the technique in both color and B&W, and doing it side by side so you can see that the method is pretty much the same.
I’ve chosen a bubble with a Knightsbridge background for my tutorial. Knightsbridge is a powerful tangle, but so easy to do, and hey! Bubbles are always fun! To keep things easy, I’m advising where to put the highlights, but you are free to put them wherever you like.
The Tools
- Black Ink pen – I used a .01 micron. You might also want a thicker nib pen for filling in the Knightsbridge squares.
- Soft lead pencil. One of those golf pencils works fine.
- White pen or ink. I used a Sharpie Poster-Paint Marker. Gelly Rolls are good. Elmer’s White Acrylic would be good. Use whatever will dry opaque.
- Paper stump (tortillon) or something to smooth your pencil shading. A finger will do as a last resort, lol!
- Eraser. I used a kneadable eraser. A gum or soft plastic eraser will do. NO pencil tips.
Optional:
- A sheet of scrap paper to place under your hand to prevent smudges. Pencil is messy.
- Pink, Blue, Yellow — if you are going to use color. I used Letraset ProMarkers, but pens, color pencils, sharpies—you choose the media. Pastel colors will be the easiest to work with.
Step 1: Draw the Bubble
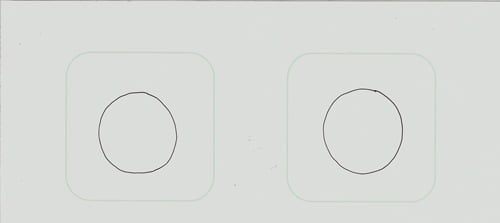
Draw a circle. Don’t stress about the shape. The best bubbles are those big wobbly things, right? Don’t worry if your lines don’t meet. I’ll tell you how to fix that later.
Step 2: Start the Shading
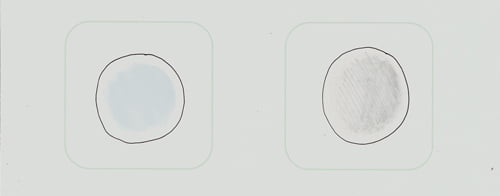
A bubble is darkest in the center, so we start there. Leave a white ring around the bubble.
| Color Use blue to color a solid circle in the center. |
B&W Using the side of the pencil lead, shade a light circle in the center. It doesn’t have to be solid. Put the scrap paper under your hand so you don’t mix the lead with the oils in your hand, or track it across the page. |
Step 3: Add the Highlights
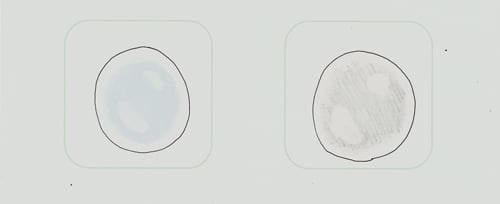
We’ll be working around the highlights, so let’s add them now. Notice that this is very similar to what we did when drawing a translucent object.
| Color Use the white pen/ink to draw a roughly bean-shaped highlight in upper right. Draw a bean-shape about twice the size in lower left of the bubble. |
B&W Erase a roughly bean-shaped highlight in upper right. Erase a bean-shape about twice the size in lower left of the bubble. |
Step 4: Darken the Center
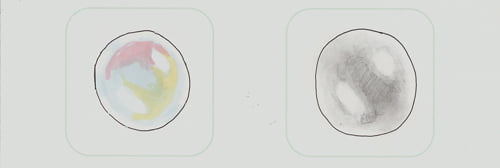
We continue to add shape. The outside of your color or pencil shading should follow the outline of the bubble. Work around the highlights so they stand out.
| Color Add yellow on the left – think of a side view of the man in the moon. Add pink to upper side of the bubble. It should be about 2/3 the size of the yellow (don’t worry about exact size). Add more blue in the center, overlapping slightly with the yellow & pink. Add blue to a few places to break up the white ring. | B&W Smooth the pencil shading with your paper stump (or whatever you are using). Think of a distorted H or I-beam. Smooth out as much of the pencil lines as you can, but it’s okay to leave some. Still using the stump, extend the shading so it touches the bubble outline in a few places, to break up the white ring. |
Step 5: Add the Background
Add the Knightsbridge tangle in the background. Bring the lines right up to the bubble outline, but don’t go inside.
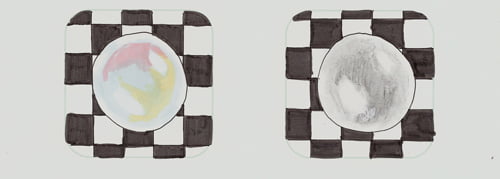
Step 6: Add the Inside Grid
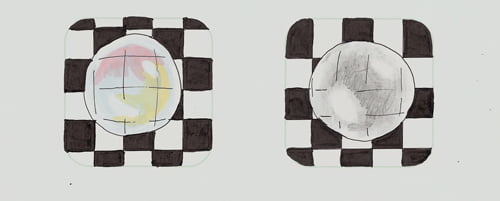
There are a few tricks to emphasize the bubble’s shape. What you don’t do is as important as what you do do (hmmmm. That doesn’t sound right does it?)
Here are the don’ts.
- Don’t let the lines of the inside grid meet the outline of the bubble.
- Don’t draw through the highlights.
- Don’t align the lines inside the bubble with lines outside the bubble.
The Do’s
- Do curve the lines slightly, because the bubble is round.
- Do have fun. Close is good enough!
Step 7: Fill in the Inside Grid
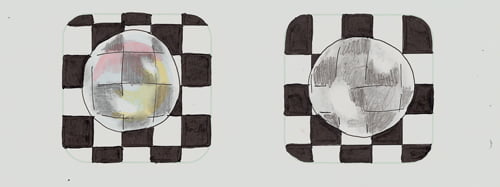
Here’s where you see that color is easier. Use your pencil and shade each square. Keep most of the white ring around the circle.
Step 8: Erase and/or Re-pencil
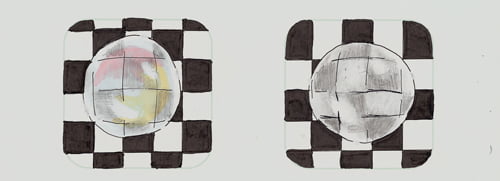
You may need to play around a bit, but don’t get stuck. Stay as light as the bubble, lest you burst it!
| Color With a light circular motion, use the eraser on the squares to lighten and buff. | B&W With a light circular motion, use the eraser on the squares to lighten and buff the squares. If needed, erase the highlights further for contrast, or you may want to darken the shading around the highlights. Use your pen to darken the grid lines if needed. |
Step 9: Finishing touches
A bubble’s outline is seldom solid, so put a touch of white ink along the outline. Do this on a white square so the line disappears. I know sometimes gel pens get muddy, but that’s okay. Even if you just lighten it, it helps.
If the lines of your circle didn’t meet when you drew it, use the white pen to obscure that. It if really didn’t meet, then shade with pencil and smooth it.
The last step is to shade around the bottom and left side of the circle to help ‘lift’ from the background.
Drawing something semi-transparent is pretty complicated for tangling. But it’s fun, and tends to impress the heck out of people. It gets easier with practice, so if you want a show stopper in your repertoire, semi-transparency is a good one.
Bubbles in the Knitting Basket by Sandra Strait
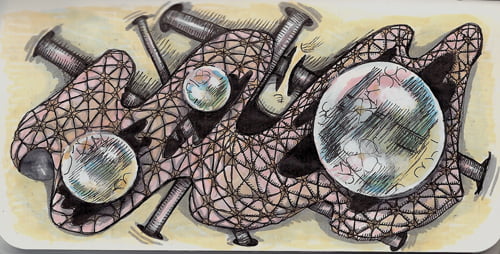
Zentangle Inspired Art: Bubbles in the Knitting Basket, by Sandra Strait. Copyright the artist, ALL RIGHTS RESERVED. Used with permission. Click image for enlarged view.
* * *
Thanks so much for the incredible amount of work you put into teaching us this great technique, Sandra!
If you find TanglePatterns a source of inspiration and helpful resources, please consider supporting the site’s sustainability by visiting the SUPPORT TANGLEPATTERNS page on the top menu for details. Your encouragement is GREATLY appreciated!
Related Links:
- Check out the other Guest Contributor tutorials on TanglePatterns by visiting the TUTORIALS link in the pink alphabetic listing at the top of any page
|
.oOo. |
|
Enhance your Zentangle experience while supporting TanglePatterns: |
|
BRAND NEW! TanglePatterns.com TANGLE GUIDE, 2026 Edition |
|
 |
The 15th Edition of the TanglePatterns.com TANGLE GUIDE is an instant-download 123-page interactive digital eBook/PDF containing over 2,300 tangles on the site from May 2010 through December 31, 2025. It's a great resource and a must-have digital tool for using the site. Visit the STORE > E-BOOKS page and help keep TanglePatterns.com going by getting your copy now! |
|
"Linda, Thank you! I was relying on too few and getting stuck after 3 years of daily working with Zentangle. This has inspired me to ‘begin again’ with renewed excitement." ~ Barbara R. |
|
| See the BOOK REVIEWS page for more details on its features and view a sample page. Note: this is a digital product to download immediately when ordering, nothing will be physically mailed to you. | |
| If you're new to Zentangle® and tangling, my TanglePatterns.com BEGINNER'S GUIDE TO ZENTANGLE is just what you need to get started. Also available en Français and en Español. | |
|
|
|
 |
This is the only Zentangle book you'll ever need: the fabulous Zentangle PRIMER Vol 1. It's your CZT-in-a-book by the founders of Zentangle®. For more about the content and to read the rave reviews, visit the BOOK REVIEWS tab. |
| Available in KINDLE format for $9.99. Spanish Edition here. Japanese Edition here. | |
| "Absolutely the best Zentangle Book yet! As an accomplished artist I used to think I did not need instruction on this art form. How wrong I was! My tangling improved by leaps and bounds after reading this book. If you think you have Zentangle down then you need this book more than ever!" ~ Kris H | |
|
|
|
|
.oOo. |
|






Linda, thank you for doing such a great job in laying this out for the post. I know I didn’t make it easy for you!
Hope you are feeling better!
This is amazing, and like you said, truly a showstopper. I can’t wait to add this to my repertoire. Thank you so much for sharing!
Sandra, thanks for another great article!
wow, really neat. what a great addition to our repertoire. It looks easy enough to do with great results. I’m a beginner and am still learning. Tanks so much,
WOW amazing, I love adding color to my work and I get criticized for it but this just gave me a whole new idea.
Sandra,
Great article, your detail and illustrations are wonderful. I especially like the “nails” in your final tile, lovely!
Wow! I’d better wait until I’m well-rested to try this! The bubbles are wonderful!
Greetings from South Africa! Many thanks for a very informative tutorial. I was wondering about the dark Knightsbridge showing through the “bubble” and then as I read further, there it was!! Very good! Regards, Sue
Thanks for sending me the link Sandra! This is cool!
Thank you Sandra! I can’t wait to try this technique. I noticed that all of the other comments were from 2011. I am new at this and wanted to let you know I appreciate your hard work!
so amazing
What a great tutorial, Sandra! As you mentioned, this will take practice for sure, but a super little tool to use once perfected! The diagrams were sensational in order to really “see” what you were saying!!
Trish
You are doing a beautiful job with your shading. Keep it up. Jan
Thanks so much, Sandra and Linda, for this tutorial. It was perfect for what I needed! I am eternally grateful to both of you as bloggers. I learn so much from you.
Thank you Sandra for such a detailed tutorial. I always figured this technique was to advanced for me…but your tutorial changed my mind.