We’re back with Part 2 of the TanglePatterns Shading Mini-Clinic. (Part 1 with CZT® Marizaan van Beek can be found here.) Time for another cup of coffee or tea …

Sandy Bartholomew, CZT of Warner, New Hampshire
Today’s guest contributor is CZT® Sandy Steen Bartholomew. Sandy needs no introduction since she’s very well known in Zentangle®-land, but I’ll give it a go regardless … Formally trained in illustration at the Rhode Island School of Design and New York School of Visual Arts, Sandy is an author, illustrator, mixed media artist, and business woman who runs her own mini-gallery, studio, and teaching studio in Warner, New Hampshire. She is the author of the wildly popular Totally Tangled and several more Zentangle-related books, AND she’s a Certified Zentangle Teacher.
As I said in the introduction to Part 1, every artist will have their own take on the subject of shading. Today Sandy shares advice and tips from her considerable experience.
She answers your shading questions with her personal suggestions and illustrates them using tiles submitted to TanglePatterns for this Mini-Clinic. For something a little different from our Part 1 tutorial using pencils for shading, Sandy also used grey Faber-Castell Pitt brush markers to shade one of the examples.
With a special thanks to the tanglers who sent their questions and tiles for today’s tutorial, here’s Sandy …
* * *
Robin J:
Is it best to shade each pattern as stand alone or the whole piece as one unit?
Yes, both. Sometimes, as in Tile A, a pattern jumps out, as the leaf shapes do.
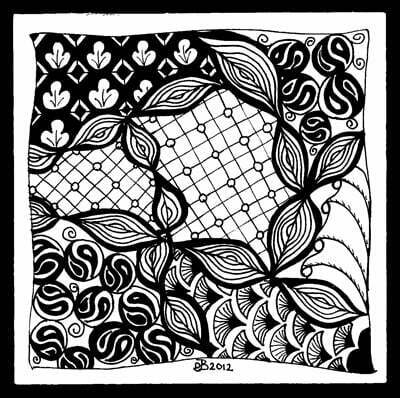
Tile A from Donna B, before shading
Shading those shapes seems like an obvious place to start.
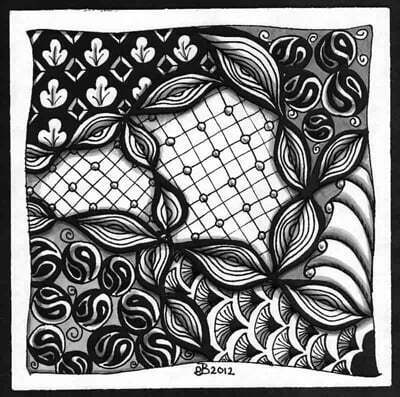
Tile A – Sandy’s shading using Pitt brush markers
Other times, as in Tile B, there is a balance or symmetry.
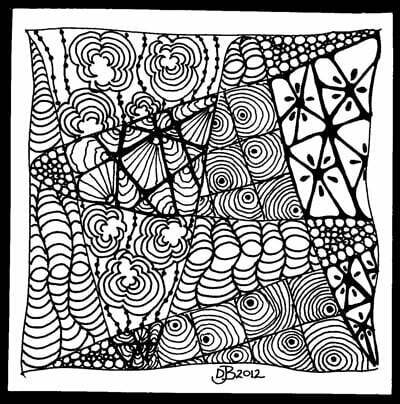
Tile B from Donna B, before shading (using TanglePatterns String 003)
Shading could be used over the whole tile to maintain that balance, but create a little depth.
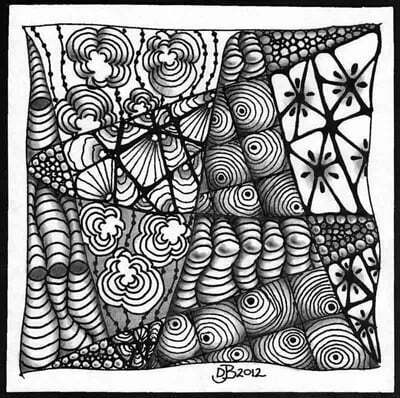
Tile B – Sandy’s shading using a mechanical pencil
Donna B (with the example tiles above):
I have read that I should just imagine where the “sun” is and shade where I think the shadows would be. I look at other finished tangles and wonder where the sun is supposed to be…But that doesn’t seem to work for me. I must be missing something.
The most wonderful thing about Zentangle is that it is NOT drawing, so you don’t have to worry about all those art rules. Some of the shading tricks can be very helpful, but zentangles don’t technically have a right-side-up – you turn them as you draw – so the shading doesn’t have to be in one direction either. Instead of worrying about cast shadows and the position of the light source (the sun), think in terms of curves and crevices. In other words, what do you want to move back, to move away from you? That’s where you put your shading. Objects that are lighter will come forward, darker objects recede.
Also, my shading tends to look like smudges, not shading. Or it looks like I started coloring and just stopped.
Think of shading as just a few more steps in the process of drawing a tangle. Just as you practice getting the tangle right, you need to practice the shading. If it looks too smudge-y, try a harder pencil with a sharper point. Or try some pale gray markers – no smudging at all. I love the gray Pitt brush markers. Or, you might like to use watercolor or Inktense pencils for your shading. They would work the same as using a regular pencil, but instead of smudging to blend the gray, you would use a brush with water.
What are the best “tools” for shading?
A no. 2 pencil is the simplest of shading tools. In the beginning, Rick and Maria suggested using your finger to smudge the pencil line, but I’m a teeny bit OCD, and I don’t like getting my hands smudge-y. I noticed a lot of my students resisted shading for similar reasons. So we started using tortillions or paper stumps for smudging. They let you be more precise with the shadows too. I like to use a mechanical pencil with a softer lead – no sharpening needed.
Elizabeth M:
I’m taking care of an elderly parent and work two part-time jobs so don’t have time to get away for classes in a local setting. I’ve been doing tangles as one means to break the stress.
I can’t help asking if you are doing Zentangle with the elderly parent? Keep in mind that there are other ways to apply the process and the benefits without using pen and paper! I saw the most wonderful use at an elementary school in Vermont. The art teacher had sprayed the tables with shaving cream and the kids were dancing to music while drawing tangles in the foam! They had some tools like combs and sticks to use as well as their hands and fingers. And it smelled wonderful.
But I don’t understand how to do shading. Growing up I never took art classes so it has me stumped. I have a good pencil and bought a wound up roll of soft paper but my efforts are so far disappointing. Looking at other peoples’ tangles I can see how much it adds to the liveliness of the design. My questions are:
How do I decide where the light is coming from?
In general, the light comes from above (lamps, the sun). If coming from below, it tends to look creepier – think of a flashlight held under your chin. As I mentioned above, a Zentangle can have the light coming from any direction. That said, if you have a Zentangle that you want people to view from one particular direction… be sure to sign your name or put your initials on the bottom edge or corner. People seem to automatically turn a piece of art so the name is at the bottom. Then imagine there is a little lamp sitting on one of the top corners of the art. Left or right, your choice, just be consistent. If the light is sitting on the left side, then all your shadows will fall towards the right, or be on the right side of your objects. And vice versa.
How do I use that wound up paper with a point on it?
A tortillion (I can’t pronounce that), a paper stump, or more affectionately – “the smoodger”.
You can think of it as either a pointy finger or a colorless pencil. Basically, it smudges the graphite from the pencil strokes. You start by blending gently back and forth over the pencil lines and then gradually pull some of the graphite out into the white areas. To practice, on scrap paper, make a dark circle with your pencil, about the size of a dime, and color it in. Take your smoodger and run over the penciled area. Notice how it blends the strokes – and any white areas of paper that were still showing end up smooth and gray? Now, run the smoodger around the outer edge of the circle. Just go around and around until you notice the edge blurring and softening. Now, move the smoodger a little bit outside the circle and keep going around. It has picked up some graphite and creates a gray halo around the circle.
How do I make the shading look natural, do I just look at the flat surface and decide how much the height or depth of each object is and try to judge how much shade it casts or how much shade it sits in?
That would be too much work and I feel a little stressed just reading the question! As a rule of thumb… or maybe a rule of smoodger… a shadow should be about the thickness of the smoodger tip. Break the rule whenever you like, but let it be the norm so you don’t worry about it. As for looking natural – Zentangles aren’t really comparable to many things in nature… but I understand what you mean. I’m an illustrator by trade and I prefer images that tell stories to ones that are abstract. So, I often want something to look like a ball, not a circle. See the next answer…
Are there general rules that help on this subject?
Yes, there are some easy tips that will make your shading look more natural. Use these tips the way you would tangle enhancers. Apply them to your tangles after you have finished drawing. Keep your mind relaxed and don’t let the scientific part start analyzing light sources! It’s all about what looks good to you and what feels good.
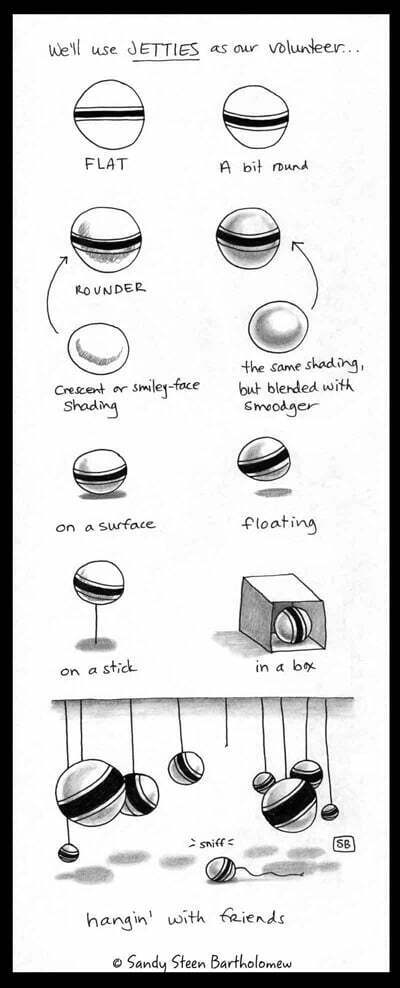
I hope these tips have been useful to you. They only touch on a small sampling of the cool things you can do with shading. I’m working on an ebook about shading and I welcome any other questions you might have on the subject.
Cheers,
Sandy Steen Bartholomew
http://www.BeezInTheBelfry.com
* * *
Thanks, Sandy, for a fun and enlightening tutorial – your sense of humor shines through while we learn more about adding shading to our Zentangle art.
I’m very proud of this TanglePatterns Mini-Clinic. Both Marizaan and Sandy have shared excellent advice. I hope you enjoyed this 2-part Series and have learned some useful tips to enhance your Zentangle experience and add dimension and polish to your art. Like anything else, it can take a little practice – but just like tangling, the practice is so-o-o-o enjoyable. 🙂
This has been an insightful series and I thank everyone for their participation in making it another useful resource on TanglePatterns.
Let’s have your feedback in the comments. Any questions? And if you’d like to share your own shading tips, please do!
And please remember to share on your favorite social networking sites using the icons below, “vote” and show Sandy and Marizaan how much you appreciate what you learned from their hard work and experience.
* * *
For more tutorials on TanglePatterns, explore the tutorial tag and visit the TIPS & TOOLS > TUTORIALS page. There are more excellent articles there about shading art in general by Sandra Strait and CZT® Geneviève Crabe. Check it out!




Very informative and useful information. Thanks so much for sharing it. I am very interested in getting your ebook when it’s finished, so please let us know. Thanks again for taking time to share your valuable information.
O Sandy, insightful and delightful as always. Just love the little hanging balls at the end, and “sniff”.
That was sooo helpful! The Jetties examples really clarified it for me. I’m one of those people who get frustrated trying to figure out where the “sun” is, when shading. It’s good to be reminded what Zentangling is about – no stress!
Thank you Sandy and Linda! Once again you’ve brought seemingly unattainable efforts (at least to me) well within my grasp! The statement “think in terms of curves and crevices” really did it for me, turned on my light bulb as it were 🙂 As well as the statement “Objects that are lighter will come forward, darker objects recede.” Boing! I knew this, I just didn’t think of it! ;D
Thanks again for all your hard work and your boundless generosity!
Thanks so much. I really didn’t get shading until I read the shading section in Totally Tangled, and then the light came on. I had been trying to do it all the same way until I realized there are different reasons for shading. This info. is helpful as well.
Thank you! This will definitely add more depth to my zentangles. You do beautiful work.
Can’t wait to get to the weekend, so I can sit in the shade.
I mainly do paper craft, recently introduced to Zentangles. I love playing around with them. I’ve just got a couple of Sandy’s books and am lapping them up. Thank you for the Mini Clinic’s part 1 and 2. Fabulous information. I love that there is no wrong way to do this!
Cheers,
Kasey ~ in Oz
Thanks so much for your generous sharing. I’m very much a beginner tangler and have much to learn, so all hints and tips are helpful.
As I live in New Zealand, I’m wondering if there are any CZTs in this part of the world? I know there are some in Australia but that’s a bit far to go for evening classes!!
Keep up the great work everyone 🙂
Go gently
Bronwyn
Aloha, Bronwyn! I met a great CZT at the most recent certification! Not sure if she’s back in NZ, yet. She was doing some awesome traveling/teaching/sharing. But stay tuned… I’m sure when she’s ready to take students, you’ll know about it! Her name is MIN.
With warm Aloha,
Jason
I really enjoyed this mini clinic. Thank you to both Sandy & Linda (love both your sites!) Shading is trickier than it looks and you both have done an awesome job in breaking it down into bite-sized pieces!!
Wow! Another Shading Mini-Clinic! I feel blessed and spoiled–like someone has been listening to my whining about not understanding shading and wishing for some instruction. A giant MAHALO to Sandy and Linda (and Marizaan!) for these awesome tutorials. Really helpful and insightful!
Thank you Linda for having these mini clinics!! Love them!! Thank you Sandy for all your tips on shading. Love the last illustration! ?
Both parts are so helpful! Shading seems less intimidating. Off to try out these new insights!
Great information presented in a very direct and applicable way. The examples really highlighted what you were saying. Loved the jetties illustration. It really showed the many possibilities.
I love tangle patterns learning all the new patterns… I am pretty new to it all but love it! I do most of my tangle on glass for my candle art. How would I go about shading on glass? I use paint pens for most of my art.
Thank You
Thanks Linda for having these tutorials, they each feel like a mini workshop! Both Marizaan and Sandy have expertly cleared up some queries I was wondering about with shading….thanks to those ‘sessions’ I shall approach shading with even more enthusiasm when tangling!
I have got to try these techniques now. I am so psyched. You took some of the mystery out of it. I’m sure it will take practice – but that’s the fun part! Thank you again for putting together this tutorial. WIll it be archived somewhere on the site to reference later?
Yes, they already are “archived” 🙂 – tutorial links can be found on the TUTORIALS link on the pink alphabetic menu bar on every page.
Sandy, I learned about shading from your Totally Tangled book, but I LEARNED shading from your Yoga for The Brain book… Then I fell in love with shading in the one class I took and CZT Kelley Kelly actually had us use one of those paper stumps. What a revelation! This article makes me determined to find those gray brush markers…
Keep up the great teaching so non-artists like me may be creative in such simple steps.
Thanks Linda…. and Marizaan and Sandy! This has been so helpful! I have been tangling (after a fashion) for about a year now and just love it! Super excited to see that Marizaan is in South Africa, as am I!! Perhaps I will finally get a proper class if I can get to her side of South Africa!
So very helpful! I love the way Sandy explains things in my language! (BTW . . . shaving cream leaves tables bright and shiny clean,too!) Thanks so much,ladies!!!
It’s no secret, you are my ‘go to’ person, Sandy. I pick video’s for learning, but prefer comparison examples for reference. It all comes down to practice; the more you do the better you become. Thanks for this crystal clear clinic.
Thanks you so much Sandy!!
I love your work and your workshops are aways clear and easy…I’m so glad you contributed to this series! These will help so much with my shading “phobia”! (lol)
Peace & Tangle On!!!
WOW!!!! What a cool series! I’m a fairly new tangler, and not an artist in the traditional sense. This make a murky (OK, shady) subject so much clearer!!
Now I just have to figure out how to print it out or PDF it so I can put in my Zentangle Resource notebook.
So well done, Sandy! Makes shading so much more accessible to me, making me feel more exited and confident about my Zentangles. Looked up where Warren, NH is and have a glimmer of hope that someday I can “play” with you at one of your workshops….also in the scary process of SERIOUSLY contemplating a move from MA to NH, so checking out Warren opened up my horizons in NH! Thx for ALL you do!
thank you for making both mini clinics on shading. Both very helpful to this newbie.
Sandy. Thank you for your tutorial on shading. Very helpful for me. I never quite know where or how to shade. I love your ‘hangin’ with friends’ ! Nancy
Thanks for your help, you have a wonderful way of making it simple to understand & your sense of humor makes it fun.
Can’t believe how much you taught me in one quick lesson!
Thank you for sharing this. I’m new to Zentangle and it was most informative as part 1 was!
Thank you Sandy for sharing this tutorial on shading. I appreciate the work that you put into this to help others!
totally awesome! some of the most useful info on the net! thank yiu so much!
Wonderful tutorial and will try your suggestions. Like the idea of the mechanical pencil with a softer lead and will check out the gray Pitt brushes.
Dear Linda,
thanks to your glowing motivation, I recently received my copy of “Totally Tangled” by Sandy Bartholomew. And am totally loving it 🙂 So this is me thanking you not only for this compelling recommendation but for all the work and energy that manifests as this wonderful resource. Can’t wait for the 2018 edition of your book 🙂
Best Wishes from Hamburg, Germany!
Kerstin
PS: oh, and for this clinic series, of course. This is such a treasure trove of amazing tips! Since I can only pick up and integrate one or two at a time, definitely a tutorial to be reviseted over and over again!
“Smoodger”! LOL! My favorite type of smoodger is made from rice paper. They create a softer smudge and are easier on your paper.
Thank you so very much, Linda! This took a bit of hunting around to find, but it was so worth it. Now I will be shading with more confidence. I do wish it were available as a download though screen clips worked. I felt that I needed a paper copy to reference while beginning to shade. You and this website are the BEST!!!
I have been tangling for awhile. Often you can find step outs, but they don’t always have suggestions for shading (which can be varied). Thanks for these insights!
I’ve been lurking G on this site for a few years and never saw these mini clinics! Thank you Linda for spotlighting them! And thanks to the authors for creating them and giving us this free education. Shading is something I sometimes struggle with, but with the tips in this mini clinic I have a better understanding of how to go about it. Im so excited to put all this information to use the next time I create a tile!!! Thank you again for this valuable site and this welcoming, judgement free community of artists!