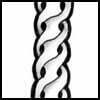
 Today’s very cool tangle Intwine by Macedonian tangler Elena Hadzijaneva can be a bit of a challenge, but in a fun way.
Intwine is Elena’s eighth tangle pattern on the site, each of them very creative winners. For more on her background check out Retro.
In a few simple strokes, placed with your full focus and concentration, Intwine creates an interesting braided or woven type of pattern that works well as a ribbon or border. I found the best results were obtained by not spacing the initial rice shapes too far apart. Shading adds a 3D element to this “over-under” tangle.
Look for this arrow in the lower right corner of your screen on flickr to download the steps.
I had a bit of a struggle following the steps as shown so if that happens for you too, here’s a suggestion. Once you’ve followed the link to her steps, download the image using the arrow in the lower right corner of the screen, then print the steps out and turn them sideways (90° to the right). Then work “backwards” from right to left. See if that helps. And be sure to pay attention to her stroke direction arrows.
Elena illustrates the step-by-step instructions for drawing Intwine here on her flickr account where she’s known as bellatrix29 and signs her works as HElena. Elena also shows several interesting variations of Intwine including an offset version of the initial rice shapes. And as she shows in her example in the lower left, Intwine works very well around curves too.
Have fun with this one!
Check out the tag elenah for more of Elena’s tangles on TanglePatterns.com.
The nature of a tangle in Zentangle
A tangle has no pre-planning with pencil guidelines, grids or dots, no erased lines. It's just pure Zentangle magic . . . one pen stroke at a time.
Co-founder Maria Thomas writes that in Zentangle "a pattern is not always a tangle". These are the characteristics that define a tangle: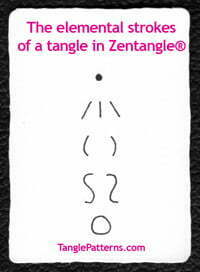
- a tangle is abstract, non-objective (non-representational)
- a tangle is non-directional, it has no up or down orientation — there's no "right side up"
- a tangle is at most 2 or 3 simple strokes — "Usually the number of elemental strokes needed are 3 or less. Often, you only need one or two. By 'elemental strokes' we mean a dot, a straight(-ish) line, a curve (like a parenthesis), a reverse curve (like an 'S'), and an orb or circle."
- a tangle is simple enough to draw without using a pre-printed grid, pencil guidelines or an eraser. "It also has to be done without any underlying pencil structure or preplanned grid." [Inked grids or dots, however, are often part of a tangle.]
- a tangle doesn't use rulers, stencils, or any other mechanical construction aids
- a tangle is usually an overall pattern that grows organically, rather than a single motif. Zentangle is about "the repetition of a stroke, not the repetition of a drawing."
- a tangle is elegant, unique
|
.oOo. |
|
Enhance your Zentangle experience while supporting TanglePatterns: |
|
BRAND NEW! TanglePatterns.com TANGLE GUIDE, 2026 Edition |
|
 |
The 15th Edition of the TanglePatterns.com TANGLE GUIDE is an instant-download 123-page interactive digital eBook/PDF containing over 2,300 tangles on the site from May 2010 through December 31, 2025. It's a great resource and a must-have digital tool for using the site. Visit the STORE > E-BOOKS page and help keep TanglePatterns.com going by getting your copy now! |
|
"Linda, Thank you! I was relying on too few and getting stuck after 3 years of daily working with Zentangle. This has inspired me to ‘begin again’ with renewed excitement." ~ Barbara R. |
|
| See the BOOK REVIEWS page for more details on its features and view a sample page. Note: this is a digital product to download immediately when ordering, nothing will be physically mailed to you. | |
| If you're new to Zentangle® and tangling, my TanglePatterns.com BEGINNER'S GUIDE TO ZENTANGLE is just what you need to get started. Also available en Français and en Español. | |
|
|
|
 |
This is the only Zentangle book you'll ever need: the fabulous Zentangle PRIMER Vol 1. It's your CZT-in-a-book by the founders of Zentangle®. For more about the content and to read the rave reviews, visit the BOOK REVIEWS tab. |
| Available in KINDLE format for $9.99. Spanish Edition here. Japanese Edition here. | |
| "Absolutely the best Zentangle Book yet! As an accomplished artist I used to think I did not need instruction on this art form. How wrong I was! My tangling improved by leaps and bounds after reading this book. If you think you have Zentangle down then you need this book more than ever!" ~ Kris H | |
|
|
|
|
.oOo. |
|





This is soooooo cool and so much fun to watch develop! Thanx!
Hi! I love this pattern. However, whenever there are stepouts on Flicker, I can’t get them. Is there a way to put the stepout on the tanglepatterns.com site?
Hi Patricia, the steps do not belong to me, they are Elena’s. Please re-read the paragraph with my suggestions, I’ve added an image to show where to look for the download arrow.
Thanks Linda! I appreciate your promptness–and thanks for all you do for of us tanglers!
Love this new pattern and can’t wait to give it a try! Thank you for sharing.
Thank you so much for telling us how to get the step-outs. I had trouble with this one also. Great work.
This is a very pretty tangle, but I can not follow the step out, even following your suggestion, Linda. I can’t figure out which is the very next stroke after the initial s curve from the seed on the first row to the seed on the row below.
Step 3 is the problem. I worked it out this way:
For the top row, work from left to right. The first stroke in step 3 on the top row should begin at the left point of the 2nd rice shape. The line extends up and to the left to create an aura above the first rice shape. Then repeat, starting at the left point of the 3rd rice shape, making an aura over the 2nd rice shape and stopping when you hit the line you just finished drawing.etc.
For the bottom row, either rotate your tile as Linda suggests (best option) or work from right to left. If you don’t rotate your tile, the first stroke in step 3 on the bottom row should begin on the right point of the 3rd rice shape. The line extends down and to the right to create an aura below the 4th rice shape.
It sounds confusing, but it isn’t once you do it. I love this pattern and plan on using it this evening – and probably often. A notation by Elena on her step outs to suggest where to start Step 3 could be helpful.
Thanks, Emily, appreciate your input. Figuring out how they work is half the fun! 🙂
Thank you, Emily. I will try your suggestions. I kept trying to trace the steps with my finger, and I figured out that it involved auraing, but I kept getting tangled up in where to begin doing it.
About how long a timeframe is there from submission to receiving a response. I submitted some kudos and questions a few days ago, and so far I haven’t heard back — ???
Thanks.
Trish
I replied to your questions by email last Friday (4/17). I’ll resend.
Hi I’ve just been drawing this into my pattern book and I think the directional arrows should be going in the opposite direction in step three, much easier that way!…very interesting pattern!