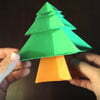
 Here is a fun and inexpensive project to jump start your crafts for the upcoming Christmas season and it’s something that, with a little supervision, children can also manage. Makes a great classroom project.
In this video from “Rob’s World”, simple origami trees are made from 3 sheets of printer paper (8.5″ x 11″).
As CZT Katy Abbott writes, “Super cute and fun trees you can tangle and fold for the holidays. I used a white gel pen on the green paper.”
You can see Katy’s origami Christmas trees here on her blog.
Rob writes, “You can use different sized origami sheets if you have them, only 4 different sizes from large to small are required. If you know how to make the bird base, this should come easy to you because they are made in similar ways.”
Get out your Gelly Rolls and colored markers and have fun creating and tangling a unique origami Christmas tree forest!
If you’d like to explore some more inexpensive paper crafts to tangle for the holidays, check out Tangle Refresher 92.
|
.oOo. |
|
Enhance your Zentangle experience while supporting TanglePatterns: |
|
BRAND NEW! TanglePatterns.com TANGLE GUIDE, 2026 Edition |
|
 |
The 15th Edition of the TanglePatterns.com TANGLE GUIDE is an instant-download 123-page interactive digital eBook/PDF containing over 2,300 tangles on the site from May 2010 through December 31, 2025. It's a great resource and a must-have digital tool for using the site. Visit the STORE > E-BOOKS page and help keep TanglePatterns.com going by getting your copy now! |
|
"Linda, Thank you! I was relying on too few and getting stuck after 3 years of daily working with Zentangle. This has inspired me to ‘begin again’ with renewed excitement." ~ Barbara R. |
|
| See the BOOK REVIEWS page for more details on its features and view a sample page. Note: this is a digital product to download immediately when ordering, nothing will be physically mailed to you. | |
| If you're new to Zentangle® and tangling, my TanglePatterns.com BEGINNER'S GUIDE TO ZENTANGLE is just what you need to get started. Also available en Français and en Español. | |
|
|
|
 |
This is the only Zentangle book you'll ever need: the fabulous Zentangle PRIMER Vol 1. It's your CZT-in-a-book by the founders of Zentangle®. For more about the content and to read the rave reviews, visit the BOOK REVIEWS tab. |
| Available in KINDLE format for $9.99. Spanish Edition here. Japanese Edition here. | |
| "Absolutely the best Zentangle Book yet! As an accomplished artist I used to think I did not need instruction on this art form. How wrong I was! My tangling improved by leaps and bounds after reading this book. If you think you have Zentangle down then you need this book more than ever!" ~ Kris H | |
|
|
|
|
.oOo. |
|


Silly question, but should you tangle before or after the origami?
Thanks,
Maria
Thanks, Linda. He does a really great job. Makes origami seem easy. 🙂
Very cool Christmas tree origami. Looking forward to more creations.
Really enjoyed this video. Please do the star. what a nice idea for my fellow art mates. we all took a zentangle class so this would be fun.
Wonderful video. I would think you would probably need to tangle after making your first but then might be able to tangle before after making one.
Excellent work. Your instruction moves at a comfortable pace making it easy to follow. Thanks!
I loved the origami tutorial. I have done origami for many years and am always interested in new (easy )folds. I would also love to see the star demonstrated.
@Maria – A little bit of both. @Donna – Exactly. Fold a sample, colour it with something so you know where the sides etc will end up, and unfold to show the crease pattern plus the best areas for tangling on. Remember not all of the paper will be visible at the end.
Then, cut your paper to size, prefold, and THEN You should tangle before folding the final tree.
I have made this tree before and here are points to consider: *Hold the tree in 3D at all times while folding the shape together, don’t try to fold it flat except in the precreasing stage. *Remember right angles. *The last flap of the four is always the trickiest. Just slow down and take it carefully.