Guest Contributor Sandra Strait offers our Gentle Readers another great how-to tutorial. This one is a technique using squirkles to shade, shape, blend color and add texture to your drawings.
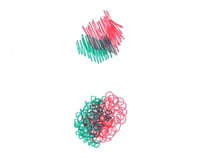 |
When you color with pens you get an overlapping section that is darker. Many people find this disturbing. There is more than one way to eliminate it, and a few ways to use it. And in using it, you can achieve other good things as well—shape, shading, color blending, and texture. And it’s easy! |
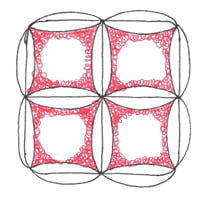 |
This technique can be done with the straight lines shown above, but it’s easier and gives more texture if you use squirkling—random circling lines that you layer over and over to achieve different levels of light or dark. |
| Note: I’m using the tangle “Bales” for this tutorial. Corners and edges should usually be the darkest area in a shape. | |
| The eye will assume darker areas are farther away. Color in these areas first and you’ve started to add shape and shading.Don’t press hard and, don’t try to color the areas solid. You want the paper to show through. | |
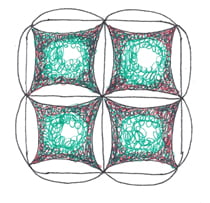 |
Take another color and squirkle over the squirkling you’ve just done. Then extend the color towards the center. Don’t completely cover the area. You want some white (or paper color) left for a highlight. Your highlight should not be dead center. I’ve chosen red and green because they are complementary colors that make a nice brown. Notice how well the color blends. |
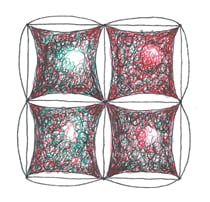 |
Now go back to your original color and squirkle over all the squirkling you’ve already done. (I know—this can get a little boring when covering large areas. But covering large areas is always boring, lol!) |
| At this point, I make the corners solid. I ended each section a little differently to show some of the effects possible. The darker the corners and sides, the more shape you imply. You could continue squirkling, thus changing the texture. Adding a third color (I often use 4 or 5 on larger pieces) makes a difference. I like to add a third color to the corners. | |
| Note: You can do this with only one color. But you still have to squirkle over, just as though it was another color, to get the shaping and shading. |
PS – Don’t miss Sandra’s recent tutorial on How to Draw a Ribbon. You can also find these tutorials by clicking TUTORIAL in the links on the pink alphabetic tangle menu bar.
|
.oOo. |
|
Enhance your Zentangle experience while supporting TanglePatterns: |
|
LATEST EDITION! TanglePatterns.com TANGLE GUIDE, 2025 Edition |
|
 |
The 14th Edition of the TanglePatterns.com TANGLE GUIDE is an instant-download 117-page interactive digital eBook/PDF containing over 2,000 tangles on the site from May 2010 through December 31, 2024. It's a great resource and a must-have digital tool for using the site. Visit the STORE > E-BOOKS page and help keep TanglePatterns.com going by getting your copy now! |
|
"Linda, Thank you! I was relying on too few and getting stuck after 3 years of daily working with Zentangle. This has inspired me to ‘begin again’ with renewed excitement." ~ Barbara R. |
|
| See the BOOK REVIEWS page for more details on its features and view a sample page. Note: this is a digital product you download immediately when you place your order, nothing will be physically mailed to you. | |
| If you're new to Zentangle® and tangling, my TanglePatterns.com BEGINNER'S GUIDE TO ZENTANGLE is just what you need to get started. Also available en Français and en Español. | |
|
|
|
 |
This is the only Zentangle book you'll ever need: the fabulous Zentangle PRIMER Vol 1. It's your CZT-in-a-book by the founders of Zentangle®. Visit the STORE tab on the top menu bar or click on the image. For more about the content and to read the rave reviews, visit the BOOK REVIEWS tab. |
| Now available in KINDLE format for $9.99. Spanish Edition here. Japanese Edition here. | |
| "Absolutely the best Zentangle Book yet! As an accomplished artist I used to think I did not need instruction on this art form. How wrong I was! My tangling improved by leaps and bounds after reading this book. If you think you have Zentangle down then you need this book more than ever!" ~ Kris H | |
|
|
|
|
.oOo. |
|





You always do such a fantastic job with your posts, Linda. Thank you for making me look good!
It looks great! Thanks for the tip – I need all the help I can get! {:-Deb
This is great information. Thank you!
Just curious, I have not noticed anyone suggesting the use of the blender pen to get a beautiful shading effect. I use this in my artwork quite a bit. It makes for beautiful blending techniques and can be subtle.
Thanks for sharing. Now I know why some of my attempts didn’t look quite right – I always center the white spot.
It’s these little hints that help us inexperienced “artists”
Thanks for showing us this. And as a bonus, I enjoy saying “squirkle over all the squirkling you’ve already done.” LOL!