Many of us are fascinated by the wonderful, mesmerizing line art murals of Justine Ashbee which she executes spontaneously by hand with paint pens. If you search Google and click on the Images tab, prepare to be blown away by her beautiful art.
Since it’s Friday and many of us have the weekend to play and practice after a hectic work week, I thought this would be a good time to share German artist and art teacher Simone Bischoff’s line drawing lessons which are reminiscent of Justine’s art, but on a Zentangle®-inspired scale. This is a long post but it’s divided into lessons so you can take it a bit at a time.
The six lessons below were published three years ago in a series during the period from April 2011 through March 2012. Simone titled her series “Linienspiele”, which roughly translates in English to “Line Games”.
All six easy lessons are ways to play with the Zentangle® aura technique and will help sharpen your line drawing skills. Not only that, they’re inspiring and just a lot of fun.
Simone has graciously given me permission to summarize her lessons here on TanglePatterns for the Zentangle community and permission to use her images for examples. All six lessons and their images link to Simone’s original posts in German. For future reference you can find this article filed on the TUTORIALS tab on the pink alphabetic index bar.
- Lesson 1: Ways to Connect Two Dots
- Lesson 2: Lines in Waves
- Lesson 3: Fantasy Flowers
- Lesson 4: Spiral Forms (Helix, Double Helix, Snail)
- Lesson 5: Corners and Edges
- Lesson 6: Braids
Simone writes, “In the small format, these exercises are suitable for people of all ages and it is amazing what different effects you can achieve with them. I teach art to children from 11 to 16 years and again and again have seen their pleasure as the young people are comfortable with these exercises. It helps them deal with the pens and improves their fine motor skills.”
As for supplies Simone says, “It is advisable to start first on a not-too-big white sheet. The paper quality should be good, because rough paper snags the pen and the lines are not uniform and/or fray. Similarly, one should look for a pen that has a steady flow of ink and does not skip or leave unsightly blobs.” Sakura 01 Microns are the perfect tool.
In the following I used Google Translate and my own interpretation of the essence of Simone’s lessons. Between us, I think we’ve got it right.
Lesson 1: Ways to Connect Two Dots
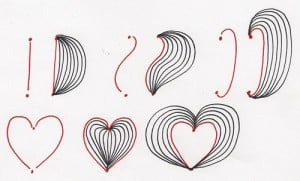
“The dot is the beginning.” In Lesson 1, Simone illustrates several ways it’s possible to connect two dots with straight and curved aura lines as shown in her illustration below.
LESSON 1 EXERCISE
- For Lesson 1’s exercise we are instructed to take a blank sheet of paper and place 10 dots randomly around it.
- Then proceed to connect pairs of dots in some of the ways shown in the above image. “That should not be difficult, since the lines are still quite short.”
- Once all the dots are connected in pairs, continue to play with extending the aura lines: “just play with the possibilities“.
Visit Simone’s original Lesson 1 in German to see her illustration of the second step of the above exercise.
Lesson 2: Lines in Waves
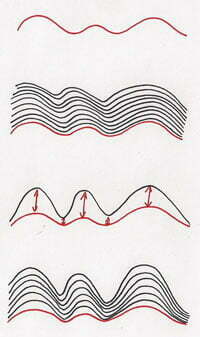
In Lesson 2, Simone shows how you can play with “a gently undulating line” creating “mountains and valleys”.
In her own technique for this type of aura, she has a personal rule that “The distance between the mountain lines should always be greater than the distance between the valley lines.” She demonstrates this in the third example here on the right.
The closer density of the “valley lines” creates its own shading.
Lesson 2 EXERCISE
- For Lesson 2’s exercise, we are to draw a gently undulating line of mountains and valleys across middle of the page.
- Then we are to add all the auras on one side of the initial line, following Simone’s “rule” from above.
- Then we turn the paper and draw the auras on the other side of the original line.
Visit Simone’s original Lesson 2 in German to see her illustrations for this exercise.
Lesson 3: Fantasy Flowers
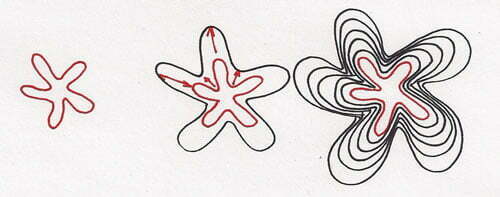
In Lesson 3, Simone starts with the closed form of a fantasy flower, as compared to the straight “open” lines of the first two lessons.
After the first few floral forms are drawn — in her exercise she chooses to start with 3 — then using the same principle of “High mountains and deep valleys”, she draws auras around each floral form either replicating the original closed form, or using a Printemps-like continuous line.
She also provides a composition tip: “Add to all three flowers at the same time, so they grow evenly until they touch each other.”
“Allow the flowers to grow to the edges and add lines to the remaining space until the entire sheet is filled out.”
Visit Simone’s original Lesson 3 in German to see her illustrations for this exercise, including the final “entire sheet” filled out.
Lesson 4: Spiral Forms (Helix, Double Helix, Snail)
“Spirals always create pleasing effects. There are many ways to draw spirals and here are a few to try.”
NOTE: This lesson’s diagrams are a little more complicated than the previous lessons, so I’ve included most of Simone’s instructions instead of just a summary.
Single Helix
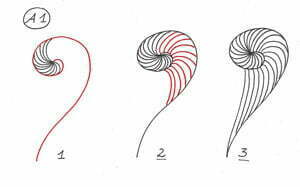
“Here one starts with a simple spiral as a baseline that ends in a long, curved line. Then begin in the center and draw the first lines. The first arcs all meet at the apex of the spiral (A1-1).
Then add more arcs by leaving the central point and moving the arcs along the baseline, bit by bit. (A1-2).
Next, exit the spiral by drawing the lines to the base of the long curved line (A1-3).”
Double Helix
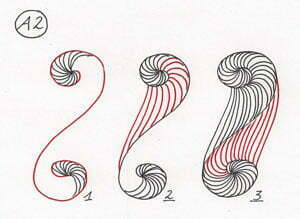
In a double helix, the first spiral does not end in a long curved line as in the Single Helix, but continues as if a large sweeping S as a second spiral in the opposite direction (A2-1).
Now repeat the drawing as in the Single Helix above, but each step must be performed twice. First draw the steps of the Single Spiral then turn the page and repeat the procedure with the second coil (A2-3). The result is a nice closed form.
Snail
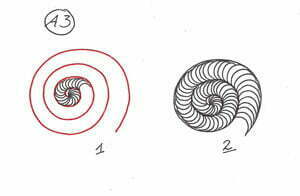
The next two spirals are more like snail shells, as they have a more rounded shape, while the actual spiral in A1 and A2 illustrations above is more like an ellipse. Both drawing techniques that I will show in the end have the same shape.
Draw a spiral base line (A3-1). As with the first two Helix types above, begin at the inside central point and add arcs uniformly following the baseline and making each the arc slightly larger than the previous one.
Another way to draw a Snail
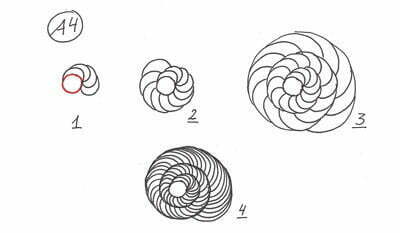
First, draw a circle (A4-1). Next draw an arc connecting the points of the circle’s diameter (A4-1). At the mid-point of that arc begin drawing the next arc and connect it to the diameter point where the first arc ends.
This results in the rotation that creates a spiral. Make each subsequent arc a little larger than the previous one. It is best to start each arc at the apex (midpoint) of the previous arc. (A4-2).
Lesson 4 EXERCISE
- Draw all three Spiral types on one page so that they meet in a point.
- Now fill in the spirals.
- Then connect them up with auras.
Visit Simone’s original Lesson 4 in German to see her illustrations for this exercise.
Lesson 5: Corners and Edges
So far all the lines we have drawn have been round or curved shapes. Corners usually occur only where a change of direction was necessary, or where lines meet in a point.
In this lesson Simone experiments drawing straight lines with angles that change direction.
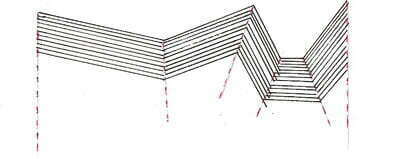
Step 1 – Draw your first baseline
We begin with a line that changes direction, and its sub-sections should also be straight.
Step 2 – Pencil guidelines for angles to change direction
Using a fine line pencil, lightly mark at each corner the direction where the “edge” will be created. Later you can erase the lines, although eventually with enough practice they will no longer necessary. In my example, I have marked the image with red dashed lines.
Then carefully draw parallel lines, changing direction at the penciled corner guides.
Depending on how you have marked your angles, the length of each line may be narrower or wider than the previous line but for this effect to work it is important to maintain the parallelism.
Step 3 – Many ways lead to different image effects
In this step, Simone demonstrates how adding difference geometric shapes either on the first baseline of Step 1, or randomly around the page, offers opportunities for different visual effects. Visit the link below for her examples of how to do this.
Lesson 5 EXERCISE
Now let’s apply what we have learned so far.
- Draw on a piece of paper (for practice A6 is ideal – about 4 inches x 6 inches) at least 5 different geometric shapes. Make sure they are not too large.
- Now draw two different baselines in the middle third of the sheet. You may use curves and arcs.
- Begin now with the line game. Don’t think too hard about it, but decide spontaneously whether you draw in one direction or in two directions. “Your spontaneity, intuition and creativity knows no limits.”
Visit Simone’s original Lesson 5 in German to see her illustrations for this exercise.
Lesson 6: Braids
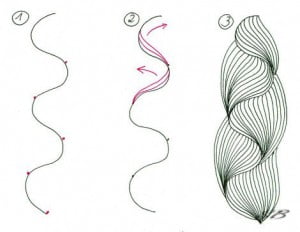
Start with a wavy line. A little bit above the apex of each curve, mark with a point (1). This is the point at which the lines will meet.
Within each curve, draw individual curved lines along the curve as shown in (2) making sure the lines meet at the point marked below your starting point.
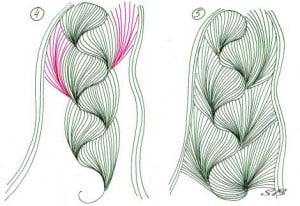
If you want to enlarge the braid created, continue drawing lines extending from the point outwards to a boundary as in (4) below.
It is best to work from the top down, so you keep track.
Lesson 6 EXERCISE A
- Draw various dense wavy lines next to each other.
- Now draw them as braids using the instructions above.
- Continue extending the braids until they touch each other (below).
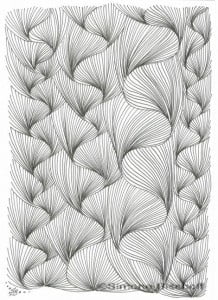
Lesson 6 EXERCISE A. Image copyright Simone Bischoff and used with permission, ALL RIGHTS RESERVED. Click to visit Simone’s blog with the full size image.
Lesson 6 EXERCISE B
- Draw a single wavy line in a large spiral.
- Now draw the braid as described above, after you have decided whether you plan to draw from the inside or outside.
- With this exercise some of the braid arrangement is lost, but the resulting structure is also very exciting.
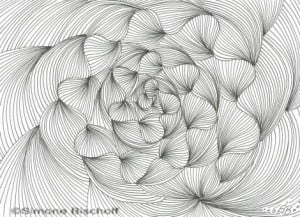
Lesson 6 EXERCISE B. Image copyright Simone Bischoff and used with permission, ALL RIGHTS RESERVED. Click to visit Simone’s blog with the full size image.
Visit Simone’s original Lesson 6 in German to see all of her illustrations for this exercise.
Here endeth Simone’s lessons! I hope you’ve enjoyed her beautiful art and her lessons.
Vielen Dank, Simone, für Sie Ihre Linienspiele mit uns!
(Thank you so much, Simone, for sharing your Linienspiele with us!)
Please come back and leave a comment to share what you learned/discovered, from Simone’s lessons. You can also use the tag simoneb to find her tangles on the site.
Have a beautiful Autumn (Spring in in the Southern hemisphere) weekend everyone!
|
.oOo. |
|
Enhance your Zentangle experience while supporting TanglePatterns: |
|
BRAND NEW! TanglePatterns.com TANGLE GUIDE, 2026 Edition |
|
 |
The 15th Edition of the TanglePatterns.com TANGLE GUIDE is an instant-download 123-page interactive digital eBook/PDF containing over 2,300 tangles on the site from May 2010 through December 31, 2025. It's a great resource and a must-have digital tool for using the site. Visit the STORE > E-BOOKS page and help keep TanglePatterns.com going by getting your copy now! |
|
"Linda, Thank you! I was relying on too few and getting stuck after 3 years of daily working with Zentangle. This has inspired me to ‘begin again’ with renewed excitement." ~ Barbara R. |
|
| See the BOOK REVIEWS page for more details on its features and view a sample page. Note: this is a digital product to download immediately when ordering, nothing will be physically mailed to you. | |
| If you're new to Zentangle® and tangling, my TanglePatterns.com BEGINNER'S GUIDE TO ZENTANGLE is just what you need to get started. Also available en Français and en Español. | |
|
|
|
 |
This is the only Zentangle book you'll ever need: the fabulous Zentangle PRIMER Vol 1. It's your CZT-in-a-book by the founders of Zentangle®. For more about the content and to read the rave reviews, visit the BOOK REVIEWS tab. |
| Available in KINDLE format for $9.99. Spanish Edition here. Japanese Edition here. | |
| "Absolutely the best Zentangle Book yet! As an accomplished artist I used to think I did not need instruction on this art form. How wrong I was! My tangling improved by leaps and bounds after reading this book. If you think you have Zentangle down then you need this book more than ever!" ~ Kris H | |
|
|
|
|
.oOo. |
|




Wow!!! This is great! Thank you Linda and Simone!
Most wonderful tutorial – instructional work. I will become CZT in the Zentangle Class Novem. 2014. This is necessary line work to understand all pieces that would follow. Look forward to giving you the credit and using this is teaching – if I have your permission. Thank you. mgmc
Thanks Marcia, and of course you may share this and thanks for noting you’ll give credit to your sources. Most appreciated.
Wow what a lesson this is…so many of us do not have access to CZTs and are learning on our own. what an amazing tutorial and one that I will work with as often as possible
Elaine, I have been taken by Zentangle since I was introduced to it and have been assisting a CZT for this year. I’m located in the mid-west USA and you?
In my opinion this “line work” is necessary in understanding tangles that would follow. I will use it in my work and in teaching beginning steps. Marty
Linda: Thanks to Simone for giving permission to use all 6 lessons on line drawing, and thanks to you for the hours you put in to make this website full of great information right at our fingertips.
Cheers, moi
Gracias por tan maravillosas lecciones.MUCHAS GRACIAS Un abrazo
Thanks Linda!! Way cool. Can’t wait to get home to begin work in these! All the best!!
Linda,
A big thanks to you and Simone for this fabulous information. I am a newbie to tangling but I have been loving and appreciating all of the time and information that you put into the website and share with others.
Thank you so much. I can’t wait to put this information into action.
Many blessings,
Bertha
Oh, my goodness! This is wonderful! Thank you so much for posting. I can’t wait to try it out.
With just Auras! Amazing!
Linda,
Thank you to both you and Simone! Those exercises are excellent! I am going to spend the WHOLE weekend trying to improve my ‘lines’. As with many things, improving the “basics” always ends up by improving the “whole”.
May I sneak in also, a very BIG thank you to all those tanglers who have written informative books both “paper” and “e-books”, without whom, I would still be seriously struggling. I am grateful to you Linda and the rest of you all, who put in so much time and love for everyone’s benefit, especially those of us who can’t get to ‘live’ lessons!
Great! Thanks.
What a fabulous lesson! Thank you so much Simone and Linda 🙂
Love this site and all the help it provides To Marty I am on the east coast but thanks for thinking of me
Wow! I looked at the lessons in German and found I can still read it after 40 years. I might have to look up a few words, but the sense comes through. What a treasure! Thanks Linda and Simone!
Linda, thank you so much for this post! I had never seen these skills , to enhance our drawing skills. They are wonderful!!! I can’t wait to play with them! I’m gonna have to thank Simone also, for sharing with us! Thanks again! :0) Annette
Simone & Linda, this is a most interesting exercise that I intend to try. I would also like to use it in my teaching and will give credit to you both. Thanks!
Obrigada, pelas lições. Vou experimentar. Muito grata.
Linda and Simone,
My heartfelt thanks for your generosity to all of us with both your time and talents. I am 84 and this has brightened my days and unfortunately my VERY late evenings. This is mind food for me and also lots of fun.
Carolyn
Thanks for sharing these lessons. Very helpful, can’t wait to get started.
These were truly inspirational and calming. Thank you profusely.
Thanks for lessons. This help a lot. Please have more tips and lessons.
Thanks jan, if you click on the TUTORIALS tab you’ll find about 60 more tutorials there to learn from.
Thanks Linda and Simon for this great lesson series. All of you do a great service to those of us tanglers learning this art form on our own with just books and on line information. Kudos to you!
thank You Simone and Linda.Marvelous!!!!!!
Linda. When you posted this tutorial a while back I read through it all but was not interested in trying it at the time. Then yesterday in church my mind started to wander (this does not happen often!) and I started thinking about swirls and how to make them look beautiful and full and —swirly—. This morning I find you posting this again and I am so ready to try this!
I find it interesting that we can be presented with a new concept and we might/might not be ready for it. Only after more experience or more knowledge do we become ready to want to try something new.
So, Simone, thank you for your beautiful line drawings/auras. They are amazing. And Linda, thank you for posting this tutorial again. I am grateful! Nancy P
Thank you very much for compiling and making this information available to all of us. It was referred to me and I intend to read and use the information in it. Thanks again to Simone and Linda.
Very much appreciated! I will practice them! You have so many good lessons buried. And now recovered and refreshed!
Thank you for all you do for our community.
Simone,
I just stumbled on this tutorial of yours. This is something I can definitely use. I am very glad it posted again.
Thank you for taking the time to put it together.
Thank you so much for Simone Bischoff’s Drawing Skills Tutorial!! I keep playing and playing with it and I think I am improving. Great instructions.